
In this topic
- About console applications
- Creating the console application
- Binding to a specific ArcGIS product
- Adding the geodatabase conversion code
- Building the project
- Scheduling the task
- Scheduling a task in Windows 7
About console applications
A console application is an easy way to utilize ArcObjects functionality without using the ArcMap or ArcCatalog application. For example, a console application can be used to run data processing or CPU-intensive tasks that do not require extensive user input. You can use any ArcObjects for which you have a license, since running a console application still requires the initialization and check out of the appropriate license and extensions as necessary.
Creating the console application
The easiest way to create a console application is to use the templates provided in the ArcObjects .NET software development kit (SDK) as described in the following steps:
- Start Visual Studio, click File, select New, and click Project. The New Project dialog box appears.
- Under Project Types, expand the ArcGIS node, and click Extending ArcObjects.
- Under Templates, select Console Application (Desktop), specify GPFiletoGDB as the project name, and click OK. The ArcGIS Project Wizard opens.
- Expand the Desktop (Core) node and add references to ESRI.ArcGIS.DataManagementTools and ESRI.ArcGIS.Geoprocessor.
- Scroll down, expand the Desktop ArcMap node, and add references to ESRI.ArcGIS.Geoprocessing and ESRI.ArcGIS.Version.
- Click Next.
- Check the box next to Basic to specify the license that is required to run the application, and click Finish.
- If it is not already open, double-click Program.cs (or Program.vb) to view the code.
- Add Using (or Imports) statements to the top of the code editor as follows:
- using ESRI.ArcGIS.Geoprocessor;
- using ESRI.ArcGIS.Geoprocessing;
- using ESRI.ArcGIS.DataManagementTools;
Binding to a specific ArcGIS product
Runtime binding is a requirement. Runtime binding refers to locating the appropriate ArcGIS product installation of a stand-alone ArcGIS for Desktop or Engine application before any ArcObjects code (including license initialization) is called. The application programming interfaces (APIs) to establish runtime binding are in the ESRI.ArcGIS.RuntimeManager class in the ESRI.ArcGIS.Version assembly.
To bind to a specific ArcGIS product, add the following line of code prior to any other ArcObjects code:
[C#] //Add runtime binding prior to any ArcObjects code in the static void Main() method.
ESRI.ArcGIS.RuntimeManager.Bind(ESRI.ArcGIS.ProductCode.Desktop);
'Add runtime binding prior to any ArcObjects code in Public Sub New().
ESRI.ArcGIS.RuntimeManager.Bind(ESRI.ArcGIS.ProductCode.Desktop)
Adding the geodatabase conversion code
To add the geodatabase conversion code, copy and paste the following sample code to the static void Main() method:
[C#] [STAThread()] static void Main(string[] args)
{
//Add runtime binding prior to any ArcObjects code in the static void Main() method.
ESRI.ArcGIS.RuntimeManager.Bind(ESRI.ArcGIS.ProductCode.Desktop);
//ESRI License Initializer generated code.
m_AOLicenseInitializer.InitializeApplication(new esriLicenseProductCode[]
{
esriLicenseProductCode.esriLicenseProductCodeBasic
}
, new esriLicenseExtensionCode[]{}
);
//ESRI License Initializer generated code.
//********************************
// Insert code here.
//********************************
//Do not make any call to ArcObjects after ShutDownApplication().
m_AOLicenseInitializer.ShutdownApplication();
}
<STAThread()> _
           Sub Main()
    'Add runtime binding prior to any ArcObjects code in the static void Main() method.
    ESRI.ArcGIS.RuntimeManager.Bind(ESRI.ArcGIS.ProductCode.Desktop)
    'ESRI License Initializer generated code.
    m_AOLicenseInitializer.InitializeApplication(New esriLicenseProductCode() {esriLicenseProductCode.esriLicenseProductCodeBasic}, _
                                                 New esriLicenseExtensionCode() {})
    'ESRI License Initializer generated code.
    '***************************
    ' Insert code here.
    '***************************
    'Do not make any call to ArcObjects after ShutDownApplication().
    m_AOLicenseInitializer.ShutdownApplication()
End Sub
A personal geodatabase is required to run the following code. In this code, the personal geodatabase is located at C:\GP. Change this location to match the location of your personal geodatabase.
// Initialize the geoprocessor.
Geoprocessor geoprocessor=new Geoprocessor();
// Allow for the overwriting of existing file geodatabases.
geoprocessor.OverwriteOutput=true;
// Set the workspace to a folder containing personal geodatabases.
geoprocessor.SetEnvironmentValue("workspace", @"C:\GP");
// Identify personal geodatabases.
IGpEnumList workspaces=geoprocessor.ListWorkspaces("*", "Access");
string workspace=workspaces.Next();
while (workspace != "")
{
    // Set the workspace to the current personal geodatabase.
    geoprocessor.SetEnvironmentValue("workspace", workspace);

    // Create a file geodatabase with the same name as the personal geodatabase.
    string gdbname=System.IO.Path.GetFileName(workspace).Replace(".mdb", "");
    string dirname=System.IO.Path.GetDirectoryName(workspace);

    // Execute the CreateFileGDB tool.
    CreateFileGDB createFileGDBTool=new CreateFileGDB(dirname, gdbname + ".gdb");
    geoprocessor.Execute(createFileGDBTool, null);
    // Initialize the Copy tool.
    Copy copyTool=new Copy();
    // Identify feature classes and copy to the file geodatabase.
    IGpEnumList fcs=geoprocessor.ListFeatureClasses("", "", "");
    string fc=fcs.Next();
    while (fc != "")
    {
        Console.WriteLine("Copying " + fc + " to " + gdbname + ".gdb");
        copyTool.in_data=fc;
        copyTool.out_data=dirname + "\\" + gdbname + ".gdb" + "\\" + fc;
        geoprocessor.Execute(copyTool, null);
        fc=fcs.Next();
    }
    // Identify feature datasets and copy to the file geodatabase.
    IGpEnumList fds=geoprocessor.ListDatasets("", "");
    string fd=fds.Next();
    while (fd != "")
    {
        Console.WriteLine("Copying " + fd + " to " + gdbname + ".gdb");
        copyTool.in_data=fd;
        copyTool.out_data=dirname + "\\" + gdbname + ".gdb" + "\\" + fd;
        geoprocessor.Execute(copyTool, null);
        fd=fds.Next();
    }
    // Identify tables and copy to the file geodatabase.
    IGpEnumList tbls=geoprocessor.ListTables("", "");
    string tbl=tbls.Next();
    while (tbl != "")
    {
        Console.WriteLine("Copying " + tbl + " to " + gdbname + ".gdb");
        copyTool.in_data=tbl;
        copyTool.out_data=dirname + "\\" + gdbname + ".gdb" + "\\" + tbl;
        geoprocessor.Execute(copyTool, null);
        tbl=tbls.Next();
    }
    workspace=workspaces.Next();
}
' Initialize the geoprocessor.
Dim geoprocessor As ESRI.ArcGIS.Geoprocessor.Geoprocessor=New ESRI.ArcGIS.Geoprocessor.Geoprocessor()
' Allow for the overwriting of existing file geodatabases.
geoprocessor.OverwriteOutput=True
' Set the workspace to a folder containing personal geodatabases.
geoprocessor.SetEnvironmentValue("workspace", "C:\GP")
' Identify personal geodatabases.
Dim workspaces As IGpEnumList=geoprocessor.ListWorkspaces("*", "Access")
Dim workspace As String=workspaces.Next()
Do While workspace <> ""
    ' Set the workspace to the current personal geodatabase.
    geoprocessor.SetEnvironmentValue("workspace", workspace)
    ' Create a file geodatabase with the same name as the personal geodatabase.
    Dim gdbname As String=System.IO.Path.GetFileName(workspace).Replace(".mdb", "")
    Dim dirname As String=System.IO.Path.GetDirectoryName(workspace)
    ' Execute the CreateFileGDB tool.
    Dim createFileGDBTool As CreateFileGDB=New CreateFileGDB(dirname, gdbname & ".gdb")
    geoprocessor.Execute(createFileGDBTool, Nothing)
    ' Initialize the Copy tool.
    Dim copyTool As Copy=New Copy()
    ' Identify feature classes and copy to the file geodatabase.
    Dim fcs As IGpEnumList=geoprocessor.ListFeatureClasses("", "", "")
    Dim fc As String=fcs.Next()
    Do While fc <> ""
        Console.WriteLine("Copying " & fc & " to " & gdbname & ".gdb")
        copyTool.in_data=fc
        copyTool.out_data=dirname & "\" & gdbname & ".gdb" & "\" & fc
        geoprocessor.Execute(copyTool, Nothing)
        fc=fcs.Next()
    Loop
    ' Identify feature datasets and copy to the file geodatabase.
    Dim fds As IGpEnumList=geoprocessor.ListDatasets("", "")
    Dim fd As String=fds.Next()
    Do While fd <> ""
        Console.WriteLine("Copying " & fd & " to " & gdbname & ".gdb")
        copyTool.in_data=fd
        copyTool.out_data=dirname & "\" & gdbname & ".gdb" & "\" & fd
        geoprocessor.Execute(copyTool, Nothing)
        fd=fds.Next()
    Loop
    ' Identify tables and copy to the file geodatabase.
    Dim tbls As IGpEnumList=geoprocessor.ListTables("", "")
    Dim tbl As String=tbls.Next()
    Do While tbl <> ""
        Console.WriteLine("Copying " & tbl & " to " & gdbname & ".gdb")
        copyTool.in_data=tbl
        copyTool.out_data=dirname & "\" & gdbname & ".gdb" & "\" & tbl
        geoprocessor.Execute(copyTool, Nothing)
        tbl=tbls.Next()
    Loop
    workspace=workspaces.Next()
Loop
Building the project
To build the project, perform the following steps;
- Save the project.
- Click Build, then click Build Solution, or press F6.
Scheduling the task
To schedule a task in Windows 8 and 8.1 perform the following steps:
- Click Start, click Control Panel ,Click System and Security, Click Administrative Tools.
- Double-click Task Scheduler. The Scheduled Task Wizard opens.
- Click Action and select Create Task. The Create Task dialog box appears. See the following screen shot:
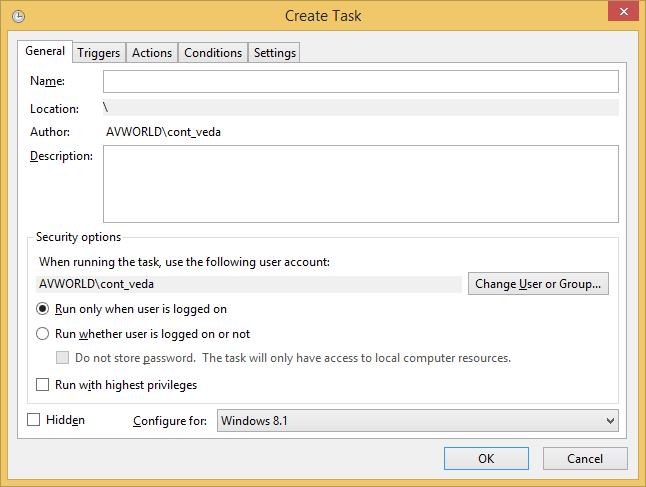
- On the General tab, specify a name for the task and select the security options.
- On the Triggers tab, click New and specify the settings for daily, weekly, or monthly and the time when you want the task to run.
- On the Actions tab, click New. The New Action dialog box appears.
- Click Browse and navigate to the location where you saved your project. For example, C:\TEMP\GPFiletoGDB\bin\Debug.
- Click Open to select the executable and click OK.
- On the Settings and Conditions tabs, specify any additional parameters, then click OK on the Create Task dialog box. Your task will now run on the specified day and time.
For more information about scheduling a task in Windows XP, see How To Schedule Tasks in Windows XP on the Microsoft Support Web site.
Scheduling a task in Windows 7
To schedule a task in Windows 7 perform the following steps:
- Click Start, click All Programs, point to Accessories, point to System Tools, and click Task Scheduler. The Task Scheduler dialog box appears.
- Click Action and select Create Task. The Create Task dialog box appears. See the following screen shot:

- On the General tab, specify a name for the task and select the security options.
- On the Triggers tab, click New and specify the settings for daily, weekly, or monthly and the time when you want the task to run.
- On the Actions tab, click New. The New Action dialog box appears.
- Click Browse and navigate to the location where you saved your project. For example, C:\TEMP\GPFiletoGDB\bin\Debug.
- Click Open to select the executable and click OK.
- On the Settings and Conditions tabs, specify any additional parameters, then click OK on the Create Task dialog box. Your task will now run on the specified day and time.
For more information about scheduling see Schedule a task on the Microsoft Windows Web site.
| Development licensing | Deployment licensing |
|---|---|
| ArcGIS for Desktop Basic | ArcGIS for Desktop Basic |
| ArcGIS for Desktop Standard | ArcGIS for Desktop Standard |
| ArcGIS for Desktop Advanced | ArcGIS for Desktop Advanced |