
In this topic
- About ArcPy
- Leveraging ArcPy in .NET
- Using geometry as tool input
- Adding the Python application to the Path variable
About ArcPy
ArcPy is a site package that comes with any ArcGIS product. The functions are built on the fine-grain ArcObjects to simplify many geoprocessing tasks. Its goal is to create the cornerstone for a useful and productive way to perform geographic data analysis, data conversion, data management, and map automation with Python. This package provides a rich and native Python experience.
ArcGIS applications written with ArcPy benefit from the development of additional modules in numerous niches of Python by geographic information system (GIS) professionals and programmers from many different disciplines.
ArcPy is well-documented in the ArcGIS Desktop Help system. To get started, see A quick tour of ArcPy. ArcPy provides access to geoprocessing tools as well as additional functions, classes, and modules that allow you to create simple or complex workflows quickly and easily. Broadly, ArcPy is organized in tools, functions, classes, and modules. Technically speaking, geoprocessing tools are functions available from ArcPy. There are also many non-tool functions, including utility functions such as ListFeatureClasses().
Although some of these functions are available in .NET via the geoprocessor or the IGPUtilities object, many other functions are not. For example, in .NET you need fine-grain ArcObjects to use cursors, whereas ArcPy has functions that are very easy to cursor through data. When you use ArcPy, you do not have to worry about navigating through many ArcObjects interfaces. For more information, see Alphabetical list of ArcPy functions.
When possible, you should take advantage of the power of the ArcPy module, then if necessary, the Python code can be integrated into .NET applications.
Leveraging ArcPy in .NET
You can leverage ArcPy in the following ways:
- You can call any Python script (*.py) from .NET. This includes code that uses Python packages designed for analytical and mathematical purposes, such as R statistics, complex matrix algebra, SciPy, or any other script.
- Similarly, you can use simplified ArcPy functions as well. The following are several modules that you can take advantage of:
- Mapping module - For more information, see Geoprocessing scripts for map document management and output.
- Geostatistical Analyst module - For more information, see A quick tour of the Geostatistical Analyst ArcPy classes.
- Spatial Analyst module - For more information, see An overview of Spatial Analyst classes.
There are many classes in an ArcPy package that you can integrate in your code. - You can use the .NET geoprocessor to execute a script tool that is implemented with Python. This is the way GIS analysts use it.
Using geometry as tool input
You can use the Geometry class to perform specific operations using ArcPy without creating on-disk feature classes. For example, in .NET, you cannot use a geometry object, such as a polygon as tool input.
In many geoprocessing workflows, you might need to run a specific operation using coordinate and geometry information but do not necessarily want to go through the process of creating a (temporary) feature class, populating the feature class with cursors, using the feature class, then deleting the temporary feature class. Geometry objects can be used instead for both input and output to make geoprocessing simpler. Geometry objects can be created from scratch using Geometry, Multipoint, PointGeometry, Polygon, or Polyline classes.
The following Python code shows how to use geometry as tool input. It creates a polygon geometry object that was created using a list of x,y coordinates. The Clip tool is then used to clip a feature class with the polygon geometry object.
import arcpy

# Create an Array object.
#
array=arcpy.Array()

# List of coordinates.
#
coordList=['1.0;1.0','1.0;10.0','10.0;10.0','10.0;1.0']

# For each coordinate set, create a point object and add the x- and
#   y-coordinates to the point object, then add the point object
#   to the array object.
#
for coordPair in coordList:
    x, y=coordPair.split(";")
    pnt=arcpy.Point(x,y)
    array.add(pnt)

# Add in the first point of the array again to close the polygon boundary.
#
array.add(array.getObject(0))

# Create a polygon geometry object using the array object.
#
boundaryPolygon=arcpy.Polygon(array)

# Use the geometry to clip an input feature class.
#
arcpy.Clip_analysis("c:/data/rivers.shp", boundaryPolygon, "c:/data/rivers_clipped.shp")
The previous script is saved to disk as a Python script (*.py file). You can then call the Python script from a .NET application. Assuming the script is saved as geom_input.py in the C:\scripts folder, the following .NET code example shows how you can run the script. The code invokes the cmd process specifying the command to be executed. The command parameter of the ExecuteCommand function is a string that you pass to cmd.
[C#] // Executes a shell command synchronously.
// Example of command parameter value is
// "python " + @"C:\scripts\geom_input.py".
//
public static void ExecuteCommand(object command)
{
try
{
// Create the ProcessStartInfo using "cmd" as the program to be run,
// and "/c " as the parameters.
// "/c" tells cmd that you want it to execute the command that follows,
// then exit.
System.Diagnostics.ProcessStartInfo procStartInfo=new
System.Diagnostics.ProcessStartInfo("cmd", "/c " + command);
// The following commands are needed to redirect the standard output.
// This means that it will be redirected to the Process.StandardOutput StreamReader.
procStartInfo.RedirectStandardOutput=true;
procStartInfo.UseShellExecute=false;
// Do not create the black window.
procStartInfo.CreateNoWindow=true;
// Now you create a process, assign its ProcessStartInfo, and start it.
System.Diagnostics.Process proc=new System.Diagnostics.Process();
proc.StartInfo=procStartInfo;
proc.Start();
// Get the output into a string.
string result=proc.StandardOutput.ReadToEnd();
// Display the command output.
Console.WriteLine(result);
}
catch (Exception objException)
{
Console.WriteLine(objException.Message);
// Log the exception and errors.
}
}
' Executes a shell command synchronously.
' Example of command parameter value is
' "python " + "C:\scripts\geom_input.py".
'

Sub ExecuteCommandSync(ByVal Command As Object)

    Try

    ' Create the ProcessStartInfo using "cmd" as the program to be run,
    ' and "/c " as the parameters.
    ' "/c" tells cmd that you want it to execute the command that follows,
    ' then exit.
    Dim procStartInfo As System.Diagnostics.ProcessStartInfo=New System.Diagnostics.ProcessStartInfo("cmd", "/c " + Command)

    ' The following commands are needed to redirect the standard output.
    ' This means that it will be redirected to the Process.StandardOutput StreamReader.
    procStartInfo.RedirectStandardOutput=True
    procStartInfo.UseShellExecute=False
    procStartInfo.CreateNoWindow=True

    ' Now you create a process, assign its ProcessStartInfo, and start it.
    Dim proc As System.Diagnostics.Process=New System.Diagnostics.Process()
    proc.StartInfo=procStartInfo
    proc.Start()

    ' Get the output into a string.
    Dim result As String=proc.StandardOutput.ReadToEnd()

    ' Display the command output.
    Console.WriteLine(result)

    Catch ex As Exception
    Console.WriteLine(ex.Message)
    ' Log the exception and errors.

    End Try

End Sub
Adding the Python application to the Path variable
To run a Python script from the command line in Windows, specify the full path of the Python application or add the Python installation location to the Path System Environment variable. Complete the following steps to set Python to the Path variable:
- Right-click My Computer and click Properties. The System Properties dialog box appears.
- On the System Properties dialog box, click the Advanced tab, then click the Environment Variables button. The Environment Variables dialog box appears as shown in the following screen shot:
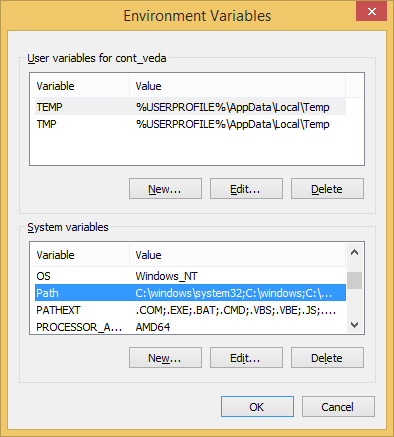
- On the Environment Variables dialog box, under the System variables section, double-click the Path variable. The Edit System Variable dialog box appears. Type the path of the Python application. See the following screen shot:
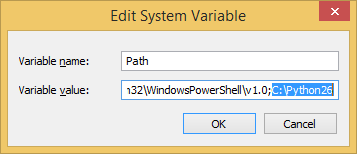
In this example, Python is installed in the C:\Python26 directory location.
Use your own install directory. For example, if you're using ArcGIS 10.1, your directory will be C:\Python27\ArcGIS10.1.
To use the code in this topic, reference the following assemblies in your Visual Studio project. In the code files, you will need using (C#) or Imports (VB .NET) directives for the corresponding namespaces (given in parenthesis below if different from the assembly name):