In this topic
- About selection trackers
- Selection tracker methods
- RotateTracker coclass
- ScaleTracker coclass
- AnchorPoint coclass
About selection trackers
The following are the three types of selection trackers:
-
Envelope tracker - An envelope tracker lets you move and resize the element. This functionality is implemented by the EnvelopeTracker object for all element types, including point, line, polygon, and group elements. See the following illustration:

-
Vertex edit tracker - A vertex edit tracker lets you move vertices of lines, polygons, curves, and curved text. This functionality is implemented by the LineTracker and PolygonTracker objects. See the following illustration:

-
Callout tracker - A callout tracker lets you move a text callout. This functionality is implemented by the CalloutTracker objects. See the following illustration:

Currently, the PointTracker object is not useful. Moving and resizing point elements is handled by envelope trackers with the size of the envelope corresponding to the symbolized point.
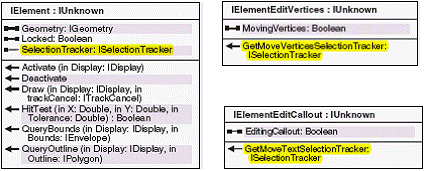
Although the selection trackers are coclasses, only cocreate one if you are building your custom element when implementing IElement.SelectionTracker.
If you need to transform the geometry of an element programmatically, you can cast directly to the ITransform2D interface, which can be used to move, scale, and rotate the element. The selection tracker objects are intended to assist element transformations in an interactive context.
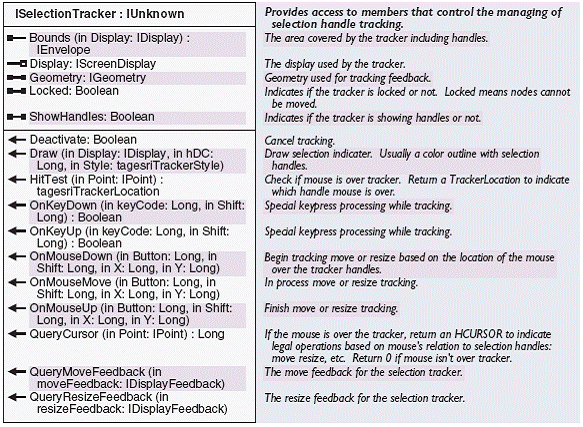
The ISelectionTracker interface controls the selection handle user interface (UI). You can use ISelectionTracker to provide different behavior than that of the standard ArcMap interface, for example, the Element Movement tool that snaps elements to a grid. However, it is more likely that you will use this interface when building a custom object, such as an element. See the following illustration:

You can gain access to selection trackers with IElement.SelectionTracker, IElementEditVertices.GetMoveVerticesSelectionTracker, or IGraphicsContainerSelect.SelectionTracker. When using IElement, you get an envelope tracker or edit vertices tracker, depending on the state of the element. See the following illustration:


The following code example ensures that an envelope tracker is returned. If the element has a vertex edit tracker, it is changed to an envelope tracker and the document is refreshed.
[C#] public void EnsureEnvelopeTracker(IActiveView activeView, IElement element)
{
IScreenDisplay screenDisplay=activeView.ScreenDisplay;
if ((element is IElementEditVertices))
{
IElementEditVertices elemVert=element as IElementEditVertices;
if ((elemVert.MovingVertices))
{
elemVert.MovingVertices=false;
activeView.PartialRefresh(esriViewDrawPhase.esriViewGraphicSelection,
null, element.SelectionTracker.get_Bounds(screenDisplay));
}
}
}
Public Sub EnsureEnvelopeTracker(ByVal activeView As IActiveView, ByVal element As IElement)

    Dim screenDisplay As IScreenDisplay=activeView.ScreenDisplayd

    If (TypeOf element Is IElementEditVertices) Then

        Dim elemVert As IElementEditVertices=TryCast(element, IElementEditVertices)

        If (elemVert.MovingVertices) Then

            elemVert.MovingVertices=False
            activeView.PartialRefresh(esriViewDrawPhase.esriViewGraphicSelection, Nothing, element.SelectionTracker.Bounds(screenDisplay))

        End If

    End If

End Sub
After obtaining a reference to a selection tracker, set the Display property before using it. The Geometry property of a selection tracker applies to the tracker and not the element. For envelope trackers, the geometry is a polygon created from the envelope shape. For vertex edit trackers, the geometry is a polygon or polyline as appropriate. The Geometry property is updated when you finish reshaping the element with the selection tracker. The HitTest method provides information about the position of the mouse. The returned values are defined by esriTrackerLocation. See the following illustration:

Selection tracker methods
Many of the ISelectionTracker methods - for example, OnMouseDown - correspond to UI events. When controlling a selection tracker with a UI tool, pass the tool events to the selection tracker. See the following code example:
[C#] //This variable is obtained by the IElement.SelectionTracker, IElementEditVertices.GetMoveVerticesSelectionTracker,
//or IGraphicsContainerSelect.SelectionTracker.
ISelectionTracker m_selTracker;
private void OnMouseMove(int button, int shift, int x, int y)
{
if (!(m_selTracker == null))
{
//Pass on the mouse move event to the selection tracker.
m_selTracker.OnMouseMove(button, shift, x, y);
}
}
'This variable is obtained by the IElement.SelectionTracker, IElementEditVertices.GetMoveVerticesSelectionTracker,
'or IGraphicsContainerSelect.SelectionTracker.
Private m_selTracker As ISelectionTracker

Private Sub OnMouseMove(ByVal button As Integer, ByVal shift As Integer, ByVal x As Integer, ByVal y As Integer)

    If Not (m_selTracker Is Nothing) Then

        'Pass on the mouse move event to the selection tracker.
        m_selTracker.OnMouseMove(button, shift, x, y)

    End If

End Sub
QueryMoveFeedback and QueryResizeFeedback return the feedback objects that the selection tracker is using.
Draw is called by ArcMap if the element is selected; normally, you don't need to use this method (it is important if you implement your own custom selection tracker). See the following illustration:

You normally use the ICalloutTracker interface when building custom elements since the symbol and its geometry can be obtained from the element or the ISelectionTracker.Geometry method.
RotateTracker coclass
The RotateTracker object manages the UI for rotating features or elements. See the following illustration:

The rotate tracker does not provide facilities for manipulation of the rotation origin - use the AnchorPoint object to do this. See the following illustration:

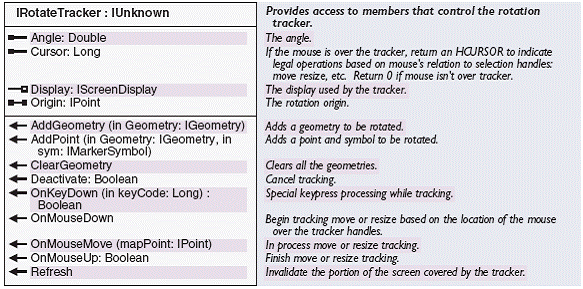
The following illustration shows the IRotateTracker interface, which provides access to members that control the rotation tracker:

The IRotateTracker interface controls the rotation UI. After cocreating a RotateTracker object, use the members in the following order:
- Display
- Origin
- ClearGeometry
- One or more calls to AddGeometry or AddPoint
If you are rotating a single polygon element, you need one call to AddGeometry for the element geometry; however, a rotation tracker can handle a group of elements. Use AddPoint for features with marker symbology. When using AddGeometry with elements whose size is determined by symbology, for example, text and marker elements, use the geometry of the element outline to get the correct feedback.
The following code example, given an element, returns a geometry suitable for AddGeometry:
[C#] IGeometry GetElementGeometry(IElement element, IScreenDisplay screenDisplay)
{
IBoundsProperties boundsProperties;
IPolygon polygon;
if (element is IBoundsProperties)
{
boundsProperties=(IBoundsProperties)element;
if (boundsProperties.FixedSize == true)
{
polygon=new PolygonClass();
element.QueryOutline(screenDisplay, polygon);
return (IGeometry)polygon;
}
}
return dlement.Geometry;
}
Private Function GetElementGeometry(ByVal element As IElement, ByVal screenDisplay As IScreenDisplay) As IGeometry

    Dim boundsProperties As IBoundsProperties
    Dim polygon As IPolygon

    If TypeOf element Is IBoundsProperties Then

        boundsProperties=CType(element, IBoundsProperties)

        If boundsProperties.FixedSize=True Then

            polygon=New PolygonClass()
            element.QueryOutline(screenDisplay, polygon)

            Return CType(polygon, IGeometry)

        End If

    End If

    Return element.Geometry
End Function
The OnMouseDown, OnKeyDown, OnMouseMove, OnMouseUp, and Deactivate methods are event handlers. Call these methods from the corresponding events in your tool.
The OnMouseMove method provides UI feedback for the rotation. Typically, you choose to update the feature or element in question in conjunction with the OnMouseUp method. This returns a Boolean expression indicating whether the element or feature was rotated. Get the amount of rotation from the Angle property; this can then be passed to ITransform2D.Rotate. IFeatureEdit.RotateSet can be useful for features.
If you pass the Key_Down event to OnKeyDown, pressing A prompts for an angle.
ScaleTracker coclass
Similar to the rotation tracker, the scale tracker can be applied to one or more elements or features. The scale tracker manages the UI for expansion or contraction of geometries by a scale ratio. See the following illustration:


You can add the ArcMap Editor Scale tool on the Customize dialog box. See the following illustration:

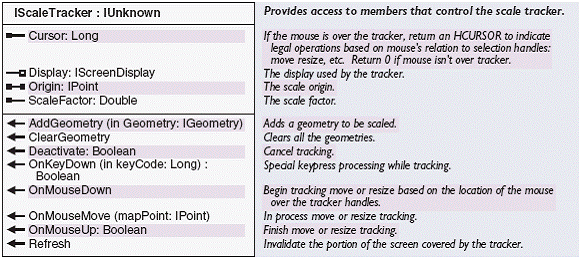
The following illustration shows the IScaleTracker interface, which provides access to members that control the scale tracker:

The IScaleTracker interface controls the UI for scaling objects and is similar to IRotateTracker. The ScaleFactor property can be used to determine the defined scaling ratio. If you pass the Key Down event to OnKeyDown, pressing F prompts for the scale factor.
AnchorPoint coclass
When working with elements, an anchor point can be considered a helper object rather than an essential object. Cocreate the anchor point and manipulate it. This is useful when implementing your tools and objects, for example, a custom rotation tool.
The anchor point represents a point that can be used when manipulating elements and features. See the following illustration:

Anchor points can be useful for rotating elements and features, and moving the origin of a text callout. See the following illustration:

The following illustration shows the IAnchorPoint interface, which provides access to members that control the tracker anchor point:

The IAnchorPoint interface provides facilities for controlling anchor points. IEditor.SelectionAnchor returns the anchor point being used by the editor, which you can subsequently manipulate.
To use the code in this topic, reference the following assemblies in your Visual Studio project. In the code files, you will need using (C#) or Imports (VB .NET) directives for the corresponding namespaces (given in parenthesis below if different from the assembly name):
- ESRI.ArcGIS.Display
- ESRI.ArcGIS.Editor
- ESRI.ArcGIS.System (ESRI.ArcGIS.esriSystem)
- ESRI.ArcGIS.Geodatabase
- ESRI.ArcGIS.Carto
- ESRI.ArcGIS.Geometry
| Development licensing | Deployment licensing |
|---|---|
| ArcGIS for Desktop Basic | ArcGIS for Desktop Basic |
| ArcGIS for Desktop Standard | ArcGIS for Desktop Standard |
| ArcGIS for Desktop Advanced | ArcGIS for Desktop Advanced |
| Engine Developer Kit | Engine |
