
In this topic
About sharing add-ins
Desktop add-ins are easy to share. Add-in files use a simple xcopy deployment model that does not require administrative privileges or the creation of entries in the system registry. An add-in file consists of a compressed (zipped) folder containing various kinds of files needed by the add-in, such as libraries, scripts, images, and - in some cases - data. As a single file, add-ins are easy to distribute.
Desktop add-ins are loaded by ESRI applications when their associated add-in file is discovered in one of several well-known add-in folders. Add-in files can be copied directly to one of these folders or to the appropriate folder automatically using the ESRI ArcGIS Add-In Installation Utility.
ESRI ArcGIS Add-In Installation Utility
The ESRI ArcGIS Add-In Installation Utility opens when a Desktop add-in is double-clicked. This utility is operational in Windows Explorer, through popular e-mail applications such as Outlook, and on Web pages running on servers that have been configured to deploy add-in files.
When the Add-In Installation Utility is invoked, it analyzes the metadata of the selected add-in file and displays the author's name, a description of the add-in, and whether or not the add-in contains a trusted digital signature. See the following screen shot:
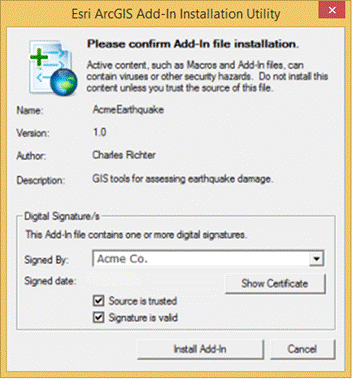
This information can be used to decide whether or not to install the add-in. If the user elects to install the add-in, the utility copies the add-in to the user's default add-in folder.
The default add-in well-known folders are located under the user's account and each ArcGIS installation. For example, C:\Users\<username>\Documents\ArcGIS\AddIns\Desktop10.4 if the version were 10.4.
The install utility copies the add-in file to a generated subfolder under the well-known add-in folder; the subfolder is automatically generated based on the globally unique identifier (GUID) specified in the add-in file metadata. This subfolder prevents file naming conflicts that might otherwise occur if several add-ins have the same file name.
Although add-ins can be manually copied to a default add-in folder, doing so bypasses the security and name conflict checks the Add-In Installation Utility performs. For this reason, use the install utility or the Add from file button on the Customize dialog box to install an add-in in ArcGIS Desktop applications.
Although add-ins can only specify one target ArcGIS version, they are automatically discovered and loaded in newer releases of ArcGIS. For example, an add-in targeting 10.3 will automatically load with 10.4, you do not need to move it to the Desktop10.4 folder. Add-ins will not load into ArcGIS if they target a version that is newer than the running version. For example, a 10.4 add-in will not load into 10.3.
Sharing add-ins on a network
Add-ins can also be distributed within a private network using a trusted network share. Add-in files can be copied to these locations and automatically picked up by clients who've added the network share to their add-in folder list. Additional add-in folders are added using the Add-In Manager dialog box. See the following screen shot:
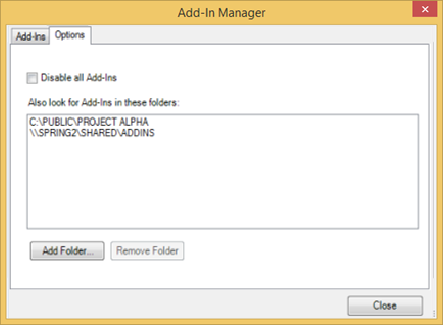
In this scenario, multiple users can benefit from add-ins managed in a central location. If an add-in needs an update, the newer version can be copied over the existing version (even if in use). Clients automatically get the updated version of the add-in the next time they restart the corresponding Desktop application.
Determining add-in customizations
Once an add-in has been installed, the Add-In Manager - accessed from the Customize menu - makes it easy to determine the customizations it contains. The following screen shot shows an add-in with a button and a tool in the Add-In Controls component category:
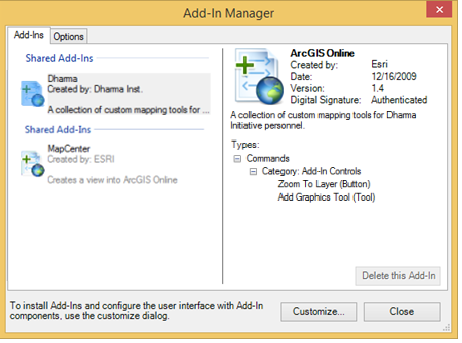
Because this particular add-in does not provide a toolbar with the commands pre-loaded on it, you must drag the commands onto an existing toolbar via the Customize dialog box. Knowing the name and category to which a command belongs simplifies this process.