ArcGIS Desktop

  • Documentación
  • Soporte

  • My Profile
  • Ayuda
  • Sign Out
ArcGIS Desktop

ArcGIS Online

La plataforma de representación cartográfica para tu organización

ArcGIS Desktop

Un completo SIG profesional

ArcGIS Enterprise

SIG en tu empresa

ArcGIS for Developers

Herramientas para crear aplicaciones basadas en la ubicación

ArcGIS Solutions

Plantillas de aplicaciones y mapas gratuitas para tu sector

ArcGIS Marketplace

Obtén aplicaciones y datos para tu organización.

  • Documentación
  • Soporte
Esri
  • Iniciar sesión
user
  • Mi perfil
  • Cerrar sesión

Help

  • Inicio
  • Introducción
  • Mapa
  • Analizar
  • Administrar datos
  • Herramientas
  • Más...

Adding a solution to the product library

You can develop your own solutions, or install one or more of the Esri Mapping and Charting solutions, and add them to the product library. This provides you with a way to easily find the product you are working with in the Product Library tree view on the Product Library window. For example, if you install ArcGIS for Maritime: Charting, you could add Maritime Charting to your product library.

  1. Start ArcMap.
  2. Verify that you have specified a database to use as your product library.
  3. If necessary, open the Product Library window by clicking Customize > Production > Product Library on the main menu.

    A tree view of the product library appears.
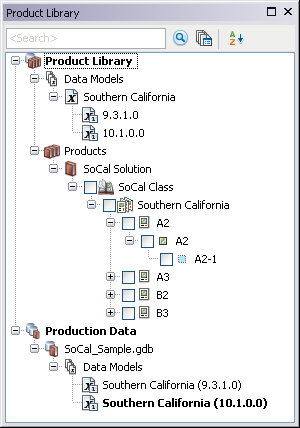
    Product Library tree view
  4. If necessary, expand Product Library and Products.
  5. Right-click Products and click New Solution.

    The New Solution dialog box appears.
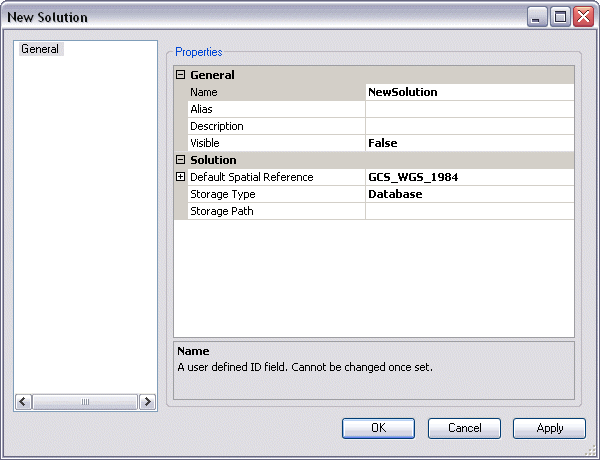
    New Solution dialog box
  6. Click the cell next to Name.

    The name is limited to 230 characters. Special characters are not valid entries.

    Explore:

    Special characters that are invalid include %, \, /, :, *, ?, ', ", <, >, and |.

  7. Double-click the existing text and type a name for the solution in the text box.
  8. Click the cell next to Alias.
  9. Type the name you want displayed in the tree view for the solution.
  10. Click the cell next to Description.
  11. Type a description for the new solution in the text box.
  12. Click the cell next to Visible.
  13. Click the drop-down arrow and choose an option to indicate whether the solution is going to be visible in the Product Library tree view.

    The default value is False.

    Sugerencia:

    You can proceed to choose a new or existing spatial reference for the solution or a storage type and path for files before closing the dialog box.

  14. Click OK to close the New Solution dialog box.

The solution appears in the Product Library tree view.

Temas relacionados

  • Product library permissions

ArcGIS Desktop

  • Inicio
  • Documentación
  • Soporte

Plataforma ArcGIS

  • ArcGIS Online
  • ArcGIS Desktop
  • ArcGIS Enterprise
  • ArcGIS for Developers
  • ArcGIS Solutions
  • ArcGIS Marketplace

Acerca de Esri

  • Quiénes somos
  • Empleo
  • Blog interno
  • Conferencia de usuarios
  • Cumbre de desarrolladores
Esri
Díganos su opinión.
Copyright © 2017 Esri. | Privacidad | Legal