In this exercise, you will generate your first schematic diagrams from the result of a manual selection, from a selection by attributes, and from a tracing result. You will also generate an inside plant diagram from an opened diagram.
- Start ArcMap.
- Open the ElecDemo.mxd file stored in C:\ArcGIS\ArcTutor\Schematics\Schematics_In_ArcMap.
Enabling the Viewer Windows running mode
A schematic diagram can be opened in a viewer window. A viewer window can be opened by clicking Windows and clicking Viewer on the ArcMap menu. You can also work with the Viewer Windows running mode as the default mode so that each time a diagram is opened or generated, it is automatically displayed in a viewer window without changing the active data frame. Here are the detailed steps to activate the Viewer Windows running mode.
- Click the Schematic menu on the Schematic toolbar and click Schematic Options.
The Schematic Options dialog box opens.
- Click the General tab.
- Check Automatically open schematic diagrams in a viewer window in the Viewer Windows section.
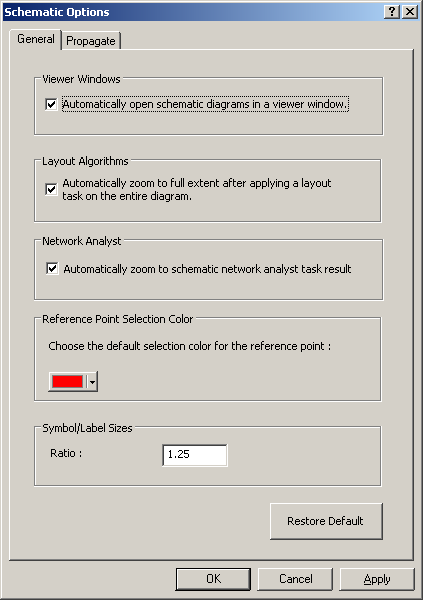
- Click OK.
The Schematic Options dialog box closes.
From now on, each time a schematic diagram is opened or generated, it is displayed in a viewer window, and the active data frame is preserved.
Generating a diagram from features manually selected
- Click Bookmarks on the main menu and click Manual Selection.
- Click the Select Features tool
 and draw a box in the map to select everything in the current view.
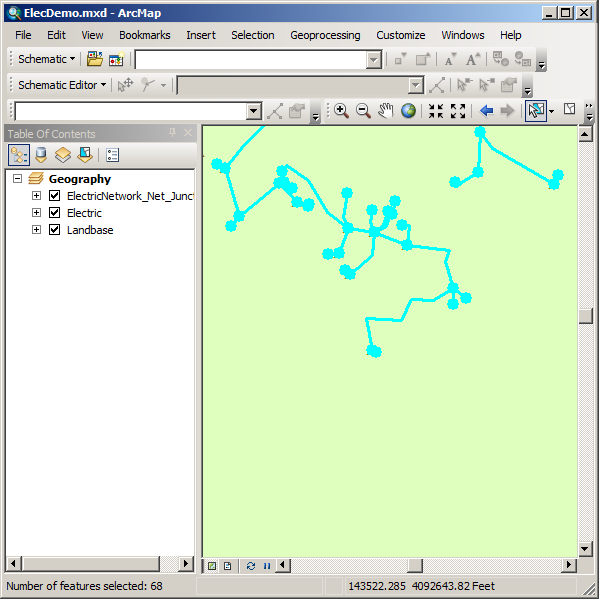
- Click the Generate New Schematic Diagram button
 .
.
The New Schematic Diagram dialog box opens.
- Click the browse button next to the Schematic Dataset or Folder text box to specify in which schematic dataset the schematic diagram is going to be stored.
- Browse to the ElecDemo geodatabase available in the C:\ ArcGIS\ArcTutor\Schematics\Schematics\ folder and double-click the ElecDemo schematic dataset.
- Click the Feeders schematic folder and click Add so the schematic diagram to be generated is stored in this specific Feeders schematic folder in the ElecDemo schematic dataset.
- Click the Schematic Diagram Template drop-down arrow and choose GeoSchematic from the list.
- Keep the default [Create New Data Frame] option selected in the Output Data Frame drop-down list.
- Type Manual Selection in the Schematic Diagram Name text box for the diagram to be generated.
- In the Input From area, keep the Selection set in Data Frame option selected and make sure that the Geography data frame containing the selection set you have just created is selected in the drop-down list.
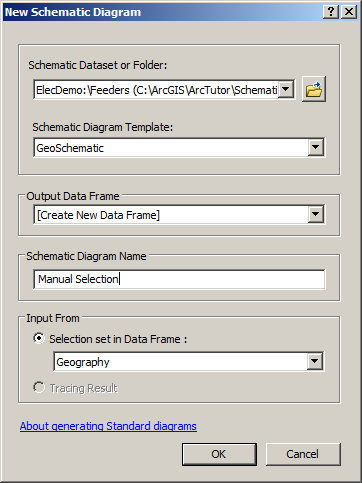
- Click OK.
The diagram generation starts, and the resulting schematic diagram displays. As the Viewer Windows mode is activated, the newly created schematic diagram is displayed in a viewer window, and the active data frame containing the geographic features is preserved. A new data frame related to this diagram has been created in the table ofcontents but is not active.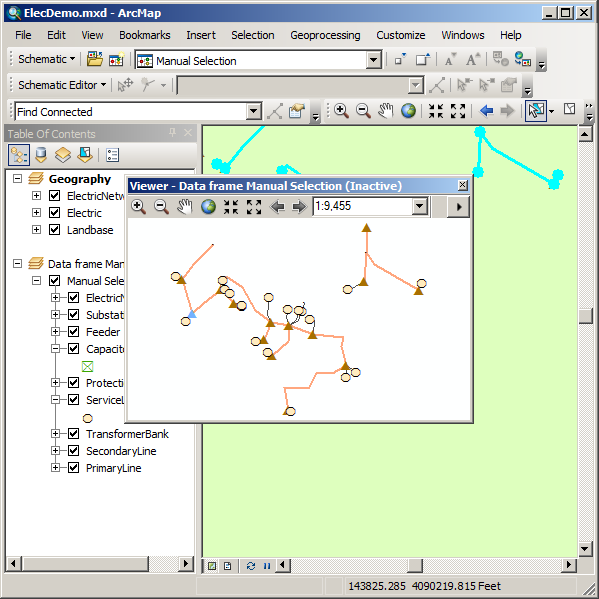
Generating a diagram based on a schematic selection
The Save Diagram As command can also be used to generate a new diagram based on the current selection set. When no schematic feature is selected in the active diagram, it copies the entire diagram, but when schematic features are selected, only that selection set is saved in the new diagram.
- Click the Select Features tool
 , and by drawing a box with the tool, select a few schematic features on the active Manual Selection schematic diagram you have just generated.
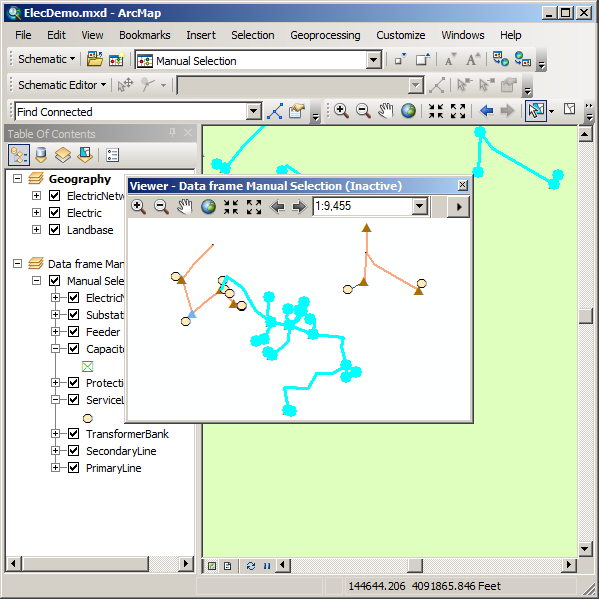
- Click the Schematic drop-down menu on the Schematic toolbar and click Save Diagram As.
- Choose the ElecDemo:\Feeders (C:\ArcGIS\ArcTutor\ Schematics\Schematics\ElecDemo.gdb) location in the Schematic Dataset or Folder drop-down list.
- Type DiagramFromSchematicSelection in the Schematic Diagram Name text box.
- Keep the default [Create New Data Frame] option.
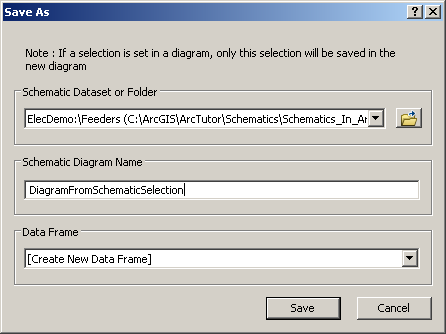
- Click Save.
A new data frame is added to the table of contents. As the Viewer Windows mode is activated, the new diagram is displayed in a viewer window.
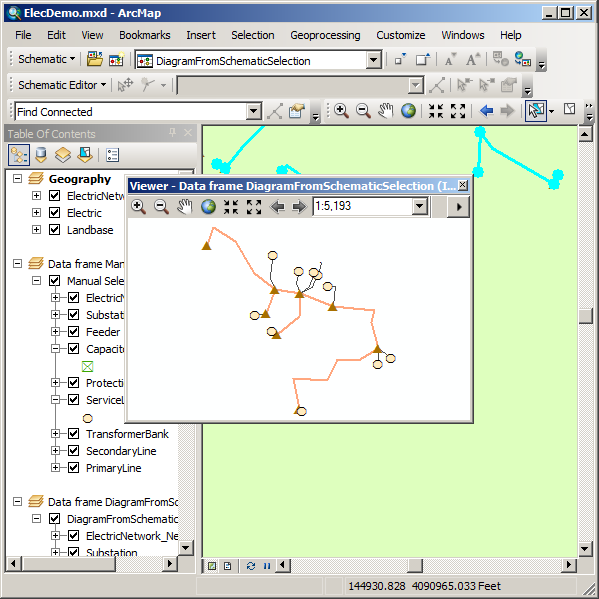
- Right-click the new DiagramFromSchematicSelection diagram data frame in the table of contents and click Remove.
- Remove the Manual Selection data frame.
- Remove the DiagramFromSchematicSelection data frame.
- Click Selection on the ArcMap menu and click Clear Selected Features
 .
.
- Click Bookmarks on the ArcMap menu and click Overview.
Generating a diagram from a selection by attributes
- Click Selection on the main menu and click Select By Attributes
 .
.
The Select By Attributes dialog box opens.
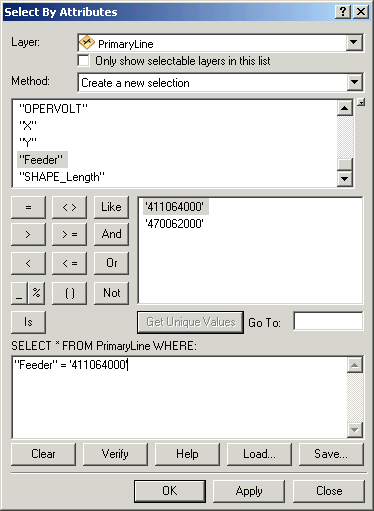
- Click the Layer drop-down arrow and click PrimaryLine.
- Double-click Feeder from the fields list.
- Click the equal sign button
 .
.
- Click Get Unique Values.
- Double-click '411064000' from the unique values list.
The Select By Attributes dialog box appears with the following query information:
- Click Apply and click Close.
- Click Selection on the main menu and click Zoom To Selected Features
 .
.
- Click the Generate New Schematic Diagram button
 .
.
The New Schematic Diagram dialog box opens.
- Click ElecDemo:\Feeders in the Schematic Dataset or Folder text box so the generated diagram will be stored in the Feeders schematic folder.
- Click the Schematic Diagram Template drop-down arrow and choose GeoSchematic in the list.
- Keep the default [Create New Data Frame] option selected in the Output Data Frame drop-down list.
- Type Feeder 411064000 in the Schematic Diagram Name text box for the diagram to be generated.
- Make sure the Selection set in Data Frame option is checked and the Geography data frame is currently selected in the drop-down list.
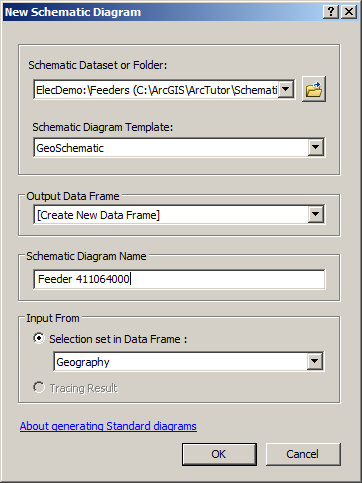
- Click OK.
The generated schematic diagram displays in a new data frame. As the Viewer Windows mode is activated, it opens in a viewer window.
- Resize the diagram viewer window. Use the Zoom In tool
 for a better view of the diagram if needed.
- Click the Decrease Symbol Sizes
 and Increase Symbol Sizes
  buttons to change the size of the symbols if needed.
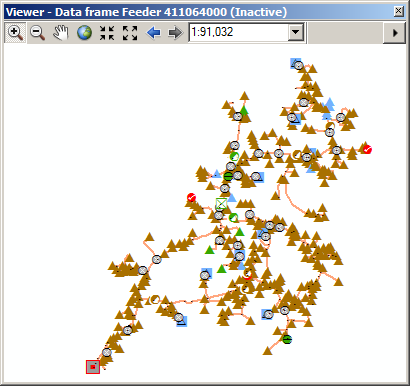
- Close the Feeder 411064000 viewer window.
Generating an inside plant diagram
- Click the Open Schematic Diagrams button
 .
.
The Select Schematic Diagrams To Open dialog box appears.
- Navigate to the C:\ArcGIS\ArcTutor\Schematics\Schematics_In_ArcMap\ElecDemo.gdb geodatabase.
- Double-click the ElecDemo schematic dataset, then double-click the Inside Plants schematic subfolder.
- Click Substation 08 in the diagram list.
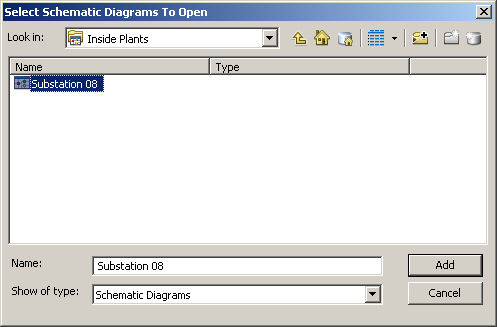
- Click Add.
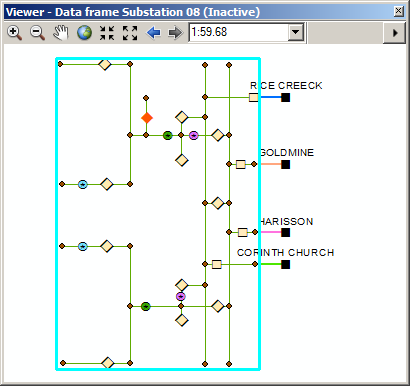
The Substation 08 diagram opens in a viewer window. This diagram details the equipment inside a substation.
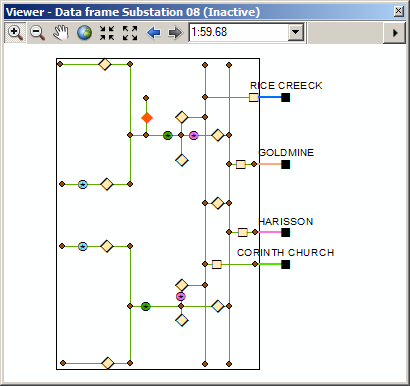
The schematic features in this diagram come from a set of object tables that detail inside plant contents. They are also dynamically linked to some GIS data contained in the Geography map, for example, to the substation in this map. The next steps highlight these relations:
- Click the Schematic drop-down menu on the Schematic toolbar and click Schematic Options.
- Click the Selection tab, then check the three check boxes on this tab and click OK.
- Click the Select Features tool
 and click the polygon that displays around all the Substation 08 equipment.
- Click Propagate Schematic Selection To Map
 .
.
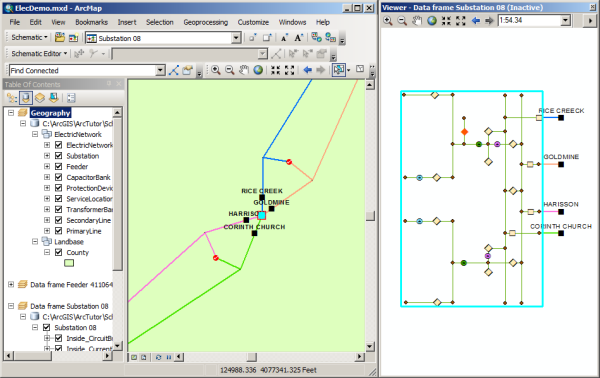
The related substation is selected in the Geography data frame.
- Click Bookmarks on the main menu and click Substation 08 to locate the selected substation feature.
- Arrange the Substation viewer window to get a clear view of the selected features in both the Geography and Substation 08 views.
- Click Propagate Map Selection To Schematic
 .
.
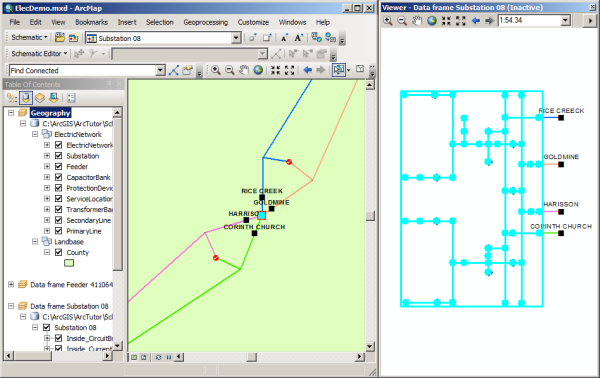
All the schematic features inside the polygon are automatically selected in the Substation 08 diagram.
- Clear the selected features on the map.
- Remove the Feeder 411064000 data frame.
- Remove the Substation 08 data frame.
Generating a diagram from a trace
- Load the Utility Network Analyst toolbar (if it is not already displayed).
- Click the arrow button next to the Add Junction Flag tool and click the Add Edge Flag tool
 .
.
- Click the primary line between Feeder 0804 Harrison and the substation to add an edge flag.
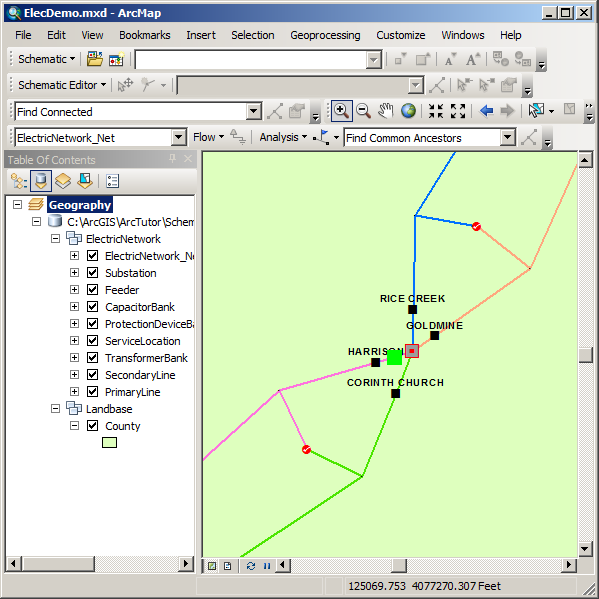
- Click the Trace Task drop-down arrow on the Utility Network Analyst toolbar and click Trace Downstream, then click Solve
 .
.
- Click Bookmarks on the main menu and click Feeder 0804-Harrison.
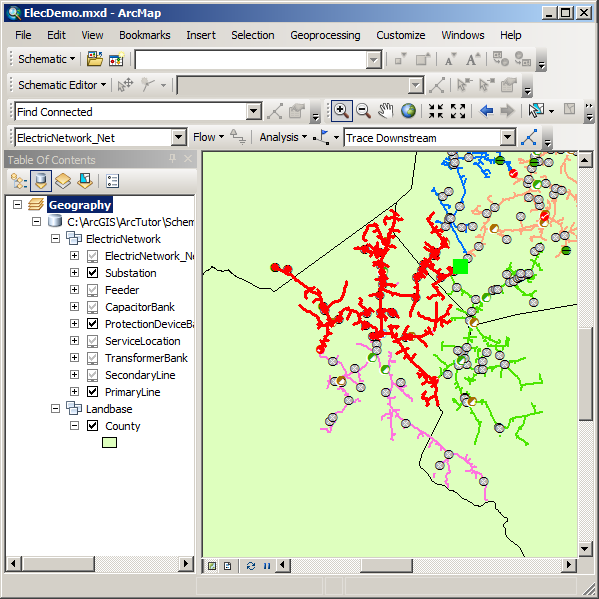
The tracing result appears as follows:
- Click the Generate New Schematic Diagram button
 .
.
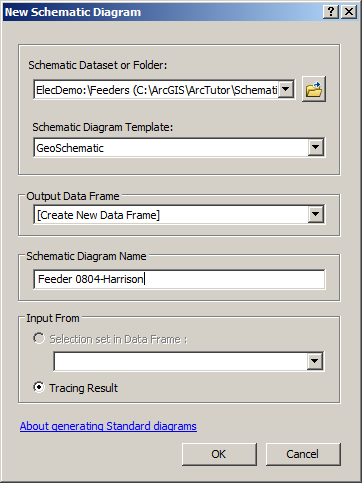
The New Schematic Diagram dialog box opens.
- Click ElecDemo:\Feeders in the Schematic Dataset or Folder text box.
- Click the Schematic Diagram Template drop-down arrow and choose GeoSchematic from the list.
- Keep the default [Create New Data Frame] option selected in the Output Data Frame drop-down list.
- Type Feeder 0804-Harrison in the Schematic Diagram Name text box for the diagram to be generated.
- Make sure the Tracing Result option is checked.
- Click OK.
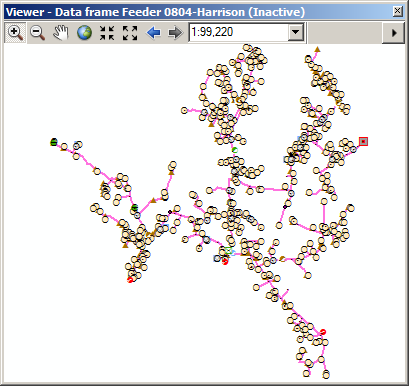
The new diagram generation starts. It displays in a viewer window.
- Click the Analysis drop-down menu in the Utility Network Analysis toolbar and click Clear Results, then click Clear Flags.
- Resize the viewer window related to the newly created Feeder 0804-Harrison schematic diagram.
- Remove the Feeder 0804-Harrison data frame.
- Click File and click Exit.
- Click No when the following message appears: Save changes to ElecDemo.mxd?