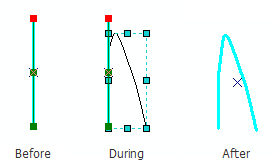
The Replace Geometry tool allows you to replace the geometry of a cartographic line feature with new geometry using elements you create with the Draw toolbar. One example where you can use this tool is cartographically generating a curved procedure leg to represent the Missed Approach. You can also use the Replace Geometry tool to curve procedure leg segments that form "pretzel" shapes near the runways. The Replace Geometry tool does not create a new cartographic feature; it only replaces the geometry of existing line features.

- Inicie ArcMap.
- Add the Replace Geometry tool in ArcMap by doing the following:
- On the main menu, click Customize > Customize Mode.
The Customize dialog box appears.
- Click the Commands tab.
- In the Categories list, choose Aviation.
- From the Commands list, drag the Replace Geometry tool
 to a toolbar.
 - Click Close.
- On the main menu, click Customize > Customize Mode.
- Click the Production Start Editing button
 on the Aviation Editing toolbar.
- Select an appropriate feature template in the Create tab on the Manage Features window.
For example, ProcedureLeg.
- Click the Edit tool
 on
the Aviation Editing toolbar.
- Select the cartographic line feature that you want to reshape.
- Right-click the selected line and click Edit Vertices.
- Right-click the selected line and click Insert Vertex to add a new vertex for the selected feature.
- Right-click the selected line and click Finish Sketch.
- On the main menu, click Customize > Toolbars > Draw.
- Click the Curve button
 on the Draw toolbar.
 - Draw your new line geometry starting at the newly inserted vertex and double-click when you are finished.
- Click the Replace Geometry button
 .
.The cartographic line is replaced with the new geometry.
- Click the Save Edits button
 on the Aviation Editing toolbar.