ArcGIS for Desktop

  • Documentation
  • Tarification
  • Support

  • My Profile
  • Aide
  • Sign Out
ArcGIS for Desktop

ArcGIS Online

La plateforme cartographique de votre organisation

ArcGIS for Desktop

Un SIG professionnel complet

ArcGIS for Server

SIG dans votre entreprise

ArcGIS for Developers

Outils de création d'applications de localisation

ArcGIS Solutions

Modèles d'applications et de cartes gratuits pour votre secteur d'activité

ArcGIS Marketplace

Téléchargez des applications et des données pour votre organisation.

  • Documentation
  • Tarification
  • Support
Esri
  • Se connecter
user
  • Mon profil
  • Déconnexion

Help

  • Accueil
  • Commencer
  • Carte
  • Analyser
  • Gérer les données
  • Outils
  • Plus...

Applying a suppression action to a layer

  1. Right-click the tracking layer you want to apply the action to in the Table of Contents window and clickProperties on the context menu. The Layer Properties dialog box appears.

    Alternatively, you can double-click the tracking layer in the Table of Contents.

  2. Click the Actions tab on the Layer Properties form.
  3. Click the New Action button.
    Click the New Action... button to create a new action
  4. Choose Highlight/Suppression on the Type of Action to Create panel.
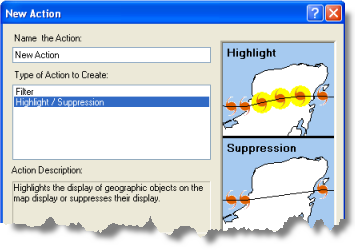
    Select the Highlight / Suppress layer action
  5. Click in the text box and type a name for the action, then click OK to launch the action parameters form.
  6. Choose Suppression from the Type drop-down list on the Highlight / Suppression Action Parameters dialog box.
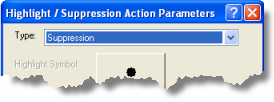
    Select Suppression for the type of action
  7. Set the trigger for your action. Click the button in the How the action will be triggered panel to the desired option below and follow further instructions to set your trigger:

    Always

    The action will always be triggered.

    Attribute Query

    The action will be triggered based on attribute criteria. Learn how to set an attribute trigger.

    Location Query

    The action will be triggered based on location criteria. Learn how to set a location trigger.

    Attribute AND Location Query

    The action will be triggered based on a combination of attribute and location criteria.

  8. When you have finished setting the trigger for the action, click OK to create the action.
  9. The new action appears in the list of layer actions. If other layer actions appear in the list, you can use the UP and DOWN ARROW buttons to put them in the order in which you want to them to be applied to the tracking layer. You can also enable or disable a layer action in the list by checking or unchecking its check box.
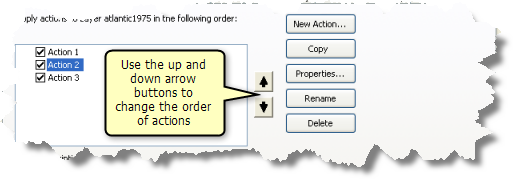
    The order of actions can be changed using the UP and DOWN ARROW buttons
  10. Click Apply or OK on the Layer Properties dialog box to apply all the changes.
Astuce:
If you are working with a real-time tracking layer and the features you are suppressing are not needed at all, you should consider using a filter service action on the tracking service to filter out the features permanently. This may improve performance. The benefit of using the suppression action is that the features still exist in the layer if you need them.

Thèmes connexes

  • Layer actions
  • Setting an attribute trigger for an action
  • Setting a location trigger for an action
  • Applying a highlight action to a layer
Vous avez un commentaire à formuler concernant cette rubrique ?

ArcGIS for Desktop

  • Accueil
  • Documentation
  • Tarification
  • Support

ArcGIS Platform

  • ArcGIS Online
  • ArcGIS for Desktop
  • ArcGIS for Server
  • ArcGIS for Developers
  • ArcGIS Solutions
  • ArcGIS Marketplace

A propos d'Esri

  • A propos de la société
  • Carrières
  • Blog des initiés
  • Conférence des utilisateurs
  • Sommet des développeurs
Esri
© Copyright 2016 Environmental Systems Research Institute, Inc. | Confidentialité | Légal