Disponible avec une licence Advanced.
The Change Reporter tool allows you to find changes made to individual feature classes or an entire geodatabase between specified dates or between versions. The changes reported are additions, modifications, tables, deletions made in feature classes, and data-driven elements that impact one or more charts. Once found, these changes are automatically committed to the Reviewer table for further examination. The feature classes and tables to be analyzed by the Change Reporter tool are stored in preferences and any supplementary areas of interest to be used in the analysis.
This tool can only be run on Charting production databases that have versioning and archiving enabled. Therefore, it can only be run on an géodatabase de bureau or an géodatabase d’entreprise.
- Start ArcMap.
- Ensure that the production properties are set correctly.
Properties include the product library workspace, production database workspace, Data Model Version, and Instances Maintained. The Data Model Version must be set to an AIS-based data model.
- Start a Reviewer session in one of the following:
- On the main menu, click Customize > Toolbars > Aviation Data Management.
- Click the Change Reporter button
 on the Aviation Data Management toolbar.
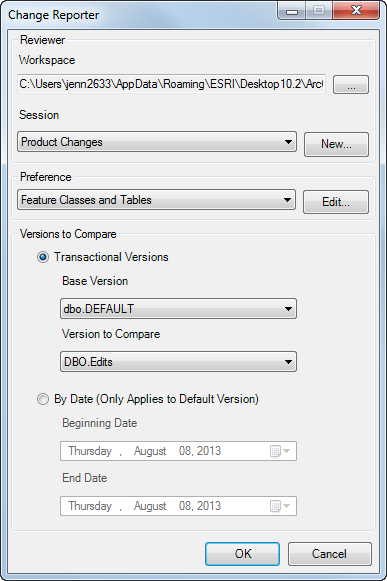
The Change Reporter dialog box appears.

- Browse to the directory of the Workspace field you want to review to choose a Reviewer workspace.
- Choose a Reviewer session to report Change Reporter results by doing one of the following:
To use an existing Reviewer session that does not have Change Reporter records
Click the Session drop-down arrow and choose a session name.
To create a session
Click New to create a session, type a name for the session in the Enter Name text box on the New Session Name dialog box, and click OK.
- Click the Preference drop-down arrow and choose the settings to run on the production database.
- Choose one of the following options for comparing the production database at different points in time:
- Transactional Version—Compares versions of the production database to find records that have been modified. The base version is typically the primary (Default) version of the production database, and the Version to Compare is the secondary version.
- By Date (Only Applies to Default Version)—Searches the Default version of the production database for records that have been modified within the specified date range.
- Configure one of the following options to compare versions:
Compare transactional versions
Click the Base Version drop-down arrow and choose the primary version of the production database. Click the Version to Compare drop-down arrow and choose the production database secondary version to be compared to the base version.
Compare by version date
Click the drop-down arrow in the Beginning Date field and choose the start of the date range. Click the drop-down arrow in the End Date field and choose the end date for the date range.
- Click OK to start processing.
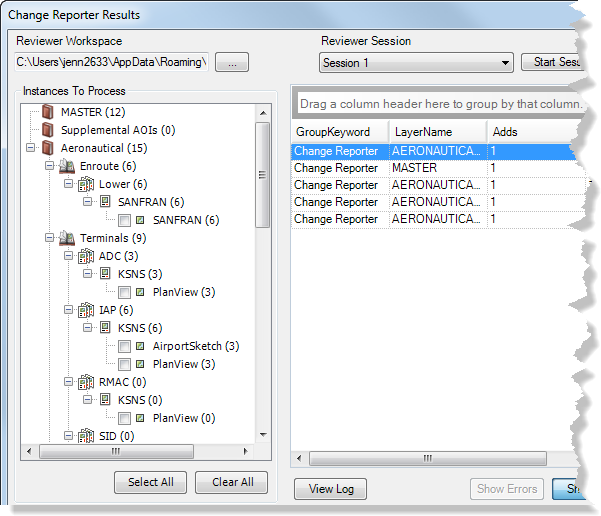
The Change Reporter Results dialog box appears when processing is complete.
Use the Instances To Process tree to review differences based on primary features, solutions, product classes, series, charts, and instances affected. The number of changes found appears in parentheses next to each node. The table illustrates the change types that have been reported and the quantity for each.

- Click Close on the Change Reporter Results dialog box.
- Cliquez sur OK.