ArcGIS Desktop

  • ArcGIS Pro
  • ArcMap

  • My Profile
  • Aide
  • Sign Out
ArcGIS Desktop

ArcGIS Online

La plateforme cartographique de votre organisation

ArcGIS Desktop

Un SIG professionnel complet

ArcGIS Enterprise

SIG dans votre entreprise

ArcGIS Developers

Outils de création d'applications de localisation

ArcGIS Solutions

Modèles d'applications et de cartes gratuits pour votre secteur d'activité

ArcGIS Marketplace

Téléchargez des applications et des données pour votre organisation.

  • Documentation
  • Support
Esri
  • Se connecter
user
  • Mon profil
  • Déconnexion

ArcMap

  • Accueil
  • Commencer
  • Carte
  • Analyser
  • Gérer les données
  • Outils
  • Extensions

Creating Dqyarea features

When collecting a new chart, you start with a set of coordinates that define your collection area. The coordinates form your Dqyarea feature. This is the first feature you collect for your new chart. You use the Dqyarea feature to trace new features that share its boundary. Once you collect this feature, you can add notes to it with the Notes Editor tool or create other features.

You use the Generate Feature dialog box to create a feature from coordinates. You must add the coordinates to a table in the Generate Feature dialog box. The coordinates define the Dqyarea feature. Before generating the feature, you can preview the shape as a graphic using the Show Create Feature command.

  1. Start ArcMap.
  2. If necessary, set up the DNC production environment.
  3. Click the Production Start Editing button Production Start Editing on the Production Editing toolbar.

    Remarque :

    The Manage Features and Create Attributes, Update Attributes, or Metadata Attributes windows automatically appear when you start an edit session using the Production Start Editing tool.

    Astuce :

    If the Create Attributes, Update Attributes, or Metadata Attributes window does not appear when you start an edit session, click the Show/Hide Attributes button Show/Hide Attributes on the Manage Features window.

  4. If necessary, click the Create tab on the Manage Features window.
  5. Click the DqyareaAS template.

    The active template at the top of the Manage Features window changes to DqyareaAS. The Create Dqyarea tool on the Nautical DNC toolbar is also enabled.

    Astuce :
    By changing the target template, features can be added from coordinate input not only into the Dqyarea feature class but into any other polygon feature class as well.
  6. Click the Create Dqyarea button Create Dqyarea on the Nautical DNC toolbar.

    The Generate Feature dialog box appears.

  7. Type the latitude and longitude coordinates in degrees minutes seconds (DMS) or decimal degrees (DD) into the table in the Create Feature area.

    For example, Lat: 33 34 22.8 N Long: 117 50 49.2 W
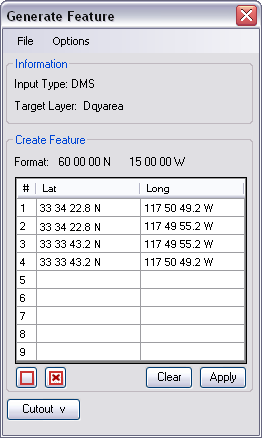
    The Generate Feature dialog box

    You need at least four points to create a Dqyarea feature.

    Astuce :

    You can load coordinates from a saved text file into the table by clicking File > Load > Create Feature.

    Astuce :

    You can change from the default DMS to DD by clicking Options > DD.

  8. Click Apply to create a Dqyarea feature.
  9. Optionally, you can perform any of the following actions:

    To clear all Lat and Long values from the table in the Create Feature area

    Click Clear.

    To preview the shape defined by the coordinates

    Click the Show Create Feature button Show Create Feature.

    To remove the preview of the shape

    Click the Clear Create Feature Graphic Clear Create Feature button.

    To save your coordinates to a text file

    Click File > Save > Create Feature.

  10. Click the Close button Close to close the dialog box.

ArcGIS Desktop

  • Accueil
  • Documentation
  • Support

ArcGIS

  • ArcGIS Online
  • ArcGIS Desktop
  • ArcGIS Enterprise
  • ArcGIS
  • ArcGIS Developer
  • ArcGIS Solutions
  • ArcGIS Marketplace

A propos d'Esri

  • A propos de la société
  • Carrières
  • Blog d’Esri
  • Conférence des utilisateurs
  • Sommet des développeurs
Esri
Donnez-nous votre avis.
Copyright © 2021 Esri. | Confidentialité | Légal