Disponible avec une licence Production Mapping.
- Adding cartographic data
- Symbolizing the U.S. Cities layer
- Symbolizing the U.S. Rivers (Generalized) layer
- Symbolizing the Country boundary, international border, and coastline, for the United States layer
- Symbolizing the U.S. National Transportation Atlas Interstate Highways layer
- Symbolizing the Internal state boundaries of the United States layer
- Symbolizing the U.S. Lakes (Generalized) layer
- Symbolizing the U.S. Counties (Generalized) layer
- Symbolizing the Countries/islands neighboring the U.S. layer
- Creating the legend for a map series
- Formatting the legend
The graphic table element can be used to create dynamic surround elements such as a legend. The dynamic legend is updated based on the data frame's visual extent whether the legend is used in an MPS-Atlas map series or in a single .mxd file.
Adding cartographic data
Before you can create the legend, you need to add the data to the map. In this walk-through, you are using the USA dataset, which is in a template database that is included with the ArcGIS Desktop installation.
- Start ArcMap.
- Cliquez sur le bouton Ajouter des données
 .
.
La boîte de dialogue Ajouter des données s'ouvre.
- Browse to C:\Program Files (x86)\ArcGIS\Desktop<version>\TemplateData.
- Add all the feature classes within the USA feature dataset to the data frame except the states feature class.
- Once all the feature classes are added to ArcMap, organize the
layers in the following order by clicking and dragging them to the appropriate location:
- U.S. Cities
- U.S. Rivers (Generalized)
- Country boundary, international border and coastline, for the United States
- U.S. National Transportation Atlas Interstate Highways
- Internal state boundaries of the United States
- U.S. Lakes (Generalized)
- U.S. Counties (Generalized)
- Countries/islands neighboring the U.S.
Symbolizing the U.S. Cities layer
The dynamic legend includes symbols for each of the features. In this part of the walk-through, you are going to define symbols for the U.S. Cities layer from the USA feature dataset.
- Right-click the U.S. Cities layer in the table of contents and click Properties.
The Layer Properties dialog box appears.
- Click the Symbology tab.
- Click the Categories heading in the left-hand pane.
- In the list that appears, click Unique values, many fields.
- Click the first Value Fields drop-down arrow and choose TYPE.
- Click the second Value Fields drop-down arrow and choose CAPITAL.
- Uncheck the check box under the Symbol column.
- Click Add Values.
The Add Values dialog box appears.
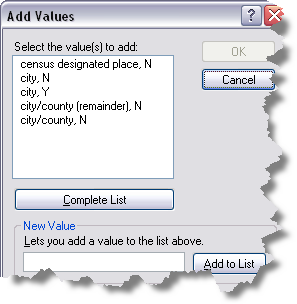
- Click Complete List.
The list expands to display all values.
- Choose values to add by pressing and holding the CTRL key and clicking the following:
- city, N
- city, Y
- town, N
- Click OK.
The Layer Properties dialog box appears.
- Double-click the symbol for city, N.
The Symbol Selector dialog box appears.
- Click the symbol for Circle 1.
- Click or type 10 in the Size text box.
- Click OK.
The Layer Properties dialog box appears.
- Repeat steps 12 through 15 for the town, N symbol, but click or type 8 in the Size text box.
- Double-click the symbol for city, Y.
The Symbol Selector dialog box appears.
- Click Edit Symbol.
The Symbol Property Editor dialog box appears.
- Click the Type drop-down arrow and choose Character Marker Symbol.
- Click the Font drop-down arrow and choose ESRI Cartography.
- Type 241 in the Unicode text box.
- Type or choose 12 in the Size text box.
- Click OK.
The Symbol Selector dialog box appears.
- Click OK.
The Layer Properties dialog box appears.
- Click city, N in the Label column and rename it City.
- Click city, Y in the Label column and rename it Capital.
- Click town, N in the Label column and rename it Town.
- Click one of the values to activate the sort arrows on the right and use them to arrange the values in the following order:
- Capital
- City
- Town
- Cliquez sur OK.
Symbolizing the U.S. Rivers (Generalized) layer
The dynamic legend includes symbols for each of the features. In this part of the walk-through, you are going to define symbols for the U.S. Rivers (Generalized) layer from the USA feature dataset.
- Right-click the U.S. Rivers (Generalized) layer in the table of contents and click Properties.
The Layer Properties dialog box appears.
- Click the Symbology tab.
- Click the Categories heading in the left-hand pane and click Unique values.
- Uncheck the check box in the Symbol column.
- If necessary, click the Value Field drop-down arrow and choose NAME.
- Click Add All Values.
- Choose all by holding down the Shift key and choosing all the values.
- Right-click the chosen values and click Group Values.
- Double-click the symbol in the Symbol column.
The Symbol Selector dialog box appears.
- Click the symbol River.
- Click OK.
The Layer Properties dialog box appears.
- Click the group values name in the Label column and rename it Rivers.
- Cliquez sur OK.
Symbolizing the Country boundary, international border, and coastline, for the United States layer
The dynamic legend includes symbols for each of the features. In this part of the walk-through, you are going to define symbols for the Country boundary, international border and coastline, for the United States layer from the USA feature dataset.
- Right-click the Country boundary, international border and coastline, for the United States layer in the table of contents and click Properties.
The Layer Properties dialog box appears.
- Click the Symbology tab.
- Click the Categories heading in the left-hand pane and click Unique values.
- Uncheck the check box under the Symbol column.
- Click the Value Field drop-down arrow and choose TYPE.
- Click Add All Values.
- Press and hold the CTRL key and click to choose Hawaii, Lake, and Ocean.
- Right-click the chosen values and click Group Values.
- Double-click the symbol for the grouped values under the Symbol column.
The Symbol Selector dialog box appears.
- Scroll until you find the symbol for Coastline and click it to choose it.
- Click OK.
The Layer Properties dialog box appears.
- Double-click the symbol for Land.
The Symbol Selector dialog box appears.
- Click the symbol for Boundary, National.
- Click OK.
The Layer Properties dialog box appears.
- Click Hawaii; Lake; Ocean under the Label column and rename it Coastline.
- Click Land under the Layer column and rename it International Boundaries.
- Cliquez sur OK.
Symbolizing the U.S. National Transportation Atlas Interstate Highways layer
The dynamic legend includes symbols for each of the features. In this part of the walk-through, you are going to define symbols for the U.S. National Transportation Atlas Interstate Highways layer from the USA feature dataset.
- Right-click the U.S. National Transportation Atlas Interstate Highways layer in the table of contents and click Properties.
The Layer Properties dialog box appears.
- Click the Symbology tab.
- Click the Categories heading in the left-hand pane and click Unique values.
- Uncheck the check box under the Symbol column.
- Click the Value Field drop-down arrow and choose ROUTE_NUM.
- Click Add All Values.
- Choose all by pressing down the Shift key and holding it while choosing all the values.
- Right-click the chosen values and click Group Values.
- Double-click the symbol in the Symbol column.
The Symbol Selector dialog box appears.
- Click the symbol for Freeway.
- Click OK.
The Layer Properties dialog box appears.
- Click the grouped values name in the Label column and rename it Interstate Highways.
- Cliquez sur OK.
Symbolizing the Internal state boundaries of the United States layer
The dynamic legend includes symbols for each of the features. In this part of the walk-through, you are going to define symbols for the Internal state boundaries of the United States layer from the USA feature dataset.
- Right-click the Internal state boundaries of the United States layer and click Properties.
The Layer Properties dialog box appears.
- Click the Symbology tab.
- Click the Categories heading in the left-hand pane and click Unique values.
- Uncheck the check box under the Symbol column.
- Click the Value Field drop-down arrow and choose TYPE.
- Click Add All Values.
- Double-click the symbol for State Bnd.
The Symbol Selector dialog box appears.
- Click the symbol for Boundary, State in the ESRI_Optimized style reference.
- Click OK.
The Layer Properties dialog box appears.
- Click State Bnd under the Label column and rename it State Boundaries.
- Cliquez sur OK.
Symbolizing the U.S. Lakes (Generalized) layer
The dynamic legend includes symbols for each of the features. In this part of the walk-through, you are going to define symbols for the U.S. Lakes (Generalized) layer from the USA feature dataset.
- Right-click the U.S. Lakes (Generalized) layer and click Properties.
The Layer Properties dialog box appears.
- Click the Symbology tab.
- Click the Categories heading in the left-hand pane and click Unique values.
- Uncheck the check box under the Symbol column.
- Click the Value Field drop-down arrow and choose NAME.
- Click Add All Values.
- Choose all by holding down the Shift key and holding it down while choosing all the values.
- Right-click the chosen values and click Group Values.
- Double-click the symbol for the group values under the Symbol column.
The Symbol Selector dialog box appears.
- Click the symbol for Lake.
- Click OK.
The Layer Properties dialog box appears.
- Click the grouped values name under the Label column and rename it Lake.
- Cliquez sur OK.
Symbolizing the U.S. Counties (Generalized) layer
The dynamic legend includes symbols for each of the features. In this part of the walk-through, you are going to define symbols for the U.S. Counties (Generalized) layer from the USA feature dataset.
- Right-click the U.S. Counties (Generalized) layer and click Properties.
The Layer Properties dialog box appears.
- Click the Symbology tab.
- Click the Categories heading in the left-hand pane and click Unique values.
- Uncheck the check box under the Symbol column.
- Click the Value Field drop-down arrow and choose NAME.
- Click Add All Values.
The following ArcMap warning appears:

- Click Yes.
- Choose all by pressing the Shift key and holding it while choosing all the values.
- Right-click the chosen values and click Group Values.
- Double-click the symbol for the grouped values under the Symbol column.
The Symbol Selector dialog box appears.
- Click Edit Symbol.
The Symbol Property Editor dialog box appears.
- Click Outline.
The Symbol Selector dialog box appears.
- Click the symbol for Boundary, City.
- Click OK.
The Symbol Property Editor dialog box appears.
- Click the Color drop-down arrow and choose Apple Dust.
- Click OK.
The Symbol Selector dialog box appears.
- Click OK.
The Layer Properties dialog box appears.
- Click the grouped values name under the Label column and rename it Counties.
- Cliquez sur OK.
Symbolizing the Countries/islands neighboring the U.S. layer
The dynamic legend includes symbols for each of the features. In this part of the walk-through, you are going to define symbols for the Countries/islands neighboring the U.S. layer from the USA feature dataset.
- Right-click Countries/islands neighboring the US layer and click Properties.
The Layer Properties dialog box appears.
- Click the Symbology tab.
- Click the Categories heading in the left-hand pane and click Unique values.
- Uncheck the check box under the Symbol column.
- Click the Value Field drop-down arrow and choose CNTRY_NAME.
- Click Add All Values.
- Choose all by pressing the Shift key and holding it while choosing all the values.
- Right-click the chosen values and click Group Values.
- Double-click the symbol for the grouped values under the Symbol column.
The Symbol Selector dialog box appears.
- Click the Fill Color drop-down arrow and choose Gray 10%.
- Click the Outline Color drop-down arrow and choose No Color.
- Click OK.
The Layer Properties dialog box appears.
- Click the grouped values name under the Label column and rename it International Countries.
- Cliquez sur OK.
Creating the legend for a map series
After all the layers that are going to be part of the legend have been symbolized, a map series needs to be created based on the counties in California. The graphic table element that will serve as the base for the legend also needs to be created. In this part of the workflow, create a map series using the Data Driven Pages and navigating to Sacramento.
- Using the counties in California, enable Data Driven Pages on your current map document.
- Using the Data Driven Pages toolbar, navigate to the Sacramento page.
- Click View > Layout View.
- On the main menu, click Insert > Graphic Table Element.
The New Table dialog box appears.
- Click to choose Item to Row in the Available formats list.
- Click Wizard.
The Set Table Format dialog box appears.
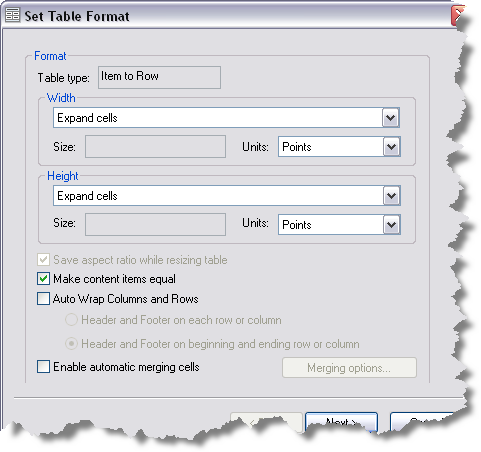
- Click the Width drop-down arrow and choose Expand cells.
- Click the Height drop-down arrow and choose Expand cells.
- Click Next.
The Selecting table datasources dialog box appears.
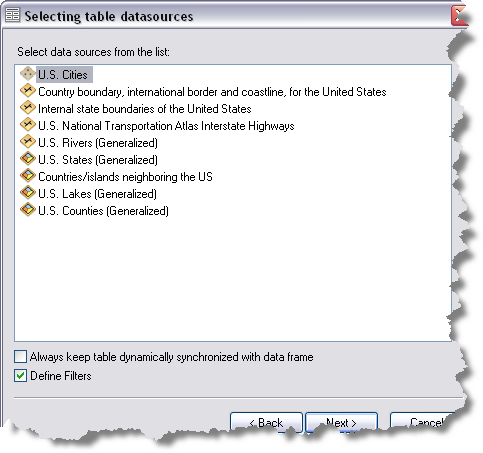
- Choose all the data sources from the list by pressing the Shift key and holding it while choosing all the data sources.
- If necessary, check the Always keep table dynamically synchronized with data frame and Define Filters check boxes.
- Click Next.
The Defining table fields dialog box appears.
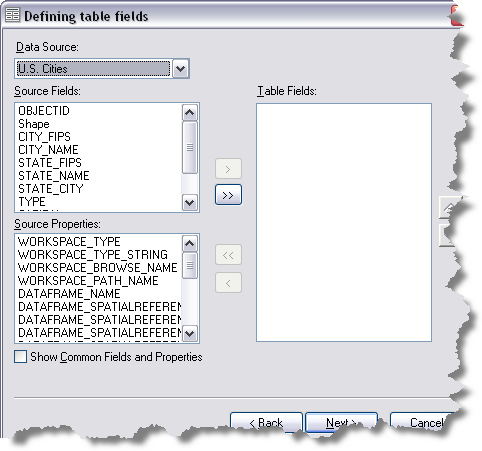
- Check the Show Common Fields and Properties check box.
- In the Source Fields list, click Shape and click the > button to move the field to the Table Fields list.
- In the Source Properties list, choose FEATURE_SYMBOL_LABEL and click the > button to move the field to the Table Fields list.
- Click Next.
The Defining filters dialog box appears.
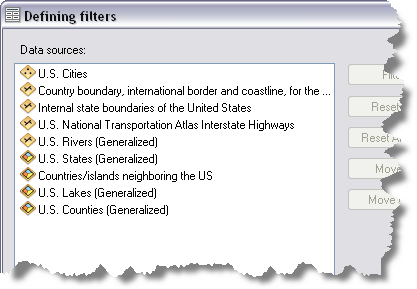
- Click U.S. Cities in the Data sources list.
- Click Filter.
The Data Filters dialog box appears.
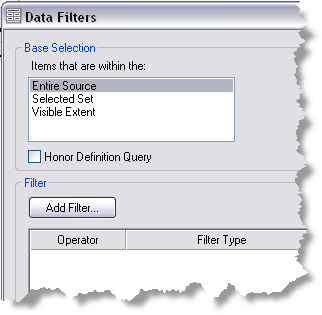
- Click the Visible Extent option in the list in the Base Selection area.
- Click Add Filter and click Sorting Filter.
The Sort Options dialog box appears.
- Click Add Table Fields.
The Table Fields Selector dialog box appears.
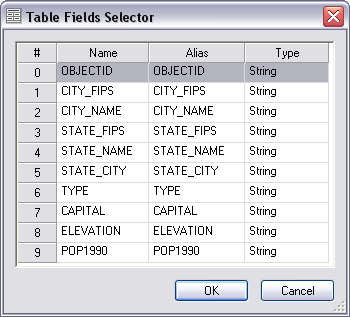
- Click Capital in the Name column.
- Click OK.
The Sort Options dialog box appears.
- Click the Sort Order drop-down arrow and choose Descending.
- Click OK.
The Data Filters dialog box appears.
- Click OK.
The Defining filters dialog box appears.
- Click U.S. Rivers (Generalized) in the Data sources list.
- Click Filter.
The Data Filters dialog box appears.
- Click the Visible Extent option in the list in the Base Selection area.
- Cliquez sur OK.
- Repeat steps 28 through 30 for the following data sources:
- Country boundary, international border and countries
- U.S. National Transportation Atlas Interstate Highways
- Internal state boundaries of the United States
- U.S. Lakes (Generalized)
- U.S. Counties (Generalized)
- Countries/islands neighboring the U.S.
- Click Data Items.
The Data Items dialog box appears.
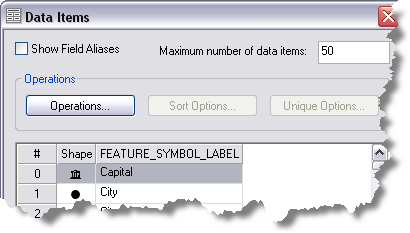
- Click Operations.
The Operations Order dialog box appears.
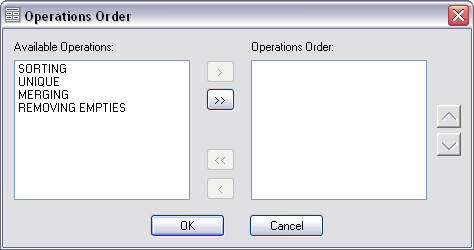
- In the Available Operations list, click Unique and Removing Empties and click the > button to move them to the Operations Order list.
- Click OK.
The Data Items dialog box appears.
- Click Unique Options.
The Unique options dialog box appears.
- Click Add Table Fields.
The Table Fields Selector dialog box appears.
- Click Feature_Symbol_Label.
- Click OK.
The Unique options dialog box appears.
- Click OK.
The Data Items dialog box appears.
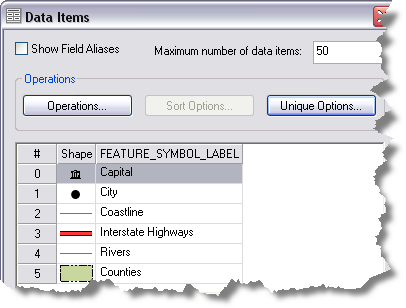
- Cliquez sur OK.
- Click Finish.
The New Table dialog box appears.
- Click OK.
The following table appears on the map layout:

Formatting the legend
After the basic table is created for the legend, you can refine its appearance. This part of the walk-through guides you through the process of adding lines between the symbols and labels and modifying the table borders.
- Right-click in the legend and choose Properties.
The Table Properties dialog box appears.
- Click the Table Format tab.
- Click Table Design.
The Item To Row Table Design dialog box appears.
- Click the X-units drop-down arrow and choose Centimeters.
- Click the Y-units drop-down arrow and choose Centimeters.
- Press and hold the Shift key and click to choose cells h1, A and h1, B in the Table Layout area.
- Right-click cell h1, A and click Delete > Rows.
- Repeat steps 6 and 7 for cells f1, A and f1, B.
- Press and hold the Shift key and click to choose cells c1, A and c1, B.
- Right-click cell c1, A and click Properties.
The Properties dialog box appears.
- Click the Border tab.
- Click the symbol for None in the Presets area.
- Click OK.
The Item To Row Table Design dialog box appears.
- Click the plus sign (+) next to c1, B in the Elements pane to expand the cell tree.
- Right-click FieldTextElement and click Properties.
The Properties dialog box appears.
- Click the Alignment tab.
- Click the Horizontal drop-down arrow and choose Right.
- Click OK.
The Item To Row Table Design dialog box appears.
- Click the plus sign (+) next to c1, A in the Elements pane to expand the cell tree.
- Right-click FieldSymbolElement and click Properties.
The Properties dialog box appears.
- Click the Fill Dimensions tab.
- Click Rounded Rectangle in the Shape list.
- Click the Line Dimensions tab.
- Click Horizontal.
- Click OK.
The Item To Row Table Design dialog box appears.
- Right-click c1, A in the Table Layout and click Insert > Column Right.
A new column is added between cells c1, A and c1, C.
- Click cell c1, B.
- Right-click cell c1, B in the Elements pane and click Add Element > Line.
The New line element dialog box appears.
- Click the Symbol tab.
- Click Change Symbol.
The Symbol Selector dialog box appears.
- Scroll down and click the Dashed with 1 Dot symbol.
- Click Edit Symbol.
The Symbol Property Editor dialog box appears.
- Click the Cartographic Line tab, if necessary.
- Click the dashed line in the Layers window.
- Click the Delete button
 .
.
- Click the Template tab.
- Click and slide the light gray square to create a gap of three white squares.
- Click or type 1 in the Interval text box.
- Click the Units drop-down arrow and choose Points if necessary.
- Click OK.
The Symbol Selector dialog box appears.
- Click OK.
The New line element dialog box appears.
- Click the Flex Margins tab.
- Check the Left check box.
- Click the Cell drop-down arrows and set the cell to c1, A.
- Click the Position drop-down arrow and choose Right.
- Click the Element drop-down arrow and choose FieldSymbolElement.
- Check the Right check box.
- Click the Cell drop-down arrow and set the cell to c1, C.
- Click the Position drop-down arrow and choose Left.
- Click the Element drop-down arrow and choose FieldTextElement.
- Click the Margins tab.
- Type 0.1 in the Left and Right text boxes.
- Click the Alignment tab.
- Click the Vertical drop-down arrow and choose Bottom.
- Click OK.
The Item To Row Table Design dialog box appears.
- Click OK.
The Table Properties dialog box appears.
- Click OK.
The resulting legend is similar to the following:
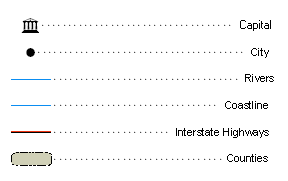
- Navigate to a different page in the Data Driven Pages to see the element update dynamically.