Tracking Analyst allows you to add a data feed from a locally connected GPS unit as a real-time tracking layer in ArcMap. By adding your GPS connection as a layer in Tracking Analyst, you gain the capabilities of Tracking Analyst, such as tracking symbology and the ability to play back the data. You also gain the capability to save your GPS data as a tracking layer.
- Connect your GPS device, configure the GPS toolbar for use with your GPS device, then open a GPS connection.
- Click the Add Data
 button on the Standard toolbar to open the Add Data dialog box.
- Click Tracking Connections in the Look in drop-down menu.

- Double-click Add GPS Connection.
The Add GPS Connection option can also be found under Tracking Connections in the catalog tree view in ArcCatalog or in the Catalog window in ArcMap.
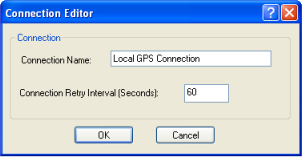
- The Connection Editor dialog box opens. Enter the name that you would like to appear for your GPS Connection in the Connection Name text box.

- Enter a number for the connection retry interval in the Connection Retry Interval (Seconds) text box, or leave it set to the default value.
- Click OK to create the GPS connection.
- The new local GPS connection you created now appears in the Tracking Connections folder in the Add Data dialog box. The local GPS connection appears with the connection name you specified earlier. Double-click the connection.
- You should now see a single service called GPS Service listed. Select the service and click the Add button to add it to your map.
You will see that a tracking layer called GPS Service has been added to your map and appears in the Table of Contents. You can now use the full capabilities of Tracking Analyst with your GPS data.