Data Reviewer のライセンスで利用可能。
The Data Reviewer service configuration file controls the configuration of the service itself, such as where it writes the log files and the job status, the location of the service job configuration file to be run, and so forth. You can also specify the format for the log files and the timestamp that is written in the log file.
- Browse to <installation location>\ArcGIS\ArcGISDataReviewer\Desktop10.3\Bin and double-click the ReviewerServiceController.exe file.
The Data Reviewer Service Controller icon
 appears in the system tray.
 - Right-click the Data Reviewer Service Controller icon
 in the system tray, then click Configure Service.
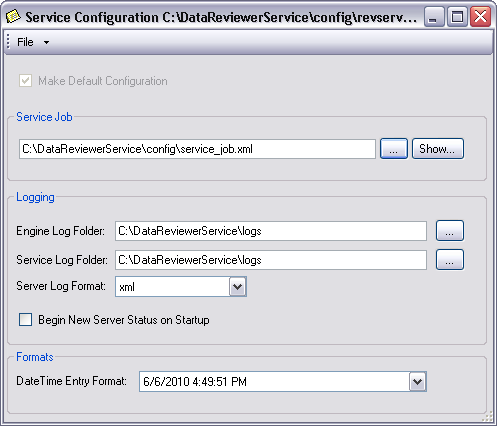
The Service Configuration <service configuration file path> dialog box appears.

- Click the ellipsis (...) next to the Service Job field.
The Select a Service Job dialog box appears.
- Navigate to the Reviewer service job file you want to run.
- Click the ellipsis (...) next to the Engine Log Folder field.
The Browse For Folder dialog box appears.
- Navigate to the directory in which you want to store the engine log file.
- [OK] をクリックします。
- Click the ellipsis (...) next to the Service Log Folder field.
The Browse For Folder dialog box appears.
- Navigate to the directory in which you want to store the service log file.
- Click the Server Log Format drop-down arrow and choose the file format you want to use for the service log.
- XML—The log file is generated as an XML file.
- Text—The log file is generated as a plain text file that can be viewed in a text editor.
- If you want to start a new service status log every time the service starts, check the Begin New Server Status on Startup check box.
- To choose a format for the date and time, click the Date Time Entry Format drop-down arrow and choose the format you want to associate with the date and time in the service log file.
- Click the drop-down arrow next to File and click Save.
- Click the drop-down arrow next to File and click Close.