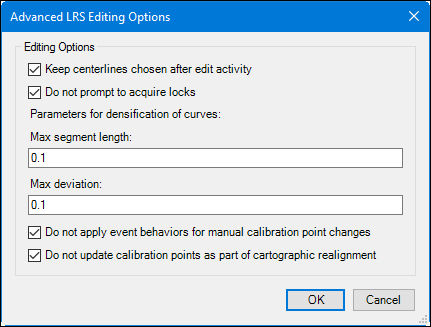
Certain options within Esri Roads and Highways can be configured on an .mxd-by-.mxd basis to tailor the editing experience. These options can also be configured within ArcGIS Workflow Manager so that any .mxd file launched always has the same options configured.
To change the advanced LRS editing options, click the Advanced LRS Editing Options button on the Roads And Highways Editing toolbar.

Keep centerlines chosen after edit activity
When choosing centerlines for use in editing activities such as creating or realigning a route, you may want the chosen centerlines to remain chosen after the edit activity is completed. Enabling the Keep centerlines chosen after edit activity option ensures that centerlines remain chosen. If more than one LRS Network is in your LRS, keeping the centerlines chosen will make the process of completing the same edit in two networks more efficient, as you won’t need to choose the centerlines again after the first edit.
Do not prompt to acquire locks
When conflict prevention is enabled, you must agree to acquire a lock for each edit when required. In most cases, you will always choose Yes to acquire a lock when prompted. If the Do not prompt to acquire locks option is enabled, you will not be prompted to acquire locks when needed; the locks will automatically be acquired.
Densification of curves
Roads and Highways supports curves by densifying centerlines that are curves into polylines so they can be used to build routes within the LRS Network. When a centerline feature is created as a curve within an edit session, Roads and Highways automatically converts the curve into a densified polyline. The Max segment length parameter determines the maximum distance between two vertices within the densified polyline. The Max deviation parameter determines the maximum distance a newly placed vertex on the densified polyline can deviate from the original location of the curve. Together, these two options control how the densified polyline will look in comparison to the original curve.
Do not apply event behaviors for manual calibration point changes
When editing calibration points as part of a correction workflow, you may not want any calibrate route event behaviors to be applied to any impacted events. If the Do not apply event behaviors for manual calibration point changes option is enabled, any manual changes to calibration points, including measure changes, location changes, or changes in from and to dates, will not result in calibrate route event behaviors being applied. In that case, the events will only have their shape regenerated. Manual calibration point changes include using the Add Calibration Points or Edit Calibration Points tool on the Roads And Highways toolbar. Additionally, any manual changes to calibration points done outside the Roads and Highways editing tools would be considered manual changes. Calibration point changes resulting from an edit activity, such as retiring a route, are not considered manual calibration point changes.
Do not update calibration points as part of cartographic realignment
When performing a cartographic realignment, any calibration points in the realigned section are either proportionally snapped or deleted. You may not want either of the options and instead prefer to manually place the calibration points at new locations on the route after the cartographic realignment is complete. If the Do not update calibration points as part of cartographic realignment option is enabled, any calibration points that would be either proportionally snapped or deleted during a cartographic realignment will instead be left at the original route location before the cartographic realignment. In this case, you should manually address each calibration point by moving it to the new route location or deleting it.