Aviation Airports ライセンスで利用できます。
There are two ways in which obstacles can be organized in the obstacle table:
- Grouped—If you choose to group the obstacles by their ID, this will make a single record in the table and create an effect like that of a pivot table.
- Not Grouped—An obstacle table in which the obstacles are not grouped will show multiple records for the same obstacle if it penetrates multiple surfaces. This is the default setting.
Creating an obstacle table (obstacle not grouped)
- ArcMap を起動します。
- On the main menu, click Customize > Toolbars > Aviation Airports.
-
Click the
Obstacle Table Element button
 on the Aviation Airports toolbar.
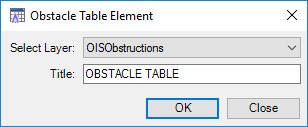
The Obstacle Table Element dialog box appears.

- Click the Select Layer drop-down arrow and choose the obstacles you want in the table.
- Type the title of the table in the Title text box.
- [OK] をクリックします。
- On the Columns tab, check or uncheck the rows or columns for the layer you want in the table element.
The following are the column definitions:
- Visible—Determines if the column is visible in the table element.
- Field—The actual field name.
- Caption—The text that will appear in the table element when created.
- Width—As defined by points, for the column.
- Size—Determines what part of the column Width applies to:
- All
- All Cells Except Header
- Header
- Fixed
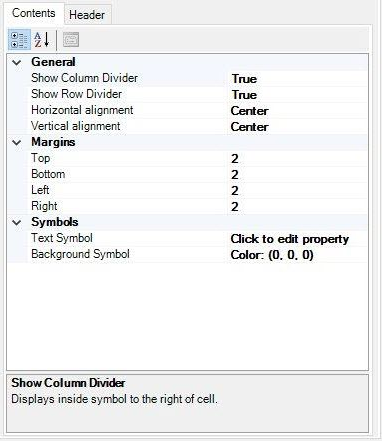
- Click the Show Column Divider drop-down arrow on the Contents tab and choose True or False.
The Show Column Divider setting controls the display of the dividing line of the column.

- Click the Show Row Divider drop-down arrow and choose True or False.
The Show Row Divider setting controls the display of the dividing line of the row.
- Click the Horizontal Alignment drop-down arrow and choose an option.
- Left
- Right
- Center
- Click the Vertical Alignment drop-down arrow and choose an option.
- Left
- Right
- Center
- Click Margin Locations and type a value.
The default is 2 points.
- Click Text Symbol, click the ellipsis button that appears (...), and modify the settings.
- Click Background Symbol, click the ellipsis button that appears (...), and modify the settings.
- Click the Table tab to access properties related to the overall table appearance.

- Click the Boundary tab to adjust the appearance of the table boundary.
- Click the Interior tab to change the appearance of lines in the table interior.
- Click the Title tab to change the following:
- Click the Show Column Divider drop-down arrow and choose True or False.
The Show Column Divider setting controls the display of the dividing line of the column.
- Click the Show Row Divider drop-down arrow and choose True or False.
- Click the Horizontal Alignment drop-down arrow and choose an option.
- Left
- Right
- Center
- Click the Vertical Alignment drop-down arrow and choose an option.
- Left
- Right
- Center
- Click Margin Locations and type a value.
The default is 2 points.
- Click Text Symbol, click the ellipsis button that appears (...), and modify the settings.
- Click Background Symbol, click the ellipsis button that appears (...), and modify the settings.
- Click the Show Column Divider drop-down arrow and choose True or False.
- [OK] をクリックします。
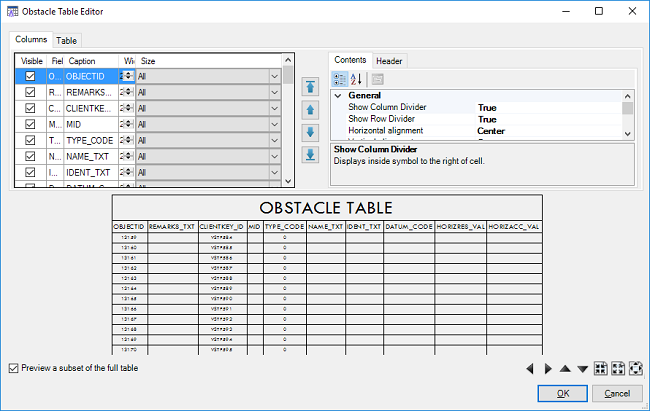
The Obstacle Table Editor dialog box appears and shows a preview of the table element.
Creating an obstacle table (grouped by obstacle)
- ArcMap を起動します。
- On the main menu, click Customize > Toolbars > Aviation Airports.
-
Click the
Obstacle Table Element button
 on the Aviation Airports toolbar.
- The Obstacle Table Element dialog box appears.

- Click the Select Layer drop-down arrow and choose the obstacles you want in the table.
- Type the title of the table in the Title text box.
- [OK] をクリックします。
- On the Columns tab, check or uncheck the rows or columns for the layer you want in the table element.
Following are the column definitions:
- Visible—Determines if the column is visible in the table element.
- Field—The actual field name.
- Caption—The text that will appear in the table element when created.
- Width—As defined by points, for the column.
- Size—Determines what part of the column Width applies to:
- All
- All Cells Except Header
- Header
- Fixed
- Click the Show Column Divider drop-down arrow on the Contents tab and choose True or False.
The Show Column Divider settings control the display of the dividing line of the column.

- Click the Show Row Divider drop-down arrow and choose True or False.
The Show Row Divider settings control the display of the dividing line of the row.
- Click the Horizontal Alignment drop-down arrow and choose from the following:
- Left
- Right
- Center
- Click the Vertical Alignment drop-down arrow and choose from the following:
- Left
- Right
- Center
- Click each of the margins text boxes and type a value.
The default is 2 points.
- Click Text Symbol, click the ellipsis button that appears (...), and modify the settings.
- Click Background Symbol, click the ellipsis button that appears (...), and modify the settings.
- Click the Table tab to access properties related to the overall table appearance.
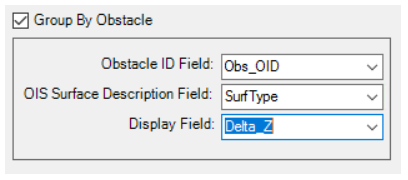
- Check the Group By Obstacle check box.

- Provide the information for the following fields:
- Obstacle ID Field—The unique identifier of the obstacle.
- OIS Surface Description Field—The name of the OIS surfaces that are in the input layer.
- Display Field—This field represents the value of the obstacle penetration.
- Click the Boundary tab to adjust the appearance of the table boundary.
- Click the Interior tab to change the appearance of lines in the table interior.
- Click the Title tab to change the following:
- Click the Show Column Divider drop-down arrow and choose True or False.
The Show Column Divider setting controls the display of the dividing line of the column.
- Click the Show Row Divider drop-down arrow and choose True or False.
- Click the Horizontal Alignment drop-down arrow and choose an option.
- Left
- Right
- Center
- Click the Vertical Alignment drop-down arrow and choose an option.
- Left
- Right
- Center
- Click each of the margins text boxes and type a value.
The default is 2 points.
- Click Text Symbol, click the ellipsis button that appears (...), and modify the settings.
- Click Background Symbol, click the ellipsis button that appears (...), and modify the settings.
- Click the Show Column Divider drop-down arrow and choose True or False.
- Click Preview a subset of the full table.
This will show a preview of not more than 10 fields and 10 rows. It helps with faster preview refresh, in case the table is very large.
- [OK] をクリックします。
The Obstacle Table Editor dialog box appears and shows a preview of the table element.