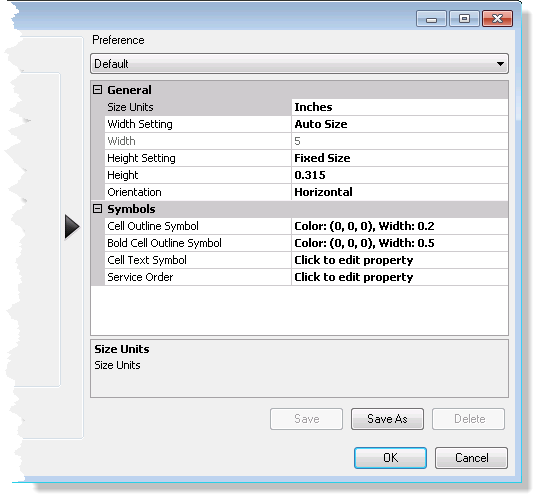
Before a communication row has been added to the map layout, the appearance of the table can be defined to ensure it meets a product specification or organizational standard. Several aspects of the table can be customized, which include all the cell symbols and fonts that create the table. This includes the table cell lines, all the text symbols, and the order of navaid components shown.
The properties are described as follows:
- Size Units—Properties related to the unit of measure for the table size
- Width Setting—Properties related to how the table width is sized
- Width—The defined width of the table (in units determined by the Size Units property)
- Height Setting—Properties related to how the table height is sized
- Height—The defined height of the table (in units determined by the Size Units property)
- Orientation—Properties related to the orientation of the table on the page
- Cell Outline Symbol—Properties related to the line symbols of the table
- Bold Cell Outline Symbol—Properties related to the line symbols for the bolded tower cell of the table
- Cell Text Symbol—Properties related to the text within the table cells
- Service Order—Properties related to the primary service type and order shown in the communication row table
When you modify the line symbol or a text element on the table, there is a separate dialog box that appears so you can customize the color, size, and other aspects of the symbol's style. There are also preview windows in these dialog boxes so you can preview each change before you preview it on the table itself.
- Start ArcMap.
- On the main menu, click Customize > Production > Production Properties.
The Production Properties dialog box appears.
- Click Aviation Properties in the list on the left side of the Production Properties dialog box.
-
In the Element Options section, click the cell next to Communication Row and click the ellipsis button (...) that appears.
The Communication Row dialog box appears.

- To modify the general settings, do the following:
- Click the cell next to Size Units and click the drop-down arrow that appears to choose a unit.
This is the unit of measure for the table size.
- Click the cell next to Width Setting and click the drop-down arrow that appears to choose a setting.
This determines how the table width is sized.
- Click the cell next to Width and type a number for the width of the table.
This is the defined width of the table in units determined by the Size Units property.
- Click the cell next to Height Setting and click the drop-down arrow that appears to choose a setting.
This determines how the table height is sized.
- Click the cell next to Height and type a number for the height of the table.
This is the defined height of the table in units determined by the Size Units property.
- Click the cell next to Orientation and click the drop-down arrow that appears to choose a setting.
This determines the orientation of the table on the page.
- Click the cell next to Size Units and click the drop-down arrow that appears to choose a unit.
- To modify the text symbols, do the following:
- Click the cell next to the symbol name and click the ellipsis button (...) that appears.
The Editor dialog box appears.
- Modify the symbol properties as needed.
Properties that can be modified include the font, size, style, offset, angle, alignment, position, and masking.
- Click OK.
- Click the cell next to the symbol name and click the ellipsis button (...) that appears.
- To modify the service order, do the following:
- Click the cell next to Service Order, and click the ellipsis button (…) that appears.
The Service Order dialog box appears. The left side of the dialog box contains all available service types in the database, while the right side contains the service types in the order in which they will be displayed in the communication row table.
- Click to select items in either list and click the >> and << buttons to add or remove items from the Service Types in Display Order list.
- Within the Service Types in Display Order list, select items and use the up and down arrow buttons to change the display order.
When a service type is selected in the Service Types in Display Order pane, the Service Display options appear. The Service Display options are used to identify the service either by name from the database or by additional text, based on how it needs to display on the chart.
- Check the Service Name check box to populate the service name from the database.
- Type additional text in the text box, and then click the Prefix and Suffix option buttons to determine where the Service Name text (if checked) is displayed in relation to the additional text.
- Click OK.
The Communication Row dialog box appears.
- Click the cell next to Service Order, and click the ellipsis button (…) that appears.
- Click Save to save the settings you have modified in the current preference.
These settings are applied to the new elements you create in the future, unless the settings are modified again.
- Click OK.
The Production Properties dialog box appears.
- [OK] をクリックします。
The Communication Row dialog box appears.