Calculated fields allow you to determine the appearance of labels and annotation or basic data type values based on attributes you select. The fields are grouped based on the specification you choose.
- Start ArcMap.
- On the main menu, click Customize > Toolbars > Production Cartography.
- If necessary, load data in the map.
- Right-click the layer for which you want to define the calculated fields and click Properties.
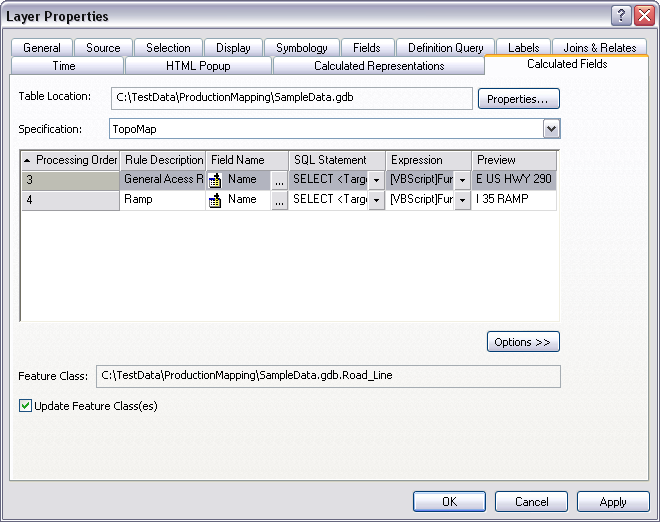
The Layer Properties dialog box appears.
- Click the Calculated Fields tab.

- Click the Specification drop-down arrow and choose the specification for which you want to create the rule.
- Click Options > New Rule.
A new row appears in the rule table.
- Double-click the Rule Description field.
The field becomes editable.
- Type a name for the rule in the Rule Description text box.
- Click the ellipsis (...) in the Field Name field.
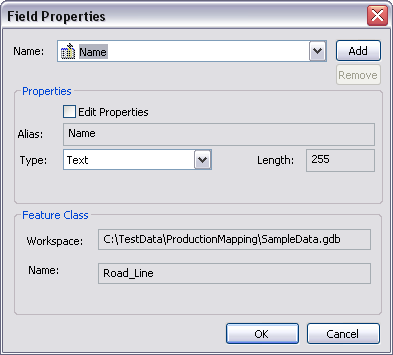
The Field Properties dialog box appears.

When the calculated fields are created, you have the option of overwriting values in an existing field or creating a new field for the calculated values. When you create a new field, the values that result from the SQL statement and VBScript expression populate the field.
- If necessary, click the Name drop-down arrow to choose the existing field you want to use.
- If you do not want to use an existing field, click Add to create a new field.
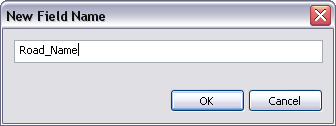
The New Field Name dialog box appears.

- Type a name in the text box.
- Click OK.
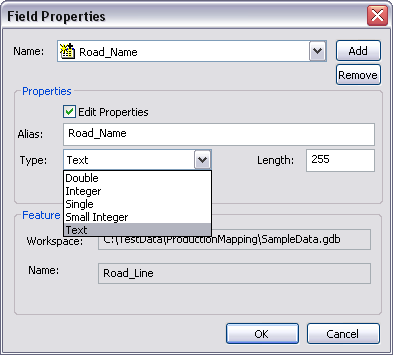
The Field Properties dialog box appears.
- If you do not want to use an existing field, click Add to create a new field.
- Check the Edit Properties check box.
The following items become available:
- Alias
- Type
- Length
- Type an alias name for the field in the Alias text box.
- Click the Type drop-down arrow and choose one of the following:
- Double
- Integer
- Single
- Small Integer
- Text

- If you choose Text, type a length in the Length text box.
- Click OK.
The Layer Properties dialog box appears.
- Click the SQL Statement drop-down arrow and choose Edit SQL statement.
The Query Builder dialog box appears.
- Define a query that includes the fields with values you want to use.
- Additionally, you can also include a field in the Select clause that has a domain value description if you want to use the description for labeling the field.
- Click OK.
The Calculated Fields tab appears.
- Click the Expression drop-down arrow and click Edit Expression.
The Expression Parser dialog box appears.
- Define an expression that includes the fields you want to use as calculated fields.
- Optionally, if any of the fields in the expression contains domain description text that you would like to use for labeling, use $[<field_name>] in the expression.
- Click OK.
The Calculated Fields tab appears.
- To ensure that the feature class is updated with the rule information, verify that the Update Feature Class(es) check box is checked.
- Click OK.
Связанные разделы
- Creating a new specification
- Creating a calculated representation specification rule
- Adding a specification rule
- Configuring calculated field properties
- Changing the layer
- Changing the representation or field name
- Changing the statement or the expression or VBScript expression
- Changing the symbol used with a rule
- Changing explicit override fields
- Changing the rule description
- SQL statements and visual specifications
- Defining a SQL statement
- Loading a SQL statement
- VBScript and visual specifications
- Creating VBScript expressions for calculated representations
- Creating VBScript expressions for calculated fields
- Saving a VBScript expression for later use
- Loading a VBScript expression