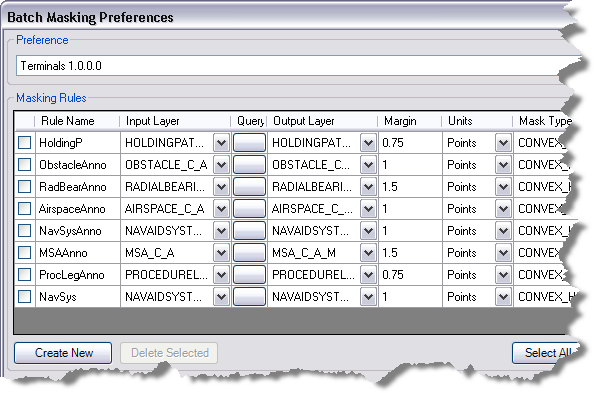
The Batch Masking Preferences dialog box allows you to create, edit, and delete masking preferences. Preferences are collections of rules. The rules contain the information necessary to create one particular type of mask for one specific feature layer. This information includes the rule name, the feature layer for which to create masks; a query that defines which features are to be included in the layer; the feature layer in which the generated masks will be stored; the margin, which determines the amount of buffer space around the masked feature; the units of measure for the margin; and the type of mask to create.
- Запустите ArcMap.
- On the main menu, click Customize > Production > Production Properties.
The Production Properties dialog box appears.
- Ensure that the correct product library and production database are set.
- Click Aviation Properties in the list on the left side of the Production Properties dialog box.
- Click the cell next to Masking Rule Preferences and click the ellipsis button (...) that appears.
The Batch Masking Preferences dialog box appears.

- Click the Preference drop-down arrow and choose a set of preferences for masking.
Each set of rules typically corresponds with products stored in the product library. For example, if you have imported masking rules from an older product library, you will have those masking preferences available from the drop-down list.
- Click Create New.
This adds a new row at the bottom of the existing rules for the selected set of masking rules.
- Type the rule name and enter the information for the rest of the columns.
- Click the drop-down arrow in the Input Layer cell and choose the feature class for which to create the feature masks.
- Optionally click the button in the Query cell to define a query in the Query Builder dialog box and determine which features will have masks created.
- Click the drop-down arrow in the Output Layer cell and choose the feature class that is going to store the masks.
The feature class names typically end with _C_A_M or _C_M.
- Optionally click the value in the Margin cell and type a new value for the margin around the masks.
- Optionally click the drop-down arrow in the Units cell to choose the units of measure for the margin.
The margin can be defined in map or page units.
- Optionally click the drop-down arrow in the Mask Type cell and choose the type of mask to create.
The default value is CONVEX_HULL. You can also choose the BOX or EXACT_SIMPLIFIED options to create the masks in different shapes.
- Save the change to the masking preference by doing one of the following:
To save the change to the current masking preference
Click Save.
To save the change in a new masking preference
Click Save As. Type a name for the new masking preference in the Enter Name text box and click OK.
- Нажмите ОК.
Once you have created rules, you can run the Batch Masking tool to create masks.