ArcGIS Desktop

  • ArcGIS Pro
  • ArcMap

  • My Profile
  • Справка
  • Sign Out
ArcGIS Desktop

ArcGIS Online

Картографическая платформа вашей организации

ArcGIS Desktop

Полноценная профессиональная ГИС

ArcGIS Enterprise

ГИС предприятия

ArcGIS Developers

Инструменты для встраивания приложений с местоположениями

ArcGIS Solutions

Бесплатные шаблоны карт и приложений для отрасли

ArcGIS Marketplace

Получение приложения и данных для вашей организации.

  • Документация
  • Поддержка
Esri
  • Войти
user
  • Мой профиль
  • Выход

ArcMap

  • На главную
  • Начало работы
  • Карта
  • Анализ
  • Управление данными
  • Инструменты
  • Дополнительные модули

Creating two intersecting circles

Доступно с лицензией Production Mapping.

The Circle Circle Intersection function creates two overlapping circles. The circles are created based on two individual coordinates and radii that are defined.
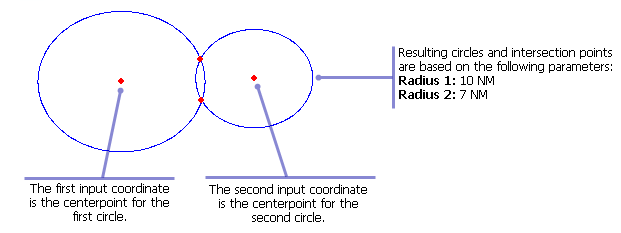
Example of input and output for the Circle Circle Intersection function
  1. Запустите ArcMap.
  2. On the menu bar, click Customize > Toolbars > Production Feature Builder.
  3. Click the Feature Builder button Feature Builder on the Production Feature Builder toolbar.

    The Feature Builder window appears.

    Подсказка:

    The Feature Builder window can be placed anywhere in ArcMap, or in the Table Of Contents window, with the aid of the arrows showing the possible placement positions.

  4. If the scratch dataset has not been added to the table of contents, click the Add Scratch Data Layers button Add scratch data layers at the top of the Feature Builder window.

    The dataset is added to the map using the current spatial reference.

  5. Choose Circle Circle Intersection in the list on the Functions tab.
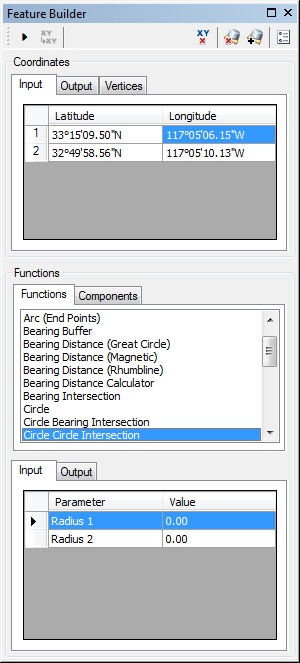
    Feature Builder window with the Circle Circle Intersection function selected

  6. Define a coordinate for the start point of the polyline by doing one of the following:
    • Click the Pinprick tool Pinprick on the Production Feature Builder toolbar and click the map
    • Type the coordinates in the cells on the Input tab in the Coordinates area.

    Подсказка:

    To view the input coordinates on the map, double-click the row headers for each coordinate.

  7. Repeat step 6 to define a coordinate for the centerpoint of the second circle.
  8. Click the cell next to Radius 1 and type a value for the radius of the first circle.

    This is the radius of the first circle. The default unit is Nautical Miles.

    Подсказка:

    Right-click the parameter name and change the unit of measurement. If you change the unit of measurement after defining a value, the value is converted to the new unit of measurement, and you may need to redefine the value.

  9. Click the cell next to Radius 2 and type a value for the radius of the second circle.

    This is the radius of the second circle. The default unit is Nautical Miles.

    Подсказка:

    Right-click the parameter name and change the unit of measurement. If you change the unit of measurement after defining a value, the value is converted to the new unit of measurement, and you may need to redefine the value.

  10. Click the Execute button Execute.

Two overlapping circles are created.

ArcGIS Desktop

  • На главную
  • Документация
  • Поддержка

ArcGIS

  • ArcGIS Online
  • ArcGIS Desktop
  • ArcGIS Enterprise
  • ArcGIS
  • ArcGIS Developer
  • ArcGIS Solutions
  • ArcGIS Marketplace

Об Esri

  • О нас
  • Карьера
  • Блог Esri
  • Конференция пользователей
  • Саммит разработчиков
Esri
Расскажите нам, что вы думаете.
Copyright © 2021 Esri. | Конфиденциальность | Правовая информация