Mit der Production Mapping-Lizenz verfügbar.
The product class is a type of geographic product designed for a particular use, typically unique types of maps, charts, or digital data that share common properties. A product class has a product class version and a default data model version that are used to define the schema of the data used for a product. The product class version, default data model version, and associated files are automatically exported.
When distributing a product class, you choose the class in the Product Library window; the solution that the product is associated with will also be distributed with the class. If you want to distribute more than one product class from the same solution, use the Distribute Solution tool. If you want to distribute product classes from multiple solutions, use the Distribute Product Library tool.
- Start ArcMap.
- If necessary, open the Product Library window by clicking Customize > Production > Product Library on the main menu.
A tree view of the product library appears.
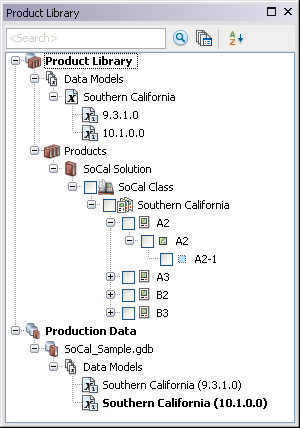
- Expand Product Library and Products.
-
Navigate to and right-click the product class you want to distribute and click Distribute Class.
The Distribute Product Library dialog box appears. The source is preset to the location of the current product library. The Choose Product Library Component(s) area displays the check boxes for the product class you selected and its solution is checked so you will not need to modify the selected product class.

- Click Browse for the Target Product Library Workspace field and navigate to the target or navigate to where you want to store the XML workspace you are creating. You can choose one of the following targets:
- Geodatabase—Allows you to choose an existing product library or any geodatabase. If the geodatabase is not already a product library, you will be prompted to create the workspace. Ensure that you have permissions to create tables in the selected geodatabase.
- Workspace XML—Allows you to create an XML workspace document with the selected information. This XML workspace document can be imported into another product library using the Distribute Product Library tool.
- Click the Config Keyword drop-down arrow and choose an option.
Options vary based on whether the geodatabase is a personal, file, or Enterprise-Geodatabase.
- Click Distribute.
The Distributing Product Library Components dialog box appears with the progress.
- Click OK when the process completes.
- Klicken Sie auf Schließen.
The product class and any associated files are copied into the target product library or into a new XML workspace.