- OIS creation process
- Creating an FAA Advisory Circular 150/5300-13A obstruction identification surface
- Creating an FAA Advisory Circular 150/5300-18B obstruction identification surface
- Creating an FAA Regulations Part 77 obstruction identification surface
- Creating an ICAO Annex 14 obstruction identification surface
- Creating an ICAO Annex 15 obstruction identification surface
Obstruction identification surfaces (OIS) are imaginary surfaces that surround airfields and identify obstruction areas. Each OIS contains several parts that vary depending on whether it is for civilian or military purposes. The Obstruction Identification Surfaces tool allows you to generate them based on five different specifications: FAA Advisory Circular 150/5300-13A, FAA Advisory Circular 150/5300-18B, FAA Regulations Part 77, ICAO Annex 14, and ICAO Annex 15.
OIS creation process
The basic workflow for creating an OIS consists of the following:
- Choose a specification.
You can choose from five different specifications for runway OIS.
- Choose the input features.
These are the features on which the OIS is based, and are typically runway centerlines or runway polygon features from either the Airports or the AIS data models. The tool will accept input features from the following feature classes:
Data Model Geometry Type FC Name Attributes used 18B
Polygon
Runway
RWYDESG
18B
Line
RunwayCenterline
RWYDESG
18B
Point
AirportControlPoint
POINTTYPE, RWYDESG
18C
Polygon
Runway
18C
Line
RunwayCenterline
RUNWAYDESIGNATORIDENTIFIER
18C
Point
POSITION
POSITIONROLECODE
AIS
Polygon
ADHPSurfaceArea
DESIGNATOR_TXT
AIS
Line
ADHPSurfaceLine
SUBTYPE_CODE, DESIGNATOR_TXT
AIS
Point
ADHPSurfacePoint
SUBTYPE_CODE, ADHPSURFACELINE_ID, DESIGNATOR_TXT
AIS
Point
ADHPThreshold
SUBTYPE_CODE, ADHPSURFACELINE_ID, DESIGNATOR_TXT
- Optionally, other feature classes or shapefiles may be used, if they meet the following requirements:
- Any input feature class must be in a projected coordinate system and Z enabled.
- Point input must have two or more points to define a runway centerline.
- Choose the output type.
This is the file type in which the OIS is created. You can choose from several different formats.
- Polygon or multipatch shapefiles
- TINs
- Polygon or multipatch features
- Define the output path.
This is the path to where the shapefile or TIN is created, or the feature class that will be appended.
- Provide the lengths of the high runway and low runway end clearance.
These are the lengths at the high and low ends of the runway.
Most of the specifications also require the airport reference elevation to be defined and runway classifications to be selected. For specifications that require a high- and low-end runway classification, the high end of the runway has a name between 19 and 36, and the low end of the runway has a name between 01 and 18. You can also choose to merge conical and horizontal surfaces and include them in the output.
Creating an FAA Advisory Circular 150/5300-13A obstruction identification surface
Surfaces generated using the FAA Advisory Circular 150/5300-13A specification are composed of primary and approach surfaces, as described:
- Primary—An imaginary surface longitudinally centered on a runway.
- Approach—A surface that extends outward and upward from each end of the primary surface.
For this OIS, you must provide values for the following:
- input runway
- output type
- output path
- length of the high runway end clearway
- length of the low runway end clearway
- Start ArcMap.
- Optionally open the map that contains the runways for which you want to generate OIS features.
- On the main menu, click Customize > Toolbars > Aviation Airports.
- Click the Obstruction Identification Surfaces button
 on the Aviation Airports toolbar to open the Obstruction Identification Surfaces window.
 - Click the Specification drop-down arrow and choose FAA Advisory Circular 150/5300-13A.
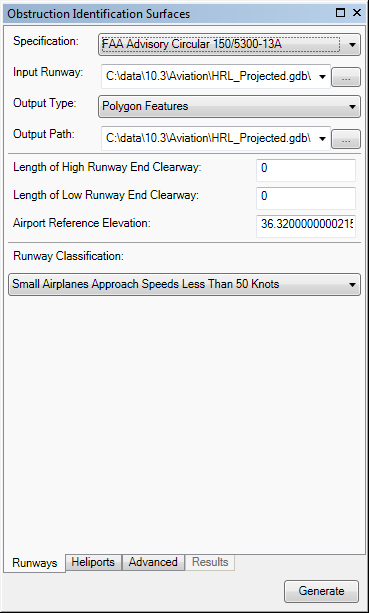
- Define the input features.
The input features can be in a feature class or shapefile that contains points, lines, or polygons. The feature class or shapefile must be z enabled and have a vertical (z) coordinate system. The RWYDESG field name (alias = Runway Designator) must be populated in this format: 09/27
If the runway features have been loaded in the map
Click the Input Runway drop-down arrow and choose the feature class that contains the runway features for which to create OIS features.
If the runway features are not in the map
Browse to the layer that contains the runway features.
- Click the Output Type drop-down arrow and choose an output type for the OIS features.
- Polygon Shapefile—The OIS features are generated in a new or existing polygon shapefile. If an existing shapefile is selected, the features are appended to it. All the OIS features are written to a single shapefile.
- Multipatch Shapefile—The OIS features are generated in a new or existing multipatch shapefile. If an existing shapefile is selected, the features are appended to it. All the features are written to a single shapefile.
- TIN—The OIS features are generated in a new TIN. One TIN is created for each surface. If there are multiple runway features, one directory is created for each one.
- Polygon Features—The OIS features are appended to an existing polygon feature class. All the features for the runways are appended to the same feature class.
- Multipatch Features—The OIS features are generated in a new or existing multipatch feature class. All the features for the runways are appended to the same feature class.
- Choose the output path for the OIS features.
If the feature class or shapefile is loaded in the map
Click the Output Path drop-down arrow and choose the feature class or shapefile that will store the OIS features.
If the feature class or shapefile is not loaded in the map, or the output type is a TIN
Click the ellipsis button (...) next to the Output Path text box and browse to the feature class or workspace in which the shapefile or TIN will be created.
- Optionally type a value that represents the length of the area at the high end of the runway in the Length of High Runway Clearway text box.
This is the area over which an aircraft can make a portion of its initial climb.
- Optionally type a value that represents the length of the low end of the runway in the Length of Low Runway Clearway text box.
This is the area over which an aircraft can make a portion of its initial climb.
- Type a value that represents the highest point on the runway in the Airport Reference Elevation text box.
The tool will automatically populate this value from a z-value in your aviation database if you are using the AIS or Airports data model. Airport elevation is stored in the z-value of the ADHP point feature class in the AIS data model. In the Airports data model, elevation is stored in the z-value of the Airport Control Point feature class for records with the Point_Type field populated with AIRPORT_ELEVATION.
If the value is 0, the Obstruction Identification Surfaces tool automatically uses the highest z-value on the runway centerline endpoint to generate the OIS.
-
Click the Runway Classification drop-down arrow and choose the classification that matches the runway.
- Small Airplanes Approach Speeds Less Than 50 Knots—A runway designed for light aircraft with a maximum takeoff weight of less than 254 pounds and approach speed less than 50 knots. This is a visual runway only that can be used during the day or night.
- Small Airplanes Approach Speeds 50 Knots Or More—A runway designed for light aircraft with a maximum takeoff weight of less than 1,320 pounds and approach speed more than 50 knots. This is a visual runway only that can be used during the day or night.
- Large Airplanes Or Instrument Approach Greater Than OR Equal To 1 Mile Visibility—A runway designed for an aircraft with a maximum certified takeoff weight of more than 12,500 pounds. The approach end of the runway is expected to serve large airplanes as visual runway available during the day or night, or instrument approach with a minimum greater than one statute mile (1.6 KM) only during the day.
- Instrument Night Operations Category A And B—A runway designed for night operation with civil single-engine aircraft and twin-engine airplanes as well as those that go 91 knots or greater but less than 121 knots. The approach end of the runway is expected to support instrument night operations and serve approach category A and B aircraft only.
- Instrument Night Operations Greater Than Category B—A runway designed for night operation with aircraft that can travel at speeds of 121 knots or greater. The approach end of the runway is expected to support instrument night operations serving greater than approach category B aircraft.
- Instrument Approach Visibility Greater Than Or Equal To 3/4 Mile And Less Than 1 Mile—A runway designed for an instrument approach procedure where the visibility is greater than three-fourths of a mile and less than one mile. The approach end of the runway is expected to accommodate instrument approaches with visible minimums more than three-fourths but less than 1 statute mile—more than 1.2 KM but less than 1.6 KM—during the day or night.
- Precision Or Instrument Approach Less Than 3/4 Mile Visibility—A runway where the course and vertical path guidance are provided with visibility less than three-fourths of a mile. The approach end of this runway is expected to accommodate instrument approaches with visibility minimum less than three-fourths of a statute mile (1.2 KM) or precision approach (Instrument landing System [ILS] or Global Navigation Satellite System [GNSS] Landing System [GLS]) day or night.
- Vertical Guidance Approach—A runway that uses precision guidance systems to support aircraft approach and landing. The approach of the runway is expected to accommodate approaches with vertical guidance such as a Glide Path Qualification Surface (GPQS).
- Departure—A runway that allows pilots to follow standard departure procedures.
- If necessary, click the Advanced tab.
The properties are grouped based on the surface generated. There are default values for each parameter, but they can be modified.
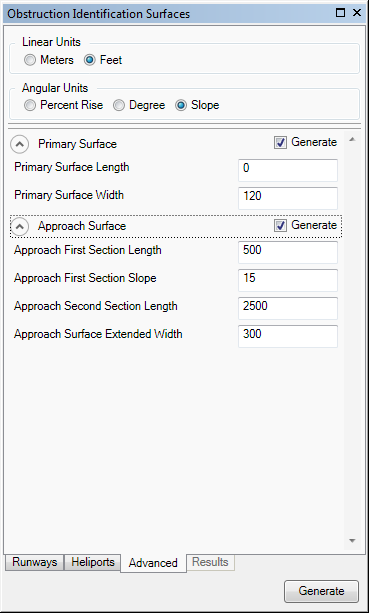
- Optionally change the unit of measure for surface lengths and widths in the Linear Units area.
- Meters—Runway length is in meters.
- Feet—Runway length is in feet. This is the default.
- Optionally, change the angular units for slope surfaces in the Angular Units area.
- Percent Rise—Slope angle is expressed as a grade (inclination) in percent.
- Degree—Slope angle is expressed in degrees.
- Slope—Slope angle is expressed as X units of run per 1 vertical unit. This is the default.
- Optionally, click the arrow next to Primary Surface to expand the group and change the values as necessary.
- Primary Surface Length—The length of an imaginary surface longitudinally centered on a runway. The length is the additional distance the primary surface extends beyond the end of the runway.
- Primary Surface Width—The specified width of an imaginary surface longitudinally centered on a runway.
- Optionally, click the arrow next to Approach Surface to expand the group and change the values as necessary.
- Approach First Section Length—The length of a surface that extends outward and upward from each end of the primary surface. The length of the first section of the approach surface.
- Approach First Section Slope—The slope of the first section of the approach surface. This is a ratio, so the value specified represents x:1.
- Approach Second Section Length—The length of the second section of the approach surface.
- Approach Surface Extended Width—The width of the approach surface's outer edge.
Creating an FAA Advisory Circular 150/5300-18B obstruction identification surface
Surfaces generated using the FAA Advisory Circular 150/5300-18B specification are composed of several different surfaces. The table below describes each surface and the runway classifications for which they are created.
| Surface | Description | Nonvertical guidance | Vertical guidance |
|---|---|---|---|
Primary | An imaginary surface longitudinally centered on a runway. |  |  |
Primary connection | A set of 500-foot-wide lateral extensions of the primary surface (one on each side of the runway). It connects the primary surface to the transitional surface. This surface also extends 200 feet beyond each runway end. |  | |
Approach | A surface that extends outward and upward from each end of the primary surface. |  |  |
Protection | A sloping surface that begins at the runway end and extends outward 6,000 feet toward the final approach course. This surface is 400 feet wide at the runway end (200 feet to either side of the centerline) and expands to a final width of 1,217.6 feet. |  | |
Horizontal | A surface located above the established airport elevation. The surface is defined by lines tangent to arcs at the Horizontal Surface Radius distance from the center of each end of the primary surface. |  |  |
Conical | A surface that extends outward and upward from the periphery of the horizontal surface. |  | |
Transitional | A surface that extends upward and outward from the primary and approach surfaces. This surface ends where it intersects the horizontal surface. |  |  |
For this OIS, you must provide values for the following:
- input runway
- output type
- output path
- length of the high runway end clearway
- length of the low runway end clearway
- airport reference elevation
- Start ArcMap.
- Optionally open the map that contains the runways for which you want to generate OIS features.
- On the main menu, click Customize > Toolbars > Aviation Airports.
- Click the Obstruction Identification Surfaces button
 on the Aviation Airports toolbar to open the Obstruction Identification Surfaces window.
 - Click the Specification drop-down arrow and choose FAA Advisory Circular 150/5300-18B.
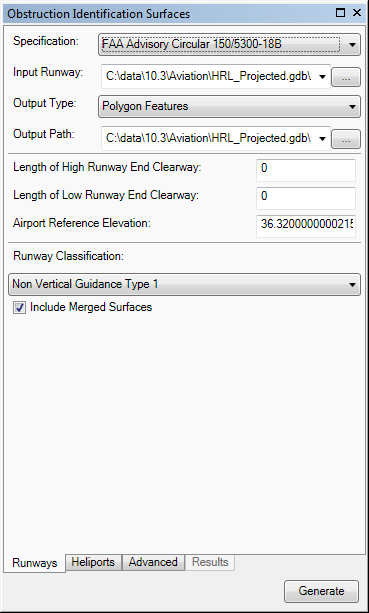
- Define the input features.
The input features can be in a feature class or shapefile that contains points, lines, or polygons. The feature class or shapefile must be z enabled and have a vertical (z) coordinate system. The RWYDESG field name (alias = Runway Designator) must be populated in this format: 09/27
If the runway features have been loaded in the map
Click the Input Runway drop-down arrow and choose the feature class that contains the runway features for which to create OIS features.
If the runway features are not in the map
Browse to the layer that contains the runway features.
- Click the Output Type drop-down arrow and choose an output type for the OIS features.
- Polygon Shapefile—The OIS features are generated in a new or existing polygon shapefile. If an existing shapefile is selected, the features are appended to it. All the OIS features are written to a single shapefile.
- Multipatch Shapefile—The OIS features are generated in a new or existing multipatch shapefile. If an existing shapefile is selected, the features are appended to it. All the features are written to a single shapefile.
- TIN—The OIS features are generated in a new TIN. One TIN is created for each surface. If there are multiple runway features, one directory is created for each one.
- Polygon Features—The OIS features are appended to an existing polygon feature class. All the features for the runways are appended to the same feature class.
- Multipatch Features—The OIS features are generated in a new or existing multipatch feature class. All the features for the runways are appended to the same feature class.
- Choose the output path for the OIS features.
If the feature class or shapefile is loaded in the map
Click the Output Path drop-down arrow and choose the feature class or shapefile that will store the OIS features.
If the feature class or shapefile is not loaded in the map, or the output type is a TIN
Click the ellipsis button (...) next to the Output Path text box and browse to the feature class or workspace in which the shapefile or TIN will be created.
- Optionally type a value that represents the length of the area at the high end of the runway in the Length of High Runway Clearway text box.
This is the area over which an aircraft can make a portion of its initial climb.
- Optionally type a value that represents the length of the low end of the runway in the Length of Low Runway Clearway text box.
This is the area over which an aircraft can make a portion of its initial climb.
- Type a value that represents the highest point on the runway in the Airport Reference Elevation text box.
The tool will automatically populate this value from a z-value in your aviation database if you are using the AIS or Airports data model. Airport elevation is stored in the z-value of the ADHP point feature class in the AIS data model. In the Airports data model, elevation is stored in the z-value of the Airport Control Point feature class for records with the Point_Type field populated with AIRPORT_ELEVATION.
If the value is 0, the Obstruction Identification Surfaces tool automatically uses the highest z-value on the runway centerline endpoint to generate the OIS.
-
Click the Runway Classification drop-down arrow and choose the classification that matches the runway.
- Non Vertical Guidance Type 1—A runway designed for visual maneuvers, nonvertically guided operations, and instrument departure procedures.
- Non Vertical Guidance Type 2—A specially prepared hard surface (SPHS) runway designed for visual maneuvers, nonvertically guided operations, and instrument departure procedures. SPHS runways have a primary surface that extends 200 feet beyond each end of the runway.
- Vertical Guidance—A runway that uses precision guidance systems to support aircraft approach and landing.
- If you do not want to include merged horizontal and conical surfaces in the OIS, uncheck the Include Merged Surfaces check box.
The Include Merged Surfaces check box is checked by default. This means that the horizontal and conical surfaces will be merged in the output.
- If necessary, click the Advanced tab.
The properties are grouped based on the surface generated. There are default values for each parameter, but they can be modified.
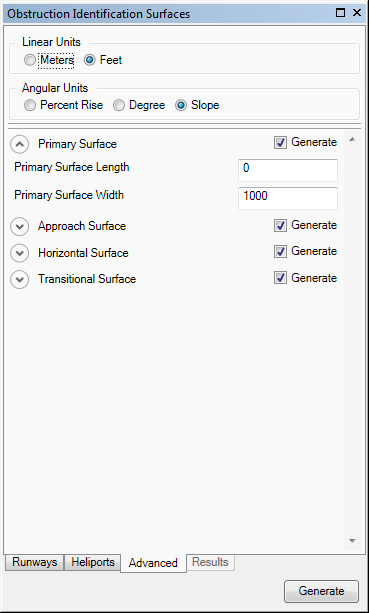
- Optionally change the unit of measure for surface lengths and widths in the Linear Units area.
- Meters—Runway length is in meters.
- Feet—Runway length is in feet. This is the default.
- Optionally, change the angular units for slope surfaces in the Angular Units area.
- Percent Rise—Slope angle is expressed as a grade (inclination) in percent.
- Degree—Slope angle is expressed in degrees.
- Slope—Slope angle is expressed as X units of run per 1 vertical unit. This is the default.
- Optionally, click the arrow next to Primary Surface to expand the group and change the values as necessary.
- Primary Surface Length—The length of an imaginary surface longitudinally centered on a runway. The length is the additional distance the primary surface extends beyond the end of the runway.
- Primary Surface Width—The specified width of an imaginary surface longitudinally centered on a runway.
- Optionally click the arrow next to Primary Connection Surface to expand the group and change the values as necessary.
- Primary Connection Surface Length—The length of the primary connection surface.
- Primary Connection Surface Width—Width of the primary connection surface. This surface is a set of 500-foot-wide lateral extensions of the primary surface (one on each side of the runway).
- Optionally, click the arrow next to Approach Surface to expand the group and change the values as necessary.
- Approach First Section Length—The length of a surface that extends outward and upward from each end of the primary surface. The length of the first section of the approach surface.
- Approach First Section Slope—The slope of the first section of the approach surface. This is a ratio, so the value specified represents x:1.
- Approach Second Section Length—The length of the second section of the approach surface.
- Approach Surface Extended Width—The width of the approach surface's outer edge.
- Optionally, click the arrow next to Protection Surface to expand the group and change the values as necessary.
- Protection Surface Length—Length of the protection surface. FAA 18B protection surfaces are 6,000 feet long.
- Protection Surface Slope—Slope of the protection surface. The slope of the surface is 62.5:1.
- Protection Surface Start Width—The initial width of the protection surface. This surface starts at the end of the runway and extends outward.
- Protection Surface End Width—The width at the end of the protection surface. The ending width is 1,217.6 feet.
- Optionally, click the arrow next to Horizontal Surface to expand the group and change the values as necessary.
- Horizontal Surface Height—The height of the horizontal surface above the established airport elevation.
- Horizontal Surface Radius—The length of the radius of an arc swung from the center of each end of the primary surface of each runway.
- Optionally, click the arrow next to Conical Surface to expand the group and change the values as necessary.
- Conical Surface Slope—The slope value of the conical surface.
- Conical Surface Offset—The length of the conical surface. The unit of measure is determined by what is set in the Angular Units area on the Advanced tab.
- Optionally, click the arrow next to Transitional Surface to expand the group and change the value for Transitional Surface Slope as necessary.
This is the slope of the transitional surface. This is a ratio, so the value specified represents x:1.
- If you do not want to generate a particular surface, uncheck the Generate check box for that surface.
- Click Generate at the bottom of the Obstruction Identification Surfaces window.
The Results tab appears on the Obstruction Identification Surfaces window and displays the progress of the OIS creation process. Once the process is finished, the OIS appears in the map.
Creating an FAA Regulations Part 77 obstruction identification surface
Surfaces generated using the FAA Regulations Part 77 are composed of several surfaces, depending on the classification. The surfaces generated for the OIS vary based on the high-end runway classification. The high- and low-end runway classifications are based on the magnetic azimuth of the runway's heading in degrees. Low-end runways are between 01 and 18, and high-end runways are between 19 and 36.
The table below describes each surface and the runway classifications for which they are created.
| Surface | Description | Construction and alteration | Military airport | Instrument runway | Visual approach |
|---|---|---|---|---|---|
Primary | An imaginary surface longitudinally centered on a runway. |  |  |  | |
Clear zone | A surface located on the ground or water at each end of the primary surface, with a length of 1,000 feet and the same width as the primary surface. |  | |||
High-end approach | A surface that extends outward and upward from the high end of the primary surface. |  |  |  | |
Low-end approach | A surface that extends outward and upward from the low end of the primary surface. |  |  |  | |
Horizontal | A surface located above the established airport elevation. The surface is defined by lines tangent to arcs at the Horizontal Surface Radius distance from the center of each end of the primary surface. |  |  |  | |
Conical | A conical surface that extends outward and upward from the periphery of the horizontal surface. |  |  |  |  |
Outer horizontal | A surface located 500 feet above the established airfield elevation, extending outward from the outer periphery of the conical surface for a horizontal distance of 30,000 feet. |  | |||
Transitional | A surface that extends upward and outward from the primary and approach surfaces. This surface ends where it intersects the horizontal surface. |  |  |  |
For this OIS, you must provide values for the following:
- input runway
- output type
- output path
- length of the high runway end clearway
- length of the low runway end clearway
- airport reference elevation
- Start ArcMap.
- Optionally open the map that contains the runways for which you want to generate OIS features.
- On the main menu, click Customize > Toolbars > Aviation Airports.
- Click the Obstruction Identification Surfaces button
 on the Aviation Airports toolbar to open the Obstruction Identification Surfaces window.
 - Click the Specification drop-down arrow and choose FAA Regulations Part 77.
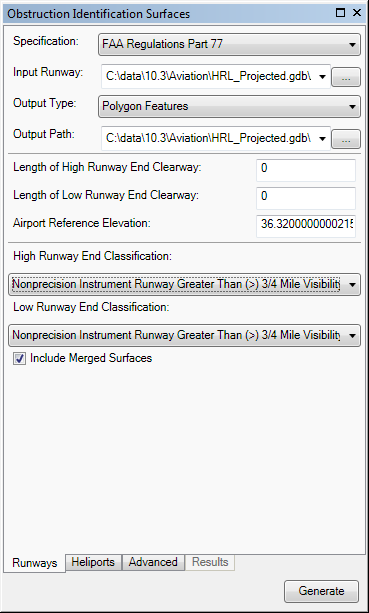
- Define the input features.
The input features can be in a feature class or shapefile that contains points, lines, or polygons. The feature class or shapefile must be z enabled and have a vertical (z) coordinate system. The RWYDESG field name (alias = Runway Designator) must be populated in this format: 09/27
If the runway features have been loaded in the map
Click the Input Runway drop-down arrow and choose the feature class that contains the runway features for which to create OIS features.
If the runway features are not in the map
Browse to the layer that contains the runway features.
- Click the Output Type drop-down arrow and choose an output type for the OIS features.
- Polygon Shapefile—The OIS features are generated in a new or existing polygon shapefile. If an existing shapefile is selected, the features are appended to it. All the OIS features are written to a single shapefile.
- Multipatch Shapefile—The OIS features are generated in a new or existing multipatch shapefile. If an existing shapefile is selected, the features are appended to it. All the features are written to a single shapefile.
- TIN—The OIS features are generated in a new TIN. One TIN is created for each surface. If there are multiple runway features, one directory is created for each one.
- Polygon Features—The OIS features are appended to an existing polygon feature class. All the features for the runways are appended to the same feature class.
- Multipatch Features—The OIS features are generated in a new or existing multipatch feature class. All the features for the runways are appended to the same feature class.
- Choose the output path for the OIS features.
If the feature class or shapefile is loaded in the map
Click the Output Path drop-down arrow and choose the feature class or shapefile that will store the OIS features.
If the feature class or shapefile is not loaded in the map, or the output type is a TIN
Click the ellipsis button (...) next to the Output Path text box and browse to the feature class or workspace in which the shapefile or TIN will be created.
- Optionally type a value that represents the length of the area at the high end of the runway in the Length of High Runway Clearway text box.
This is the area over which an aircraft can make a portion of its initial climb.
- Optionally type a value that represents the length of the low end of the runway in the Length of Low Runway Clearway text box.
This is the area over which an aircraft can make a portion of its initial climb.
- Type a value that represents the highest point on the runway in the Airport Reference Elevation text box.
The tool will automatically populate this value from a z-value in your aviation database if you are using the AIS or Airports data model. Airport elevation is stored in the z-value of the ADHP point feature class in the AIS data model. In the Airports data model, elevation is stored in the z-value of the Airport Control Point feature class for records with the Point_Type field populated with AIRPORT_ELEVATION.
If the value is 0, the Obstruction Identification Surfaces tool automatically uses the highest z-value on the runway centerline endpoint to generate the OIS.
- Click the High Runway End Classification drop-down arrow and choose a classification type for the runway.
The high runway end classification describes the high end of the runway, which generally points west to north (190 to 360 degrees). These are runway ends with ranges 19 through 36.
Once the high runway end classification is selected, the Low Runway End Classification parameter automatically populates with the same classification, unless it is construction or alteration or a military airport.
- Construction Or Alteration On An Airport With Longest Runway More Than 3200 Feet—Construction on or alteration to a runway longer than 3,200 feet with an imaginary surface that extends outward 20,000 feet and has a slope that does not exceed 100 to 1.
- Construction Or Alteration On An Airport With Longest Runway Less Than 3200 Feet—Construction on or alteration to a runway less than 3,200 feet long with an imaginary surface that extends outward 10,000 feet and has a slope that does not exceed 50 to 1.
- Construction Or Alteration On A Heliport—Construction on or alteration to a heliport landing and takeoff area with an imaginary surface that extends outward 5,000 feet and has a slope that does not exceed 25 to 1.
- Military Airport—Military airport runways are operated by one of the armed forces of the United States. Primary surfaces are the same length as the runway. The primary surface width is 2,000 feet. The clear zone surface length is 1,000 feet, and the width is the same as the primary surface. The approach clearance surface starts 200 feet beyond each end of the primary surface and extends for 50,000 feet. The approach surface width matches the primary surface width at the runway end but flares to a width of 16,000 feet at an elevation of 50,000 feet. The approach clearance surface slope is 50 to 1 to an elevation of 500 feet above airport elevation. It then rises horizontally to 50,000 feet. Transitional surface slope is 7 to 1 outward and upward at right angles to the runway centerline. See section 77.28 in the FAR Part 77 specification for more information.
- Nonprecision Instrument Runway Greater Than (>) 3/4 Mile Visibility—A runway with a nonprecision instrument approach procedure that allows for landing in visibility conditions greater than three-fourths of a mile.
- Nonprecision Instrument Runway Less Than (<) 3/4 Mile Visibility—A runway with a nonprecision instrument approach procedure that allows for landing in visibility conditions less than three-fourths of a mile.
- Precision Instrument Runway—A runway that uses an Instrument Landing System (ILS) or Precision Approach Radar (PAR) for approach procedures.
- Utility Runway Visual Approach—A runway built for propeller aircraft not exceeding 12,500 pounds gross weight. Aircraft using the runway employ visual approach procedures.
- Utility Runway Non Precision Instrument Approach— A runway built for propeller aircraft not exceeding 12,500 pounds gross weight. The runway has an instrument approach procedure that uses air navigation facilities with horizontal guidance. It can also have area type navigation equipment with approved nonprecision instrument approach procedures.
- Visual Runway Visual Approach— A runway that supports only visual approach procedures.
- Optionally, click the Low Runway End Classification drop-down arrow and choose a classification type for the runway.
The low runway end classification describes the low end of the runway, which generally points east to south (1 to 180 degrees). These are runway ends with ranges 01 through 18.
- Nonprecision Instrument Runway Greater Than (>) 3/4 Mile Visibility—A runway with a nonprecision instrument approach procedure that allows for landing in visibility conditions greater than three-fourths of a mile.
- Nonprecision Instrument Runway Less Than (<) 3/4 Mile Visibility—A runway with a nonprecision instrument approach procedure that allows for landing in visibility conditions less than three-fourths of a mile.
- Precision Instrument Runway—A runway that uses an ILS or PAR for approach procedures.
- Utility Runway Visual Approach—A runway built for propeller aircraft not exceeding 12,500 pounds gross weight. Aircraft using the runway employ visual approach procedures.
- Utility Runway Non Precision Instrument Approach—A runway built for propeller aircraft not exceeding 12,500 pounds gross weight. The runway has an instrument approach procedure that uses air navigation facilities with horizontal guidance. It can also have area type navigation equipment with approved nonprecision instrument approach procedures.
- Visual Runway Visual Approach—A runway that supports only visual approach procedures.
- If you do not want to include merged horizontal and conical surfaces in the OIS, uncheck the Include Merged Surfaces check box.
The Include Merged Surfaces check box is checked by default. This means that the horizontal and conical surfaces will be merged in the output.
- If necessary, click the Advanced tab.
The properties are grouped based on the surface generated. There are default values for each parameter, but they can be modified.
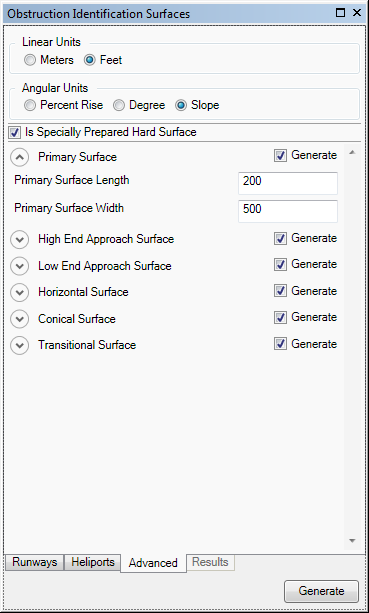
- Optionally, uncheck the Is Specially Prepared Hard Surface check box.
This check box indicates whether the primary surface extends 200 feet beyond each end of the runway. By default, it is checked.
- Optionally change the unit of measure for surface lengths and widths in the Linear Units area.
- Meters—Runway length is in meters.
- Feet—Runway length is in feet. This is the default.
- Optionally change the angular units for slope surfaces in the Angular Units area.
The default value varies based on the specification.
- Percent Rise—Slope angle is expressed as a grade (inclination) in percent.
- Degree—Slope angle is expressed in degrees.
- Slope—Slope angle is expressed as X units of run per 1 vertical unit.
- Optionally, click the arrow next to Conical Surface to expand the group and change the values as necessary.
- Conical Surface Slope—The slope of the conical surface. This is a ratio, so the value specified represents x:1.
- Conical Surface Offset—The length of the conical surface.
- Optionally, click the arrow next to Primary Surface to expand the group and change the values as necessary.
- Primary Surface Length—The primary surface length, excluding the length of the runway.
- Primary Surface Width—The primary surface width, excluding the length of the runway.
- Optionally, click the arrow next to Clear Zone Surface to expand the group and change the Clear Zone Surface Length value as necessary.
This is the length of a surface located at each end of the primary surface.
- Optionally, click the arrow next to High End Approach Surface to expand the group and change the values as necessary.
- High Runway End Approach Extended Width—The width of the approach surface outer edge of the high end of the runway.
- High Runway End First Section Length—The length of the first section of the approach surface of the high end of the runway.
- High Runway End First Section Slope—The slope of the first section of the approach surface of the high end of the runway.
- High Runway End Second Section Length—The length of the second section of the approach surface of the high end of the runway.
- High Runway End Second Section Slope—The slope of the second section of the approach surface of the high end of the runway.
- Optionally, click the arrow next to Low End Approach Surface to expand the group and change the values as necessary.
- Low Runway End Approach Extended Width—The width of the approach surface outer edge of the low end of the runway.
- Low Runway End First Section Length—The length of the first section of the approach surface of the low end of the runway.
- Low Runway End First Section Slope—The slope of the second section of the approach surface of the low end of the runway.
- Low Runway End Second Section Length—The length of the second section of the approach surface of the low end of the runway.
- Low Runway End Second Section Slope—The slope of the second section of the approach surface of the low end of the runway.
- Optionally, click the arrow next to Horizontal Surface to expand the group and change the values as necessary.
- Horizontal Surface Height—The height of the horizontal surface above the established airport elevation.
- Horizontal Surface Radius—The length of the radius of an arc swung from the center of each end of the primary surface of each runway.
- Optionally, click the arrow next to Outer Horizontal Surface to expand the group and change the value for Outer Horizontal Surface Length as necessary.
This is a plane that extends outward from the conical surface horizontally for 30,000 feet. The plane is located 500 feet above airport elevation.
- Optionally, click the arrow next to Transitional Surface to expand the group and change the value for Transitional Surface Slope as necessary.
This is the slope of the transitional surface. This is a ratio, so the value specified represents x:1.
- If you do not want to generate a particular surface, uncheck the Generate check box for that surface.
- Click Generate at the bottom of the Obstruction Identification Surfaces window.
The Results tab appears on the Obstruction Identification Surfaces window and displays the progress of the OIS creation process. Once the process is finished, the OIS appears in the map.
Creating an ICAO Annex 14 obstruction identification surface
Surfaces for the ICAO Annex 14 specification are composed of different surfaces, depending on the runway classification. The table below describes the surfaces and their corresponding classifications.
| Surface | Description | Non instrument | Non precision approach | Precision approach |
|---|---|---|---|---|
Primary | An imaginary surface longitudinally centered on a runway. |  |  |  |
Approach | A surface that extends outward and upward from each end of the primary surface. |  |  |  |
Horizontal | A surface located above the established airport elevation. The surface is defined by lines tangent to arcs at the distance defined in Horizontal Surface Radius from the center of each end of the primary surface. |  |  |  |
Conical | A conical surface that extends outward and upward from the periphery of the horizontal surface. |  |  |  |
Transitional | A surface that extends upward and outward from the primary and approach surfaces. This surface ends where it intersects the horizontal surface. |  |  |  |
Balked landing | An inclined plane located after the threshold and between the inner transitional surface. |  | ||
Inner approach | A rectangular surface that lies at the end of the approach surface and precedes the threshold. |  | ||
Inner transitional | An inner surface between the runway and the transitional surface. |  | ||
Take off climb | An inclined plane or other surface that lies beyond the end of the runway. |  |  |  |
For this OIS, you must provide values for the following:
- input runway
- output type
- output path
- length of the high runway end clearway
- length of the low runway end clearway
- airport reference elevation
- runway classification
- runway direction
- Start ArcMap.
- Optionally open the map that contains the runways for which you want to generate OIS features.
- On the main menu, click Customize > Toolbars > Aviation Airports.
- Click the Obstruction Identification Surfaces button
 on the Aviation Airports toolbar to open the Obstruction Identification Surfaces window.
 - Click the Specification drop-down arrow and choose ICAO Annex 14.
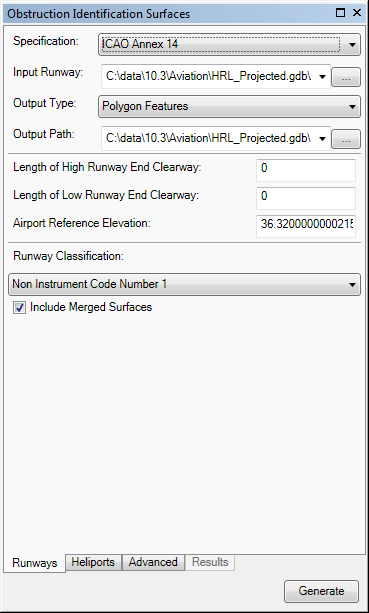
- Define the input features.
The input features can be in a feature class or shapefile that contains points, lines, or polygons. The feature class or shapefile must be z enabled and have a vertical (z) coordinate system. The RWYDESG field name (alias = Runway Designator) must be populated in this format: 09/27
If the runway features have been loaded in the map
Click the Input Runway drop-down arrow and choose the feature class that contains the runway features for which to create OIS features.
If the runway features are not in the map
Browse to the layer that contains the runway features.
- Click the Output Type drop-down arrow and choose an output type for the OIS features.
- Polygon Shapefile—The OIS features are generated in a new or existing polygon shapefile. If an existing shapefile is selected, the features are appended to it. All the OIS features are written to a single shapefile.
- Multipatch Shapefile—The OIS features are generated in a new or existing multipatch shapefile. If an existing shapefile is selected, the features are appended to it. All the features are written to a single shapefile.
- TIN—The OIS features are generated in a new TIN. One TIN is created for each surface. If there are multiple runway features, one directory is created for each one.
- Polygon Features—The OIS features are appended to an existing polygon feature class. All the features for the runways are appended to the same feature class.
- Multipatch Features—The OIS features are generated in a new or existing multipatch feature class. All the features for the runways are appended to the same feature class.
- Choose the output path for the OIS features.
If the feature class or shapefile is loaded in the map
Click the Output Path drop-down arrow and choose the feature class or shapefile that will store the OIS features.
If the feature class or shapefile is not loaded in the map, or the output type is a TIN
Click the ellipsis button (...) next to the Output Path text box and browse to the feature class or workspace in which the shapefile or TIN will be created.
- Type a value that represents the length of the area at the high end of the runway in the Length of High Runway Clearway text box.
This is the area over which an aircraft can make a portion of its initial climb.
- Type a value that represents the length of the low end of the runway in the Length of Low Runway Clearway text box.
This is the area over which an aircraft can make a portion of its initial climb.
- Type a value that represents the highest point on the runway in the Airport Reference Elevation text box.
The tool automatically populates this value from a z-value in your aeronautical database if you are using the AIS or Airports data model. Airport elevation is stored in the z-value of the ADHP point feature class in the AIS data model. In the Airports data model, elevation is stored in the z-value of the Airport Control Point feature class for records with the Point_Type field populated with AIRPORT_ELEVATION.
- Click the Runway Classification drop-down arrow and choose a classification for the runway.
- Non Instrument Code Number 1—A runway intended for the operation of aircraft using visual approach procedures. Runway strip length is 30 meters.
- Non Instrument Code Number 2—A runway with a 60-meter strip length and 40-meter strip width intended for the operation of aircraft using visual approach procedures.
- Non Instrument Code Number 3—A runway with a 60-meter strip length and 75-meter strip width intended for the operation of aircraft using visual approach procedures.
- Non Instrument Code Number 4—A runway with a 60-meter strip length and 75-meter strip width intended for the operation of aircraft using visual approach procedures.
- Non Precision Approach Code Number 1—An instrument runway served by visual aids and a nonvisual aid providing at least directional guidance adequate for a straight-in approach. This runway type has a 60-meter strip length and a 75-meter strip width on either side of the runway centerline.
- Non Precision Approach Code Number 2—An instrument runway served by visual aids and a nonvisual aid providing at least directional guidance adequate for a straight-in approach. This runway type has a 60-meter strip length and a 75-meter strip width on either side of the runway centerline.
- Non Precision Approach Code Number 3—An instrument runway served by visual aids and a nonvisual aid providing at least directional guidance adequate for a straight-in approach. This runway type has a 60-meter strip length and a 150-meter strip width on either side of the runway centerline.
- Non Precision Approach Code Number 4—An instrument runway served by visual aids and a nonvisual aid providing at least directional guidance adequate for a straight-in approach. This runway type has a 60-meter strip length and a 150-meter strip width on either side of the runway centerline.
- Precision Approach Category I Code Number 1—An instrument runway served by ILS or a microwave landing system (MLS) and visual aids intended for operations with a decision height not lower than 60 meters (200 feet), and either a visibility not less than 800 meters or a runway visual range not less than 550 meters. This runway type has a 60-meter strip length and a 75-meter strip width on either side of the runway centerline.
- Precision Approach Category I Code Number 2—An instrument runway served by ILS or MLS and visual aids intended for operations with a decision height not lower than 60 meters (200 feet), and either a visibility not less than 800 meters or a runway visual range not less than 550 meters. This runway type has a 60-meter strip length and a 75-meter strip width on either side of the runway centerline.
- Precision Approach Category I Code Number 3 4—An instrument runway served by ILS or MLS and visual aids intended for operations with a decision height not lower than 60 meters (200 feet), and either a visibility not less than 800 meters or a runway visual range not less than 550 meters. This runway type has a 60-meter strip length and a 150-meter strip width on either side of the runway centerline.
- Precision Approach Category II III Code Number 3 4—An instrument runway served by ILS or MLS and visual aids intended for operations with a decision height lower than 60 meters (200 feet) but not lower than 30 meters (100 feet), and a runway visual range not less than 350 meters. This runway type has a 60-meter strip length and a 150-meter strip width on either side of the runway centerline.
- Optionally, click the Runway Direction drop-down arrow and change the direction of the runway.
The high end of the runway ranges from 181 to 360 degrees, and the low end ranges from 1 to 180 degrees.
- HIGH_END_TO_LOW_END—The runway features extend from high end to low end.
- LOW_END_TO_HIGH_END—The runway features extend from low end to high end.
- If you do not want to include merged horizontal and conical surfaces in the OIS, uncheck the Include Merged Surfaces check box.
The Include Merged Surfaces check box is checked by default. This means that the horizontal and conical surfaces will be merged in the output.
- If necessary, click the Advanced tab and modify any of the properties.
The properties are grouped based on the surface generated. There are default values for each parameter, but they can be modified.
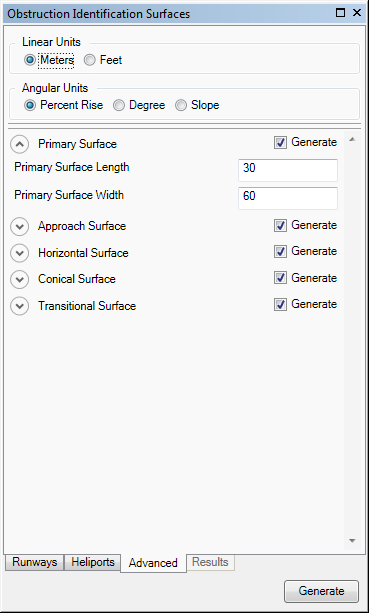
- Optionally, change the unit of measure for surface lengths and widths in the Linear Units area.
- Meters—Runway length is in meters. This is the default.
- Feet—Runway length is in feet.
- Optionally, change the angular units for slope surfaces in the Angular Units area.
- Percent Rise—Slope angle is expressed as a grade (inclination) in percent. This is the default.
- Degree—Slope angle is expressed in degrees.
- Slope—Slope angle is expressed as X units of run per 1 vertical unit.
- Optionally, click the arrow next to Primary Surface to expand the group and change the values as necessary.
- Primary Surface Length—The primary surface length, excluding the length of the runway.
- Primary Surface Width—The primary surface width, excluding the length of the runway.
- Optionally, click the arrow next to Approach Surface to expand the group and change the values as necessary.
- Approach Surface Length of Inner Edge—The length of the inner edge of the approach surface.
- Approach Surface Divergence—The rate of divergence of two sides that originate from the approach surface's inner edge.
- Approach First Section Length—The length of the first section of the approach surface.
- Approach First Section Slope—The slope of the first section of the approach surface.
- Approach Second Section Length—The length of the second section of the approach surface.
- Approach Second Section Slope—The slope of the second section of the approach surface.
- Approach Surface Horizontal Section Length—The horizontal section length of the approach surface.
- Optionally, click the arrow next to Horizontal Surface to expand the group and change the values as necessary.
- Horizontal Surface Height—The horizontal surface height measured above a preestablished elevation datum. The airport reference elevation is used for the height as well.
- Horizontal Surface Radius—The length of the radius of an arc swung from the center of each end of the primary surface of each runway.
- Optionally, click the arrow next to Conical Surface to expand the group and change the values as necessary.
- Conical Surface Slope—The slope value of the conical surface.
- Conical Surface Height—An elevation value measured above the horizontal surface.
- Optionally, click the arrow next to Transitional Surface to expand the group and change the value for Transitional Surface Slope as necessary.
This is a slope value calculated in a vertical plane set at right angles to the runway's centerline.
- Optionally, click the arrow next to Balked Landing Surface to expand the group and change the values as necessary.
- Balked Landing Length—The length of the balked landing surface.
- Balked Landing Divergence—The rate at which the balked landing surface sides diverge from the centerline of the runway.
- Balked Landing Slope—The balked landing surface slope is calculated in a vertical plane that contains the runway's centerline.
- Optionally, click the arrow next to Inner Approach Surface to expand the group and change the values as necessary.
- Inner Approach Width—The width of the inner approach surface rectangle.
- Inner Approach Length—The length of the sides of the inner approach surface.
- Inner Approach Slope—A slope computed from a vertical plane containing the runway's centerline.
- Optionally, click the arrow next to Inner Transitional Surface to expand the group and change the Inner Transitional Slope value as necessary.
This is a slope value calculated in a vertical plane set at right angles to the runway's centerline.
- If you do not want to generate a particular surface, uncheck the Generate check box for that surface.
- Click Generate at the bottom of the Obstruction Identification Surfaces window.
The Results tab appears on the Obstruction Identification Surfaces window and displays the progress of the OIS creation process. Once the process is finished, the OIS appears in the map.
Creating an ICAO Annex 15 obstruction identification surface
OIS for the ICAO Annex 15 specification has three surfaces, as described:
- Primary—An imaginary surface longitudinally centered on a runway.
- Approach—A surface that extends outward and upward from each end of the primary surface.
- Conical—A conical surface that extends outward and upward from the edges of the primary surface.
For this OIS, you must provide values for the following:
- input runway
- output type
- output path
- length of the high runway end clearway
- length of the low runway end clearway
- Start ArcMap.
- Optionally open the map that contains the runways for which you want to generate OIS features.
- On the main menu, click Customize > Toolbars > Aviation Airports.
- Click the Obstruction Identification Surfaces button
 on the Aviation Airports toolbar to open the Obstruction Identification Surfaces window.
 - Click the Specification drop-down arrow and choose ICAO Annex 15.
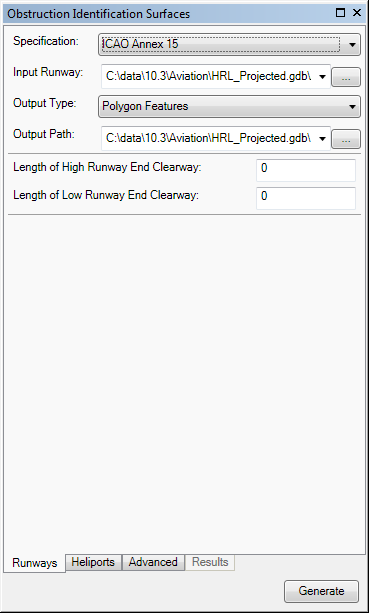
- Define the input features.
The input features can be in a feature class or shapefile that contains points, lines, or polygons. The feature class or shapefile must be z enabled and have a vertical (z) coordinate system. The RWYDESG field name (alias = Runway Designator) must be populated in this format: 09/27
If the runway features have been loaded in the map
Click the Input Runway drop-down arrow and choose the feature class that contains the runway features for which to create OIS features.
If the runway features are not in the map
Browse to the layer that contains the runway features.
- Click the Output Type drop-down arrow and choose an output type for the OIS features.
- Polygon Shapefile—The OIS features are generated in a new or existing polygon shapefile. If an existing shapefile is selected, the features are appended to it. All the OIS features are written to a single shapefile.
- Multipatch Shapefile—The OIS features are generated in a new or existing multipatch shapefile. If an existing shapefile is selected, the features are appended to it. All the features are written to a single shapefile.
- TIN—The OIS features are generated in a new TIN. One TIN is created for each surface. If there are multiple runway features, one directory is created for each one.
- Polygon Features—The OIS features are appended to an existing polygon feature class. All the features for the runways are appended to the same feature class.
- Multipatch Features—The OIS features are generated in a new or existing multipatch feature class. All the features for the runways are appended to the same feature class.
- Choose the output path for the OIS features.
If the feature class or shapefile is loaded in the map
Click the Output Path drop-down arrow and choose the feature class or shapefile that will store the OIS features.
If the feature class or shapefile is not loaded in the map, or the output type is a TIN
Click the ellipsis button (...) next to the Output Path text box and browse to the feature class or workspace in which the shapefile or TIN will be created.
- Type a value that represents the length of the area at the high end of the runway in the Length of High Runway Clearway text box.
This is the area over which an aircraft can make a portion of its initial climb.
- Type a value that represents the length of the low end of the runway in the Length of Low Runway Clearway text box.
This is the area over which an aircraft can make a portion of its initial climb.
- If necessary, click the Advanced tab and modify any of the properties.
The properties are grouped based on the surface generated. There are default values for each parameter, but they can be modified.
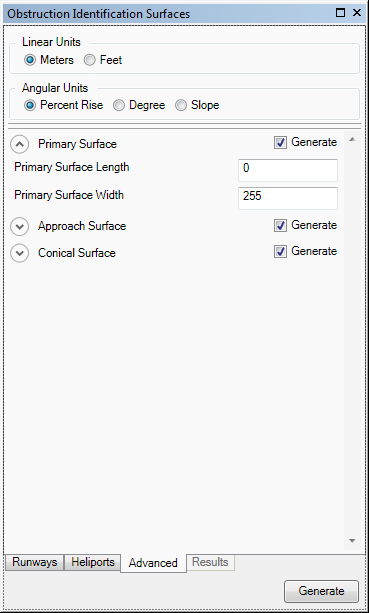
- Optionally, change the unit of measure for surface lengths, widths, and offsets in the Linear Units area.
- Meters—Runway length is in meters. This is the default.
- Feet—Runway length is in feet.
- Optionally, change the angular units for slope values in the Angular Units area.
- Percent Rise—Slope angle is expressed as a grade (inclination) in percent. This is the default.
- Degree—Slope angle is expressed in degrees.
- Slope—Slope angle is expressed as X units of run per 1 vertical unit.
- Optionally, click the arrow next to Primary Surface to expand the group and change the values as necessary.
- Primary Surface Length—Primary surface length, excluding the length of the runway.
- Primary Surface Width—Primary surface width, excluding the width of the runway.
- Optionally, click the arrow next to Approach Surface to expand the group and change the values as necessary.
- Approach Surface Divergence—The rate of divergence of two sides that originate from the approach surface's inner edge.
- Approach First Section Length—The length of the first section of the approach surface.
- Approach First Section Slope—The slope of the first section of the approach surface.
- Optionally click the arrow next to Conical Surface to expand the group and change the values as necessary.
- Conical Surface Slope—The slope value of the conical surface.
- Conical Surface Offset—The distance from the edge of the primary surface to the outer edge of the conical surface.
- If you do not want to generate a particular surface, uncheck the Generate check box for that surface.
- Click Generate at the bottom of the Obstruction Identification Surfaces window.
The Results tab appears on the Obstruction Identification Surfaces window and displays the progress of the OIS creation process. Once the process is finished, the OIS appears in the map.