Before you can create a Chart or S-57 product, you need to define the area of interest (AOI), which is the spatial boundary for your product extent. For S-57 products, the AOI is the M_COVR object's coverage and no coverage areas. For Chart products, it is the extent of the panel or plan.
To create a product using the New Nautical Product wizard, you need to create AOI features within the AOI feature class that is stored in your product library workspace. Each product type that ArcGIS for Maritime: Charting supports (ENC, Chart, and so on) has its own AOI feature class. You need to directly edit this feature class by building AOI features for all the products you plan to support. When building the AOI features, you need to populate some attributes that are used within the New Nautical Product wizard.
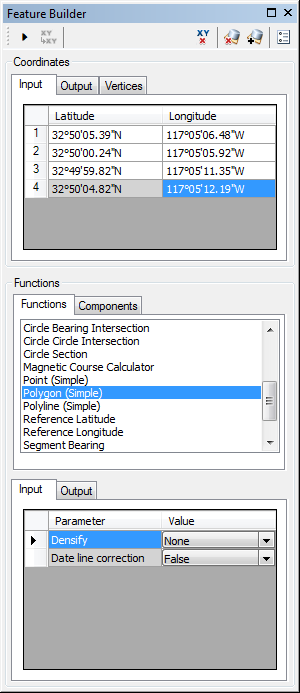
You can use a variety of tools in ArcGIS for Desktop and Esri Production Mapping when building the AOI features. If you need to input DMS coordinate values, it is strongly recommended that you use Feature Builder to enter the exact coordinates to build the AOI polygons.
Creating the AOI polygon
The following steps guide you through creating an AOI using the Polygon (Simple) function in the Feature Builder window.
- Start ArcMap.
- Click the Add Data button
 .
.
The Add Data dialog box opens.
-
Navigate to your product library workspace and select the PL_<product type>_AOI feature class.
Each product type supported by Maritime Charting has its own AOI feature class precreated.
- Click Add.
- On the main menu, click Customize > Toolbars > Production Editing.
- Click the Production Start Editing button
 on the Production Editing toolbar.
- On the menu bar, click Customize > Toolbars > Production Feature Builder.
- Click the Feature Builder button
 on the Production Feature Builder toolbar.
The Feature Builder window appears.
- Choose Polygon (Simple) in the list on the Functions tab.

- Define a coordinate for the start point of the polyline by doing one of the following:
- Click the Pinprick tool
 on the Production Feature Builder toolbar and click on the map
 - Type the coordinates in the cells on the Input tab in the Coordinates area.
- Click the Pinprick tool
- Click the row header for the second row in the coordinates list.
- Repeat steps 10 and 11 for the remaining coordinates you want to include in the polygon.
- Press the W key and click the header row for the last coordinate you want to define.
- Repeat step 10 to define the coordinate for the endpoint of the polygon.
- Click the Execute button
 .
.
Your new AOI polygon appears on the map and is selected by default.
Updating the attributes
The New Nautical Product wizard directly accesses the AOI feature class for your product type and allows you to select the applicable features. For S-57 products, you can select multiple AOI features, since S-57 cells can have more than one coverage and no coverage areas. However, for Chart products, you only select one AOI per panel or plan. Using the selected AOI, all data falling within the extent of the AOI coverage area for S-57 or panel for charts is extracted to your production database based on the value you define in the Use attribute. If the value is set to True, then the data is extracted; if it is False, then no data is extracted, since this feature represents a no coverage area.
- Click the Update Attributes window.
- Scroll and locate the UseData attribute.
- Set the UseData attribute based on the nautical product type for which you are creating the AOI polygon.
- S-57 M_COVR coverage—True
- S-57 M_COVR no coverage—False
- Chart AOI—True
- Scroll and locate the Alias attribute.
- Define the Alias value using the cell or chart name.
- Click Apply on the Update Attributes window to set your attribute values.
- Click the Save Edits button
 .
.
You may need to create more AOI polygons and update their attributes for any additional coverage and/or no coverage areas.
You can now use the New Nautical Product wizard to create your product.