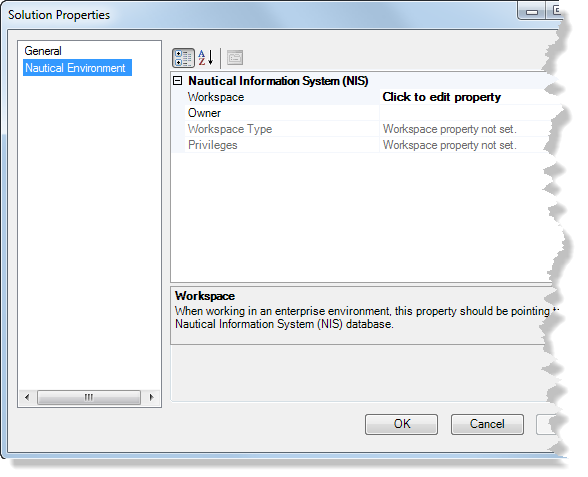
Defining the NIS production workspace
When creating products using the product library, the production workspace should be pointing to your NIS database so the different processes in the product library can access the central database (NIS) to extract data and create the replica connections from the NIS database to the production database.
- Start ArcMap.
- If necessary, open the Product Library window by clicking Customize > Production > Product Library on the main menu.
A tree view of the product library appears.

- If you haven't already, set the product library.
- Browse to the product library level for which you want to set the NIS database, right-click it, then click Properties.
You can set the NIS database at the solution, class, series, product, or instance level.
The properties dialog box for the level you selected appears.

- Click the Nautical Environment pane on the left.
- In the Nautical Information System (NIS) section, click the Click to edit property cell next to Workspace and click the ellipsis button (...) that appears.
- Browse to the location of your NIS database.
- Click Open.
The NIS workspace location is added to the property.
- Click OK.
Associating the NIS data model version
The NIS data model version in the product library represents the schema of the database and the product class version that will contain the configuration files. To ensure that the correct schema and configuration files are used when editing a production database, you need to associate the NIS data model version in the product library to the NIS database.
- If necessary, add data from the NIS database if you don’t already have it loaded.
- If necessary, expand Production Data.
- Right-click the NIS database and click Choose Data Model Versions.
The Choose Data Model Versions dialog box appears.
- Check the check box next to the NIS data model you want to associate with this NIS database.
- Click OK.
- If necessary, expand the NIS database and Data Models.
- Right-click the data model version and click Set As Active.
The data model version font changes to bold to indicate that it is the current data model version for the production database.
If there is only one data model version, this will be set as the active one; if there is more than one data model version, follow the rest of the steps to set the current one.