ArcGIS Desktop

  • ArcGIS Pro
  • ArcMap

  • My Profile
  • Help
  • Sign Out
ArcGIS Desktop

ArcGIS Online

The mapping platform for your organization

ArcGIS Desktop

A complete professional GIS

ArcGIS Enterprise

GIS in your enterprise

ArcGIS for Developers

Tools to build location-aware apps

ArcGIS Solutions

Free template maps and apps for your industry

ArcGIS Marketplace

Get apps and data for your organization

  • Documentation
  • Support
Esri
  • Sign In
user
  • My Profile
  • Sign Out

Help

  • Home
  • Get Started
  • Map
  • Analyze
  • Manage Data
  • Tools
  • More...

Creating a turn feature that represents a U-turn

Available with Network Analyst license.

To create a U-turn feature, you need to follow many of the same steps discussed in Creating a turn feature to prepare the editing environment. Then you create the U-turn feature by clicking at three locations along the line feature representing the edge where the U-turn occurs.

  1. Click somewhere along the length of the line feature.
  2. Click at the end of the line feature where the U-turn occurs.
  3. Double-click along the length of the same line feature to finish the sketch.
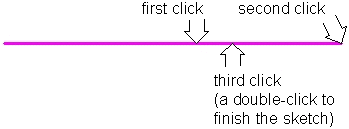
    Diagram illustrating where to click to create a U-turn

    The turn feature is created if there are no errors.

    The fields on the turn feature describing the line features you snapped to are filled in automatically.

Related topics

  • Creating a turn feature class in ArcMap
  • Creating a turn feature class using a geoprocessing tool
  • Creating a turn feature
  • About editing turn features
  • U-turn policies

ArcGIS Desktop

  • Home
  • Documentation
  • Support

ArcGIS Platform

  • ArcGIS Online
  • ArcGIS Desktop
  • ArcGIS Enterprise
  • ArcGIS for Developers
  • ArcGIS Solutions
  • ArcGIS Marketplace

About Esri

  • About Us
  • Careers
  • Esri Blog
  • User Conference
  • Developer Summit
Esri
Tell us what you think.
Copyright © 2019 Esri. | Privacy | Legal