ArcGIS for Desktop

  • Documentation
  • Pricing
  • Support

  • My Profile
  • Help
  • Sign Out
ArcGIS for Desktop

ArcGIS Online

The mapping platform for your organization

ArcGIS for Desktop

A complete professional GIS

ArcGIS for Server

GIS in your enterprise

ArcGIS for Developers

Tools to build location-aware apps

ArcGIS Solutions

Free template maps and apps for your industry

ArcGIS Marketplace

Get apps and data for your organization

  • Documentation
  • Pricing
  • Support
Esri
  • Sign In
user
  • My Profile
  • Sign Out

Help

  • Home
  • Get Started
  • Map
  • Analyze
  • Manage Data
  • Tools
  • More...

Rotating annotation using the rotate handles

Annotation features selected with the Edit Annotation tool have special handles that you can drag to rotate the annotation.

If you want to rotate about a pivot point other than a rotate handle, use rotate mode. Rotate handles are not shown for curved annotation, so you should use rotate mode to rotate those features.

  1. Click the Edit Annotation tool Edit Annotation on the Editor toolbar and select the annotation.
  2. Move the pointer over a rotate handle. The cursor changes to the rotate symbol while it is positioned over the rotate handle.
  3. Click a rotate handle and drag the annotation to where you want it placed. The other rotate handle is the pivot point.
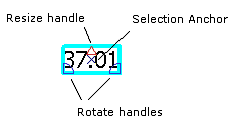
  4. Rotating annotation

    Tip:
    To turn off the rotate and resize handles, click Editor, click Options, then click the Annotation tab and uncheck the Show resize and rotate handles check box.

Related Topics

  • Rotating annotation in rotate mode
Feedback on this topic?

ArcGIS for Desktop

  • Home
  • Documentation
  • Pricing
  • Support

ArcGIS Platform

  • ArcGIS Online
  • ArcGIS for Desktop
  • ArcGIS for Server
  • ArcGIS for Developers
  • ArcGIS Solutions
  • ArcGIS Marketplace

About Esri

  • About Us
  • Careers
  • Insiders Blog
  • User Conference
  • Developer Summit
Esri
© Copyright 2016 Environmental Systems Research Institute, Inc. | Privacy | Legal