Available with Standard or Advanced license.
In the parcel fabric, parcels can be divided by area to create new parcels. Using the Parcel Division tool, you can divide parcels using the following area-based division methods:
- In equal widths
- By proportional area
- Into equal areas
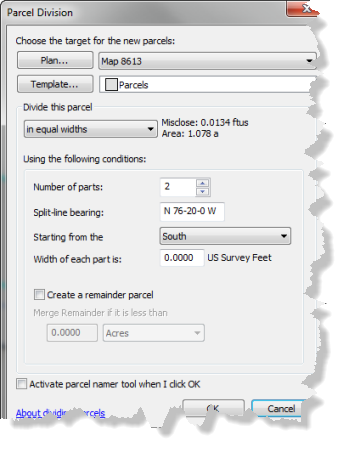
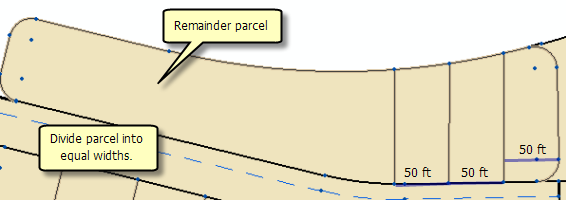
When using the methods in equal widths and into equal areas, you have the option to create a remainder parcel if the areas do not completely divide the parent parcel. The parent parcel is flagged as historic when it is divided using the Parcel Division tool.
In equal widths
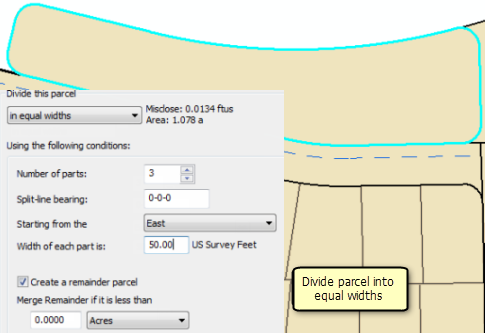
When dividing a parcel into equal widths, you need to specify the number of parcels to create, a split-line bearing, and a width value. Split lines are equal widths apart, creating parcel areas of equal width. By default, the bearing of the split line is taken from the parcel line closest to where you initially right-clicked the parcel. Depending on the bearing you enter for the split lines, the parcel will either be split horizontally (west–east) or vertically (north–south).
By proportional area
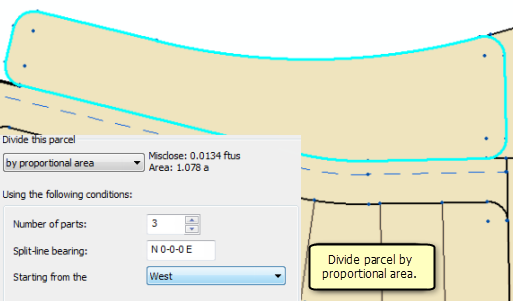
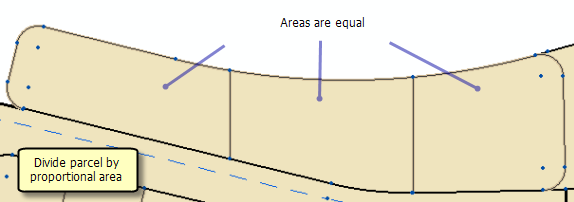
When dividing a parcel using proportional area, the entire parcel is divided and proportioned into equal areas based on the number of parts you specify and the split-line bearing. For example, if you specify three parts, the parcel is divided and proportioned into three equal areas. By default, the bearing of the split line is taken from the parcel line closest to where you initially right-clicked the parcel. Depending on the bearing you enter for the split lines, the parcel will either be split horizontally (west–east) or vertically (north–south).
Into equal areas
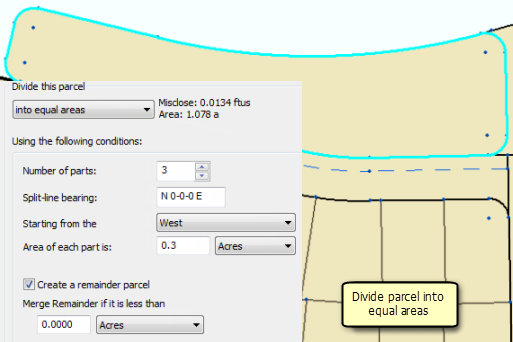
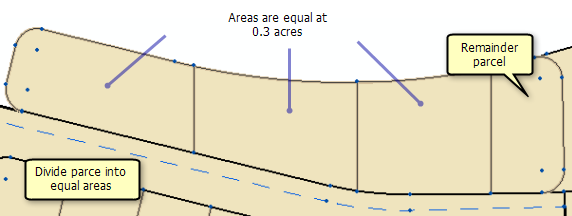
When dividing a parcel into equal areas, you need to specify the number of parcels to create, a split-line bearing, and an area that will be used for each parcel. Divided parcels are created with the same area. Unlike proportional area, there can be a remainder parcel when dividing a parent parcel into parcels of equal areas. This is because the number of parcels created with the same area may not equal the entire area of the parent parcel. By default, the bearing of the split line is taken from the parcel line closest to where you initially right-clicked the parcel. Depending on the bearing you enter for the split lines, the parcel will either be split horizontally (west–east) or vertically (north–south).
Split-line bearings
To divide a parcel by area, follow these steps:
-
Open the
Editing Options dialog box (Editor > Options) and make sure the correct editing units are set under Angular Units on the Units tab.
The units of the split-line bearing will be in the units currently set for the editor.
- In an edit session in ArcMap, click the Select Parcel Features tool
 on the Parcel Editor menu, right-click the parcel you want to divide, and click Parcel Division.
- In the Parcel Division dialog box, click the Plan button to select a plan or record of survey from the Plan Directory dialog box for the newly subdivided parcels.
- If you are using templates, click the Template button to set a feature template for the new parcels.
- Click the drop-down list under Divide this parcel to select how to divide the parcel:
- In equal widths
- Specify the number of parts or parcels to create in the Number of parts text box. Parcels are created with areas of equal width.
- Type a bearing for the split lines that will divide the parcel in the Split-line bearing text box. Depending on the bearing you type, the Starting from the drop-drop down list will update to display North/South or East/West options for selection.
- Click the drop-down box next to Starting from the to select the direction from which to start creating parcels.
- Type a width for the parts or parcels in the Width of each part is text box.
- If you want to create a remainder parcel, check the Create a remainder parcel check box. To merge the remainder parcel with the adjacent parcel, type a maximum area value for the remainder parcel under Merge Remainder if it is less than. Remainder parcels that have an area greater than the value you specified will not be merged.
- Check the Activate parcel namer tool when I click OK check box to activate the parcel namer tool after the new parcels have been created. The mouse pointer will change to the crosshairs tool, which can be used to drag a line over a sequence of parcels to be named.
- Click OK on the Parcel Division dialog box to subdivide the parcel using the method you have chosen.
- By proportional area
- Specify the number of parts or parcels to create in the Number of parts text box. Parcels are proportioned into equal areas to subdivide the entire parcel. There is no remainder parcel.
- Type a bearing for the split lines that will divide the parcel in the Split-line bearing text box. Depending on the bearing you type, the Starting from the drop-drop down list will update to display North/South or East/West options for selection.
- Click the drop-down box next to Starting from the to select the direction from which to start creating parcels.
- Check the Activate parcel namer tool when I click OK check box to activate the parcel namer tool after the new parcels have been created. The mouse pointer will change to the crosshairs tool, which can be used to drag a line over a sequence of parcels to be named.
- Click OK on the Parcel Division dialog box to subdivide the parcel using the method you have chosen.
- Into equal areas
- Specify the number of parts or parcels to create in the Number of parts text box. Parcels are created with areas that are equal to the area value that is specified.
- Type a bearing for the split lines that will divide the parcel in the Split-line bearing text box. Depending on the bearing you type, the Starting from the drop-drop down list will update to display North/South or East/West options for selection.
- Click the drop-down box next to Starting from the to select the direction from which to start creating parcels.
- Type an area for the parts or parcels in the Area of each part is text box.
- If you want to create a remainder parcel, check the Create a remainder parcel check box. To merge the remainder parcel with the adjacent parcel, type a maximum area value for the remainder parcel under Merge Remainder if it is less than. Remainder parcels that have an area greater than the value you specified will not be merged.
- Check the Activate parcel namer tool when I click OK check box to activate the parcel namer tool after the new parcels have been created. The mouse pointer will change to the crosshairs tool, which can be used to drag a line over a sequence of parcels to be named.
- Click OK on the Parcel Division dialog box to subdivide the parcel using the method you have chosen.
- In equal widths