Available with 3D Analyst license.
A profile graph can be created from steepest path surface analysis results. Follow these steps to graph your steepest path results.
- In ArcMap, click the layer drop-down arrow on the 3D Analyst toolbar and click the surface that you want to analyze.
- Click the Create Steepest Path button
 .
.
- Click the surface at the location where you want the path to begin. The steepest path is automatically drawn on the map.
- With the graphic or graphics selected, click the Profile Graph tool button
 . The profile graph appears as a floating window on your map.
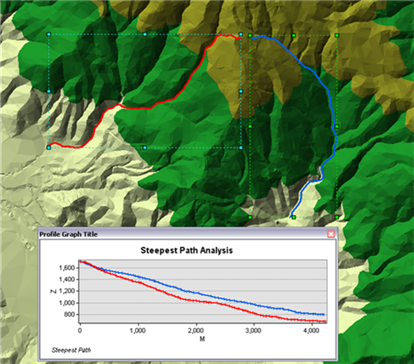
The analysis shown in the image below represents a steepest path from two locations on a mountaintop. The profile graph displays the elevation and distance difference between the two steepest path results. This example depicts possible drainage patterns.

Related topics
- Fundamentals of creating profile graphs
- Understanding the 3D Analyst toolbar options
- What is the ArcGIS 3D Analyst extension?
- Creating a profile graph from digitized features of a surface
- Creating a profile graph from 3D line features
- Creating a profile graph from line-of-sight results
- Using the Point Profile interactive tool
- Using the interactive Terrain Point Profile tool