Deploying Data Reviewer services
ArcGIS Data Reviewer for Server is a series of tools that automates and simplifies data quality control to improve the integrity of your data. Data Reviewer for Server can be deployed for the Roadway Characteristics Editor (RCE) so that checks and batch jobs can be used to validate and correct your organization's event data from the RCE. For more information about deploying the RCE, see Roadway Characteristics Editor (RCE) user guide.
To enable the Data Reviewer for Server capability in the RCE, the Data Reviewer services must be published to ArcGIS for Server. Setting up Data Reviewer for the RCE involves the following steps:
- Install Data Reviewer for Server on your machine.
- Deploy Data Reviewer batch validation services.
- Deploy Data Reviewer dashboard services.
- Configure the map service using the DRS Configuration Utility.
For more information, see Publishing ArcGIS Data Reviewer for Server Services .
In a multimachine clustered environment, the Reviewer workspace tables must be accessible to all machines in the deployment. This means when using the DRS Configuration Utility, you may need to place the connection file for the Reviewer workspace in a file share accessible to all ArcGIS servers in the cluster.
- In a multimachine clustered environment, an enterprise scheduler database type must be configured.
For more information, see Configuring the scheduler database.
- Browse to the location of your RCE folder.
In IIS, the web folder may be located at C:\inetpub\wwwroot\RoadwayCharacteristics.
- Using a text editor, open the configuration file (config.json) and browse to dataReviewer.
- Change serviceUrl to point to the URL of the Data Reviewer map service you have published.
"dataReviewer": {
    	"serviceUrl": "http://<server name>:6080/arcgis/rest/services/reviewer/MapServer",
    	"executeBatchJobUrl": "http://<server name>:6080/arcgis/rest/services/ExecuteBatchJob/GPServer",
     "productionWorkspace": "",
     "batchJobWaitTime": 60,
    	"recordsPerPage": 25
}
The service URLs can be found in your Services Directory:
http://<server name>:6080/arcgis/rest/services
- Change executeBatchJobUrl to point to the URL of the Data Reviewer geoprocessing service you have published.
- Assign the production workspace parameter.
- A production workspace allows you to validate data in a different workspace than what is referenced in the Reviewer batch job file (.rbj). The workspace path can be absolute or UNC. The ArcGIS server account must have access to the folder that contains the connection file that references the workspace (eGdb), for example, c:\\arcgisserver\\data\\arcsde_connection_file.sde.
- If no production workspace is defined, it will default to the geodatabase that was identified as the Reviewer workspace using the Data Reviewer Configuration Utility.
- Open RCE in your web browser. Data Reviewer tools are now available for use.

Data Reviewer toolbar
Adding Data Reviewer checks in RCE
Data Reviewer for Server does not support creating Reviewer sessions. Any sessions used from the RCE for running Data Reviewer checks must be preconfigured using Data Reviewer for Desktop. The steps below explain how to do this. Configure as many sessions as needed.
- Start ArcMap.
- Enable the Data Reviewer extension in ArcMap to access the associated tools and capabilities in the desktop environment.
- Click Customize > Toolbars > Data Reviewer to add the Data Reviewer toolbar in ArcMap.
- Create and save a new batch job.
- Browse to your RCE web folder and open the dataReviewerBatchJobs folder.
You may see an additional folder named DataReviewer_BatchJobs if you have configured Data Reviewer prior to the 10.2.2 release and have batch jobs stored in that location. Copy the batch jobs you would like to save to the new dataReviewerBatchJobs folder. When you have finished copying your batch jobs to the new folder, delete the DataReviewer_BatchJobs folder.
For more information regarding the RCE deployment, see Roadway Characteristics Editor (RCE) user guide.
- Copy and paste the batch job file you saved in step 4 to this folder.
- Deploy the RCE in your web browser.
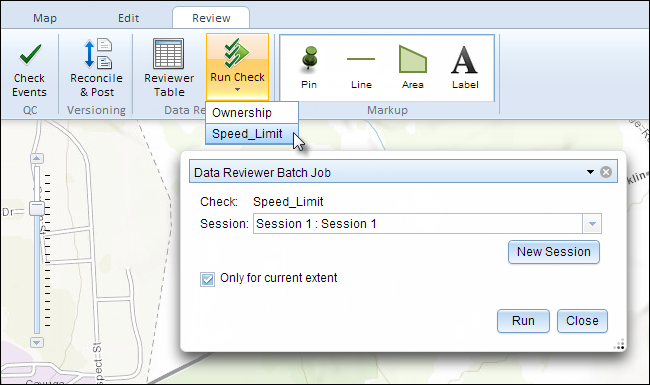
- Click the Review tab in RCE.
- In the Data Reviewer group, click Run Check.

The batch jobs are now available in the RCE.
For more information, see Executing Data Reviewer batch jobs in the Roadway Characteristics Editor (RCE) application.