Global directional vector properties are saved in a map document. By default, they are used by all tracking layers in the map document, unless you set different directional vector properties for individual layers.
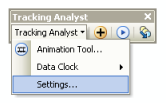
- Click Tracking Analyst on the Tracking Analyst toolbar to expand the drop-down list. Click Settings to open the Tracking Analyst Global Settings Properties dialog box.

- Click the Directional Vector Properties tab.
- Click the large button with a line symbol on the Directional Vector Renderer Properties dialog box. This opens the Symbol Selector dialog box. Choose a line symbol to represent the global directional vectors to be used in your map document.
When choosing a symbol for directional vectors, it is recommended that you choose a symbol with an arrow at the end, similar to the default symbol. This will allow you to see the direction that tracked objects are moving in.
- Click the Projected Time Interval drop-down arrow and click a number from the drop-down list. You can also click inside the text box and enter a number.
- Click the following drop-down arrow and choose the units for the projected time interval.
The number and units together determine the length of the directional vectors. For example, if you enter2 in the first text box and chooseHours for the units, then each directional vector projects where a tracked object will be two hours in the future. You must understand your data to choose an appropriate projected time interval.
- Click OK to close the Tracking Analyst Global Settings Properties dialog box and apply the changes.
The new global directional vector properties you set will be used by all point tracking layers in your map that are using global directional vectors. New tracking layers that are added to your map document will use the global directional vector settings by default.