Available with Location Referencing license.
To create and maintain measures on your LRS Network, events, and intersections, calibration points are necessary. Each route in the LRS Network has at least two calibration points that provide measure values for the route. The Update Calibration Points geoprocessing tool will create calibration points on your LRS Network and regenerate the shape of the network to provide measures. The steps to create or update calibration points, once you have created your LRS Network and loaded routes, are discussed below.
Calibrating a network using the geometric length of the source routes
Perform the following steps if you plan to use the geometric length of the source routes to calibrate the network:
-
In the ArcToolbox window, expand the Location Referencing toolbox and double-click the Update Calibration Points geoprocessing tool.

- If you clicked Yes on the Do you wish to launch Update Calibration Points tool? dialog box after loading routes, the Update Calibration Points dialog box appears.
- If you clicked Yes after completing the route loading process, the dialog box will be prepopulated.
- If you opened the tool from the ArcToolbox window, you will need to populate the parameters manually.
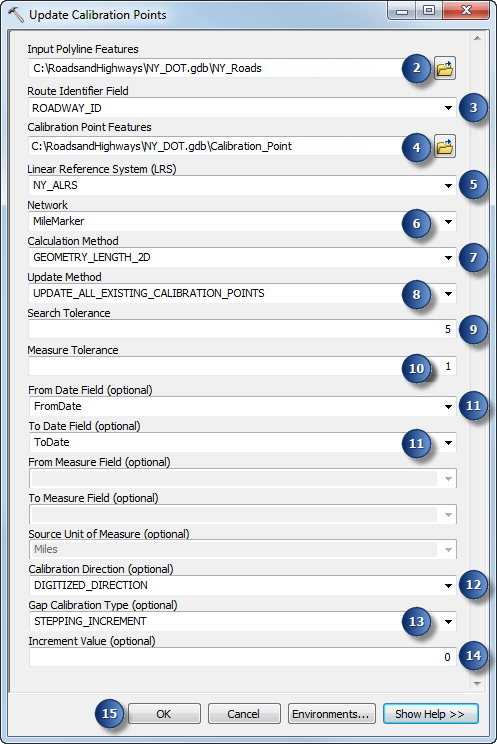
The Update Calibration Points dialog box appears.

- Choose the source polyline route feature class used during initial route loading from the Input Polyline Features drop-down list.
- Choose the route ID field used during initial route loading from the Route Identifier Field drop-down list.
- Choose the calibration point feature class from the geodatabase with your LRS from the Calibration Point Features drop-down list.
- Choose your LRS from the geodatabase from the Linear Referencing System (LRS) drop-down list.
- Choose your LRS Network from the LRS from the Network drop-down list.
- Choose GEOMETRY_LENGTH_2D, or GEOMETRY_LENGTH_3D if your source polyline route feature class has z-values, from the Calculation Method drop-down list.
- Choose UPDATE_ALL_EXISTING_CALIBRATION_POINTS from the Update Method drop-down list.
- Leave the Search Tolerance parameter with the default value.
- Leave the Measure Tolerance parameter with the default value.
- Choose the from and to date fields for your input polyline features from the From Date Field and To Date Field drop-down lists.
- Choose the Calibration Direction method to guide the direction of calibration for the routes in the network.
- DIGITIZED_DIRECTION uses the digitization direction of the chosen Input Polyline Features feature class to determine the direction that calibration should follow.
- MEASURE_DIRECTION uses the measure values of the chosen Input Polyline Features feature class to determine the direction that calibration should follow and in which order multipart features should be calibrated.
- Choose the Gap Calibration Type method you want to use when calibrating physically gapped routes.
- STEPPING_INCREMENT adds a step to any routes with physical gaps.
- ADDING_INCREMENT adds the increment to any routes with physical gaps.
- ADDING_EUCLIDEAN_DISTANCE adds Euclidean distance to any routes with physical gaps.
- Choose the Increment Value parameter to be applied for calibration of physical gaps in routes.
- Click OK.
- When the tool is finished, click Close to return to ArcMap.
The LRS Network is calibrated and ready for use in your LRS.
Calibrating a network using the m-values stored in the source routes
Perform the following steps if you plan to use the m-value of the source routes to calibrate the network:
-
In the ArcToolbox window, expand the Location Referencing toolbox and double-click the Update Calibration Points geoprocessing tool.

- If you clicked Yes on the Do you wish to launch Update Calibration Points tool? dialog box after loading routes, the Update Calibration Points dialog box appears.
- If you clicked Yes after completing the route loading process, the dialog box will be prepopulated.
- If you opened the tool from the ArcToolbox window, you will need to populate the parameters manually.
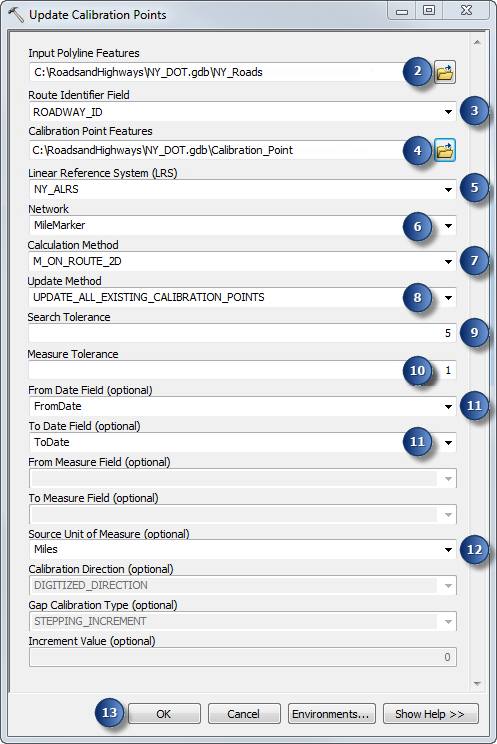
The Update Calibration Points dialog box appears.

- Choose the source polyline route feature class used during initial route loading from the Input Polyline Features drop-down list.
- Choose the route ID field used during initial route loading from the Route Identifier Field drop-down list.
- Choose the calibration point feature class from the geodatabase with your LRS for the Calibration Point Features parameter.
- Choose your LRS from the geodatabase for the Linear Referencing System (LRS) parameter.
- Choose your LRS Network for the LRS as the Network parameter.
- Choose M_ON_ROUTE_2D, or M_ON_ROUTE_3D if your source polyline route feature class has z-values, from the Calculation Method drop-down list.
- Choose UPDATE_ALL_EXISTING_CALIBRATION_POINTS from the Update Method drop-down list.
- Leave the Search Tolerance parameter with the default value.
- Leave the Measure Tolerance parameter with the default value.
- Choose the From Date Field and To Date Field from your input polyline features.
- Choose the unit of measure of the m-values in your source polyline route feature class for Source Unit of Measure.
If you chose a different unit of measure for your LRS Network, the measures for the calibration points will automatically be converted to the LRS Network unit of measure.
- Click OK.
- When the tool is finished, click Close to return to ArcMap.
This LRS Network is now calibrated and ready for use in your LRS.