Available with Standard or Advanced license.
This workflow describes the steps for splitting parcels using an area description in a parcel fabric enabled with the Local Government Information Model (LGIM). Use this workflow on your own data.
This workflow is also available as an automated workflow. To use the Parcel Split area description automated workflow, open the Parcel Workflows dialog box by clicking Parcel Editor > Parcel Workflows. Select Parcel Split: Area Description and click Begin workflow. Automated parcel editing workflows are available when you enable the Local Government Information Model on your parcel fabric.
The workflow consists of the components shown in the diagram below:

Legal description
A legal description for a parcel split using area may look like this:
The west half of parcel 1916326003; described as T2N, R10E, SEC 16 PART OF E 1/2 OF SW 1/4 BEG AT PT DIST N 89-02-10 W 517.71 FT FROM CEN OF SEC, TH S 00-57-50 E 230 FT, TH N 89-02-10 W 289.25 FT, TH N 00-57-50 W 230 FT, TH S 89-02-10 E 289.25 FT TO BEG EXC N 60 FT TAKEN FOR HWY 1.13 A C145J
Search for parent parcel
- Open a map document that contains your parcel fabric (enabled with the Local Government Information Model).
- In the Table Of Contents window, make only the Tax Parcels layer selectable.
- Turn off the visibility of the Lots and Units layer.
- Search for the parent parcel that will be divided.
Select parent parcel
- Start an edit session and use the Select Parcel Features tool
 on the Parcel Editing toolbar to select the parcel you want to divide.
Divide parent parcel
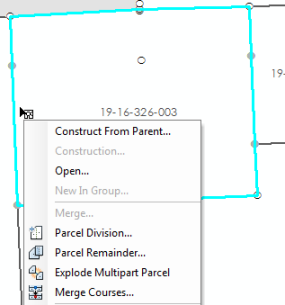
- Right-click near the parcel line that you wish to use as the split line and click Parcel Division.
- On the Parcel Division dialog box, click Plan to set the plan for the new parcels.
- Click Template to open the Select Feature Template dialog box and choose the feature template for the new split parcels.
- Choose the division method to use to divide the parcel from the the Divide this parcel drop-down list.
- Specify a division number for Number of parts.
- Leave the bearing value for the Split-line bearing.
The split-line bearing is the bearing of the line used to divide the parcel. It is the same bearing as the parcel line near which you right-clicked.
- Specify any remaining options on the Parcel Division dialog box and click OK to divide the parcel.
The Parcel Division tool uses the position of the mouse cursor to determine which parcel line to use as the split-line. The parcel line closest to the position of the right-click is used as the split-line. The split-line bearing is the bearing of the line used to divide the parcel.

The parcel fabric plan represents the legal document recording a parcel merge, subdivision, and so on. Parcels are created in plans. Plans are managed in the Plan Directory dialog box, which is opened by clicking Plan on the Parcel Details dialog box.
Annotate parcels
- Add the ParcelDimensions annotation feature class to the map.
The ParcelDimensions annotation feature class is created when the Local Government Information Model is enabled on the parcel fabric. The annotation feature class is feature linked to the parcel fabric Lines feature class.
Annotation is created using the Annotate Parcel Courses tool
 , which handles the duplication of annotation on parcel lines.
 - With the new parcel selected, click the Annotate Parcel Courses tool
 on the Parcel Editor toolbar.
 - Select ParcelDimensions on the Annotate Selected Features dialog box and click OK.
Click Yes to re-create annotation.
- If necessary, use the Edit Annotation tool
 to edit and change the placement of the generated annotation.
Attribute parcels
The final step in the workflow is to update the attributes of the new parcels:
- Use the selection chip to select the new, divided parcels and open the Attributes window.
- Select a parcel from the parcel list under Tax Parcels and update attributes such as the Parcel Identification Number, StatedArea, LegalStartDate, and Accuracy.
The LegalStartDate attribute should correspond to the date on the parcel's plan. If the Accuracy attribute is left empty, the value is inherited internally from the plan accuracy. You can override the plan accuracy by specifying a different parcel accuracy. Accuracy values are used in the parcel fabric least-squares adjustment.
- Update the attributes of the remaining parcels in the list.
- Optionally update the attributes of the historic parcels:
- Turn on the Historic Parcels layer in the Table Of Contents window.
- Use the selection chip to select the historic parcel in the map.
- Open the Parcel Details dialog box and update attributes such as LegalStartDate, LegalEndDate, and Reason Parcel Retired.