Creating a Python add-in button
A button is the simplest form of customization that can be used to execute some business logic when clicked.
This topic guides you through the process of creating a button on a new toolbar using the Python Add-In Wizard. Before beginning this workflow, make sure that you have created an ArcMap add-in project and specified the project settings. For more information, see Creating an add-in project. While this workflow shows you how to create a button for ArcMap, you can use this process to add a button to any ArcGIS Desktop application. This topic examines the process of creating a simple Zoom to Selected Features button. The Python class that is created by the wizard is then examined in greater detail to explore the properties and methods that provide functionality to your button.
Creating an add-in button consists of the following steps:
- Create a toolbar or menu
Once you have entered the required project settings, click the Add-In Contents tab and begin declaring your add-in customizations. A button may reside on a toolbar or a menu. In this example, a new toolbar is created as a container for the button. See Creating an add-in toolbar for steps on creating your own toolbar.
- Create the button
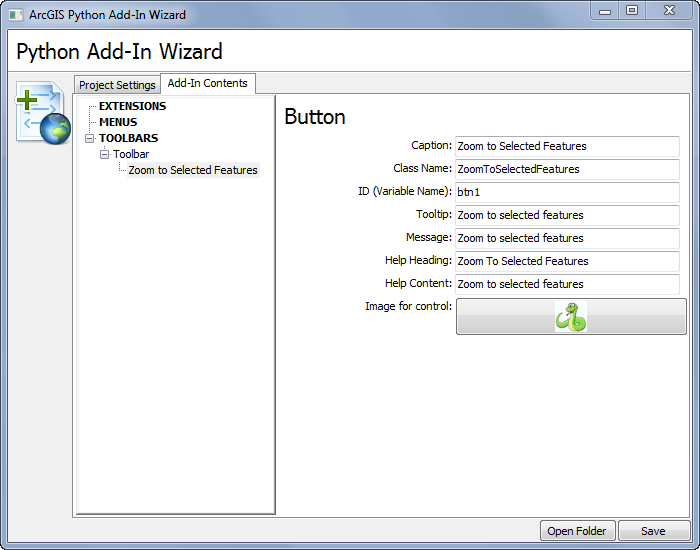
Once you have entered the toolbar properties, you can create a new button. Right-click the new toolbar named "Toolbar" and select New Button.

A button has a number of properties for you to set. The following is a list of all of the properties with an explanation for each. These properties are stored in the config.xml file for the project.
Property Description Caption (required)
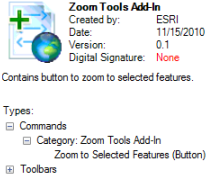
Defines the caption of the button. The following illustration shows the caption used in the ArcGIS Add-In Manager to help identify the different types of customizations available (the type of add-in is identified in parentheses):

The next illustration shows the caption used as text to identify the button on the toolbar:

Class (required)
The Python class that is executed when the button is clicked in a desktop application. The Python class is where you write your business logic for the button. Use the Python cap-word naming convention when constructing your class (for example, "ZoomToSelectedFeatures" rather than "zoomtoselectedfeatures."
ID (required)
A unique name that is used to identify your button. It is possible for you to create more than one button for a given project and this ID is used to distinguish between the different buttons. Ideally, you should replace the default ID with a more meaningful value. The ID should not contain any spaces. You may use underscores to connect words. You should not use Python keywords. Consult the Python documentation for reserved words.
ToolTip (optional)
A brief description that appears when the mouse pointer pauses over the button in a desktop application.
Message (optional)
A detailed description of what the button does. The message appears beneath the ToolTip when the mouse pointer pauses over the button.
Image (optional)
This should be a 16-by-16 pixel image used to symbolize your button. The image format should be one of the commonly used formats (that is, .bmp, .jpg, and so on). The image will be copied to the Images folder created in your add-in project.
The final section of the button is the Help heading and content. These properties allow you to supply information that will be used when a user invokes context-sensitive help. These are pop-up topics that remain on-screen until a user clicks somewhere else.
The following properties comprise this context-sensitive Help section:
Property Description Heading (optional)
Indicates what the help content is about.
Content (optional)
The help content for the button.
Once you have finished entering the properties, you can click the Save button at the bottom of the wizard. This will create all the necessary files and folders within your working folder.
- Editing the Python script
At this stage, you have finished adding values for the properties needed to define the add-in button. The next step in this workflow is to edit the Python script and update the Python class to include the functionality for zooming to selected features. If no features are selected, it zooms to the full extent of all layers. To add the functionality to the custom button, perform the following steps:
- Edit the Python script in the Install folder located in the working folder you created through the wizard.
A class will exist with the same name as the Class property you entered above. You should not rename this class as the class name is referenced in the config.xml file. For the explanation of each function and property of the class, see the Button class topic.
- Add the following script code into the onClick(self) function.
This code provides the functionality to zoom to the selected features.
# Implementation of OnClick method of Button's class def onClick(self): # Get the current map document and the first data frame. mxd = arcpy.mapping.MapDocument('current') df = arcpy.mapping.ListDataFrames(mxd)[0] # Call the zoomToSelectedFeatures() method of the data frame class df.zoomToSelectedFeatures() - Save the script.
- Edit the Python script in the Install folder located in the working folder you created through the wizard.
- Testing the button
Once you have created the button and added your script code, it is important to make the add-in file and test the add-in before sharing it. For these steps, see Testing an add-in.
- Sharing the add-in
After testing the button and confirming it works as expected, you are ready to deploy and share the add-in. For more information, see Sharing add-ins.