Available with Standard or Advanced license.
Available with Workflow Manager license.
Job notification types define the template for messages to be sent to individuals, via email, after certain events have occurred in the system. Similar to activity types, these notifications are sent for events throughout the life cycle of the job. Unlike activity types, users must be subscribed to the notification type to be able to see them. In addition to the message, you can include all job attachments as part of the email sent with notifications. By default, these notifications are sent at the following times:
- Job is assigned or reassigned
- Job created
- Job cloned
- Job closed
- Dependency added
- Hold released
- Hold added
- Extended properties updated
- Step execution completed
- Workflow updated
- Workflow committed for execution
- Step completed
- Attachment added
- Attachment deleted
- Dependency deleted
- Job properties updated
- Area of interest updated
- Version created
- Current step set
- Step assigned or reassigned
- Step started
- Step set as current job step
- Notes updated
- Linked (1-M) property added
- Linked (1-M) property deleted
- Linked (1-M) property updated
Unlike activity types, notifications can be extended and easily built into your workflows using the Send Notification step type. This custom step is part of the Workflow Manager (Classic) Steps library and takes a notification type as an argument.
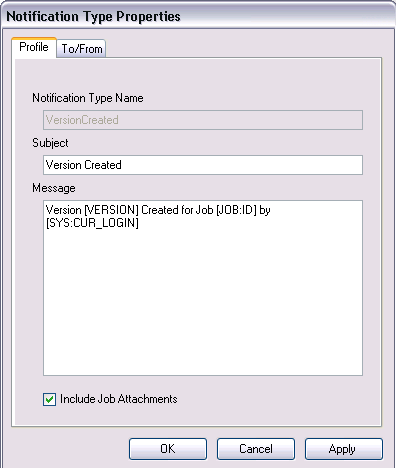
A notification type has the following properties associated with it:
- Name
- Subject
- Message Body
- Include Job Attachments
- Sender Email
- Sender Display Name
- Subscribers
The Subscribers property is a list of email addresses. Each of the above properties can contain dynamic values. These are controlled by tokens. For example, you can subscribe the current user to a particular notification, even if you don't know who that person is at design time, by entering the following:
[EMAILOF([SYS:CUR_LOGIN])]
For notifications to be sent, the SMTP server for the system must be configured. For more information about configuring this setting, see Workflow Manager (Classic) system settings. The attachment size limit is based on your mail server settings.
Adding new job notification types
Prerequisite:
Open the Workflow Manager Administrator and connect to your Workflow Manager (Classic) database.
You can add new notification types triggered by actions in the application or by workflow steps.
- In the Workflow Manager Administrator, browse to the Job Notifications folder under Notifications.
The list shows all the currently configured notification types. If no notification types exist, the list will be blank.
- Right-click and click Add Job Notification.
The Notification Type Properties dialog box appears.
- Enter a name.
This will be how you identify the notification type when configuring steps in the workflow.
- Enter a subject.
This will be the subject of the email that is sent.
- Enter a message.
This will be the contents of the email that is sent.
- Check the Include Job Attachment check box to send all the job's attachments with this notification.
- Click the To/From tab.
- Enter the sender's email address and display name.
These fields could contain tokens for the current user at the time the notification is sent.
- Click Modify to add or remove subscribers, or the people who receive the notification.
Enter the email address in the lower text box (separate multiple subscribers with a semicolon) or double-click a Workflow Manager (Classic) user to add their email address.

- Click OK to save changes and close the dialog box.
Subscribing to existing notification types
Subscribing to notification types in the Administrator
You can subscribe to multiple notification types in the Administrator.
- Select the notification types you want to subscribe users to by pressing the Shift key as you click.
- Enter the sender's email address and display name.
These fields could contain tokens for the current user at the time the notification is sent.
- Click Modify to add or remove subscribers, or the people who receive the notification.
Enter the email address in the lower text box (separate multiple subscribers with a semicolon) or double-click a Workflow Manager (Classic) user to add their email address.
- Click OK to save changes and close the dialog box.
Subscribing to notification types in the application
You can also subscribe to notification types in the application.
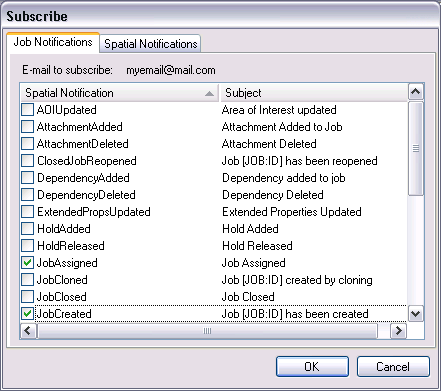
- Click the Subscribe to Notifications button
 .
.If you do not have an email address configured, the application will display the User Properties dialog box for you to provide a valid email address.
- Check the check box next to the notification type you want to subscribe the current user's email address to.
Repeat this for all notification types you want to subscribe the current user's email address to.

Subscribe the current user's email address to notifications. - Click the Spatial Notifications tab to subscribe to existing spatial notification rules.
- Click OK to apply changes.
Subscribing to notifications is controlled by the CanSubscribeToNotifications privilege.
Using notifications in your workflows
If you have configured custom notification types for your system, you can build them into your workflows by setting a notification as part of a step property or using the SendNotification custom step.
Using notifications as a property of a step
Prerequisite:
Open the Workflow Manager Administrator and connect to your Workflow Manager (Classic) database.
You can configure your workflow steps to send notifications when the step is executed.
- In Workflow Manager Administrator, select the Workflow folder under Job Components.
- Edit an existing workflow or create a new one.
- Click the Workflow tab.
- Drag a step into the workflow canvas or select a step already in the workflow.
- Right-click the step and click Properties.
The Detailed Step Properties dialog box appears.
- Choose the notification type you want sent after this step is executed from the drop-down list.
- Click OK on all dialog boxes to make these settings persist.
Using notifications as a step type
Prerequisite:
Open the Workflow Manager Administrator and connect to your Workflow Manager (Classic) database.
You can configure your workflow steps to send notifications when the step is executed.
- In Workflow Manager Administrator, select the Step Types folder under Job Components.
- Right-click and click Add Step Type.
The Step Type Properties dialog box appears.
- Give the step a name, description, and indicator. Leave the Hide Workflow Manager While Running check box unchecked.
- Click the Execution tab.
- Choose Custom Step Object.
- Browse for the CLSID/ProgID.
The Browse for Custom Steps dialog box appears.
- Choose SendNotification from the Workflow Manager (Classic) Steps library and click OK.
- In the arguments, enter the name of the notification type you want this step to send.
For this step type, the argument must be preceded with /notifType.
/notifType:MyCustomNotification - Verify that the argument you've entered is formatted correctly.
- Click OK to save the new step type and close the dialog box.
- Edit an existing workflow or create a new one.
- Click the Workflow tab.
Your new step type appears in the step list under the Custom Step folder.
- Add it to the workflow and arrange the path to include the new step.
You're now ready to create a new job and see how it works.