In this topic
About the ArcGIS Snippet Editor Manager
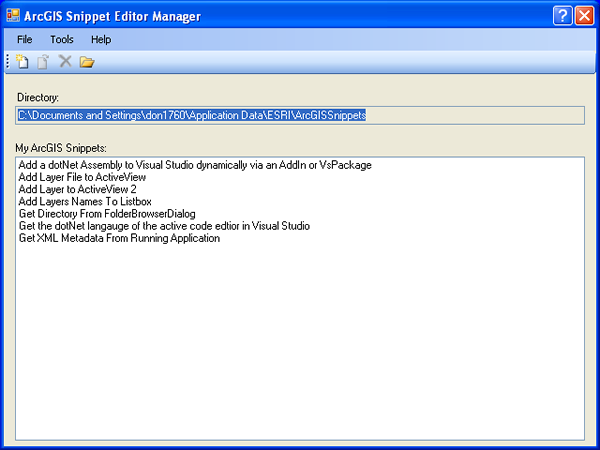
The ArcGIS Snippet Editor Manager is a topmost, non-modal dialog box that lets you create, edit, and delete ArcGIS snippets. ArcGIS snippets are a special form of the Microsoft snippet file format that adds extra Extensible Markup Language (XML) tags for use by the ArcGIS Snippet Finder.
Because the ArcGIS Snippet Editor Manager dialog box is topmost and non-modal, you can use other parts of Visual Studio while the dialog box is open (if necessary, move the dialog box from covering portions of Visual Studio's main window).
You can set a directory location where your ArcGIS snippets reside. When creating or editing ArcGIS snippets, a series of modal wizard dialog boxes open to aid in the ArcGIS snippet creation process. You can also customize the available options as part of the wizard dialog boxes on the ArcGIS Snippet Editor Manager.
The remainder of this topic discusses the components of the ArcGIS Snippet Editor Manager dialog box and other features as they impact the creation of custom ArcGIS snippets.
Using the ArcGIS Snippet Editor Manager
To open the ArcGIS Snippet Editor Manager dialog box, choose ArcGIS Snippet Editor Manager under the Tools menu in Visual Studio. See the following screen shot:
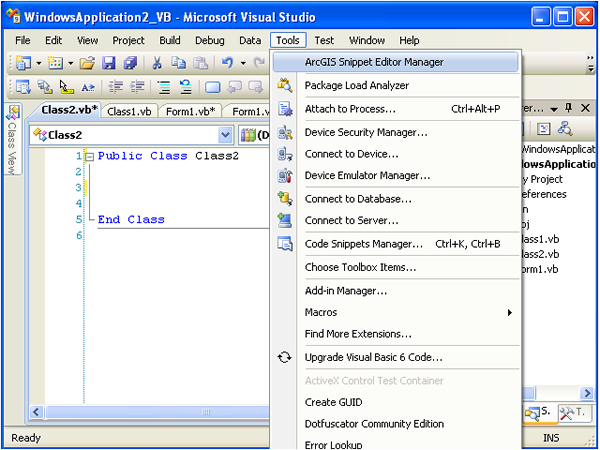
When you choose ArcGIS Snippet Editor Manager from the preceding screen shot, the ArcGIS Snippet Editor Manager dialog box opens. Use this dialog box to create, edit, and delete ArcGIS snippets. See the following screen shot:
Create an ArcGIS snippet
There are two options for creating ArcGIS snippets. Both options open a series of ArcGIS Snippet Editor wizard dialog boxes to create ArcGIS snippets that can be used by the ArcGIS Snippet Finder. Deciding which option to use is a matter of workflow preference. Do one of the following to create ArcGIS snippets:
- Create an ArcGIS snippet with the ArcGIS Snippet Editor Manager—Choose Create a New ArcGIS Snippet under the File menu on the ArcGIS Snippet Editor Manager dialog box. See the following screen shot:

You can also click the Create a New ArcGIS Snippet button on the toolbar. See the following screen shot:
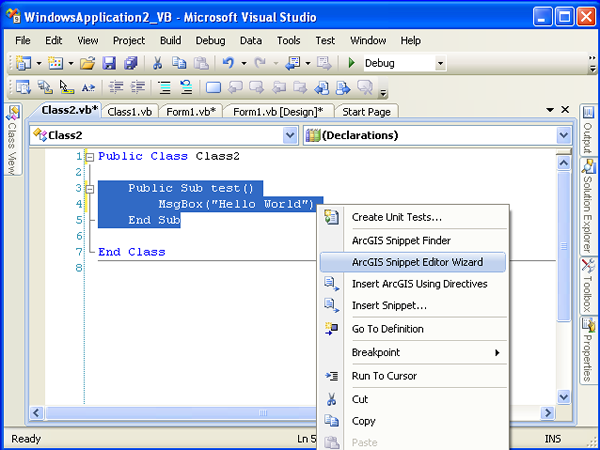
Using this option to create an ArcGIS snippet sets the first wizard dialog box to be the topmost dialog box (instead of modal). This means you can copy a block of code from any Visual Basic or C# code editor class file, then paste it into the Source code - ArcGIS Snippet Editor dialog box. Click the Language option button on the Source code - ArcGIS Snippet Editor dialog box before you click Next, then proceed through the remaining ArcGIS Snippet Editor dialog boxes. All subsequent ArcGIS Snippet Editor dialog boxes are modal after you click Next. Complete or cancel the creation of the ArcGIS snippet before you interact with the rest of Visual Studio. For more information, see Source code option for the ArcGIS Snippet Editor. - Create an ArcGIS snippet from a highlighted block of code in Visual Studio's code editor—In a Visual Basic or C# code editor window, highlight a block of code, then right-click and choose ArcGIS Snippet Editor Wizard, which opens the ArcGIS Snippet Editor series of dialog boxes. By using this option, all ArcGIS Snippet Editor dialog boxes (including the Source code - ArcGIS Snippet Editor) are modal. Complete or cancel the creation of the ArcGIS snippet before you interact with the rest of Visual Studio. This option copies the highlighted block of code in Visual Studio's Visual Basic or C# code editor window, then pastes it into the Source code - ArcGIS Snippet Editor. The correct language is set based on the type of class file (that is, .vb or .cs from the copied highlighted block of code) to initiate the new ArcGIS snippet. See the following screen shot:
Edit an ArcGIS snippet
There are three options for editing ArcGIS snippets. Each option open a series of ArcGIS Snippet Editor wizard dialog boxes for editing ArcGIS snippets used by the ArcGIS Snippet Finder. Do one of the following to edit ArcGIS snippets:
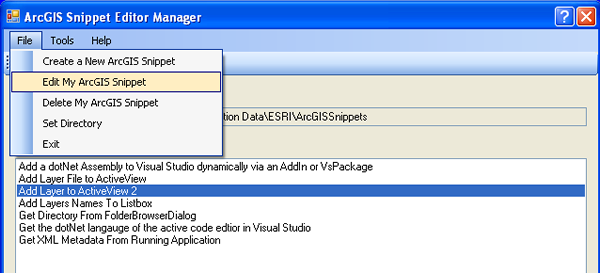
- File menu—Select a snippet on the ArcGIS Snippet Editor Manager and choose Edit My ArcGIS Snippet under the File menu. See the following screen shot:
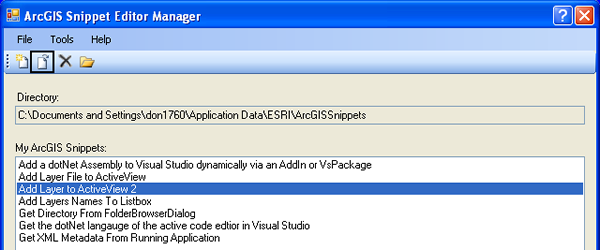
- Toolbar button—Select a snippet on the ArcGIS Snippet Editor Manager and click the Edit My ArcGIS Snippet button on the toolbar. See the following screen shot:
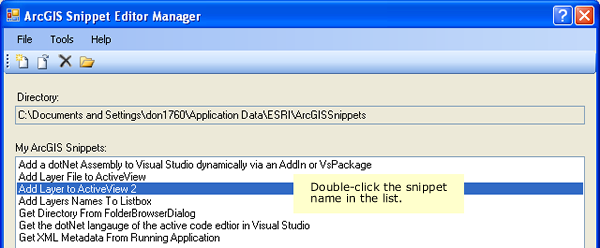
- List of available snippets—Select, then double-click a snippet on the ArcGIS Snippet Editor Manager. See the following screen shot:
Delete an ArcGIS snippet
There are two options for deleting ArcGIS snippets. Both options show a dialog box confirming that you want to delete the snippet. Once a snippet is deleted, it is "permanently destroyed." There are no recovery methods for deleted snippets. Do one of the following to delete ArcGIS snippets:
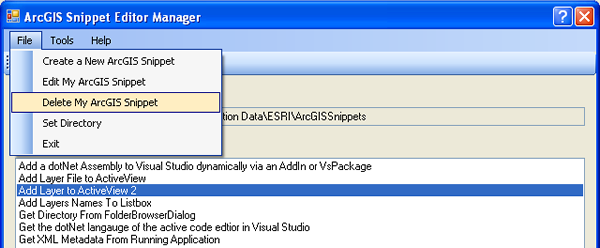
- File menu—Select a snippet on the ArcGIS Snippet Editor Manager and choose Delete My ArcGIS Snippet under the File menu. See the following screen shot:
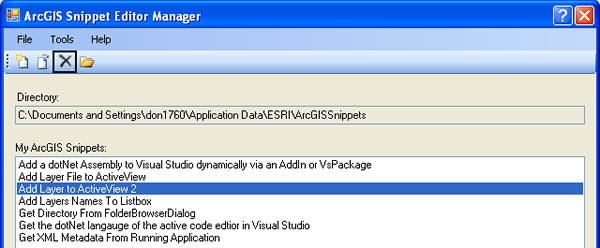
- Toolbar button—Select a snippet on the ArcGIS Snippet Editor Manager and click the Delete My ArcGIS Snippet button on the toolbar. See the following screen shot:
Set a directory location
The ArcGIS Snippet Editor Manager shows all available ArcGIS snippets in a specified directory location. There are three options for setting the default location where the ArcGIS Snippet Editor Manager shows the available snippets. Do one of the following to set the directory location:
- File menu—Choose Set Directory under the File menu. See the following screen shot:

- Toolbar button—Click the Set Directory button on the toolbar. See the following screen shot:

- ArcGIS Snippet Editor dialog box—On the Title, Long Description, Type, Directory - ArcGIS Snippet Editor dialog box, click the Specify an Output Directory folder browser button. For more information, see Title, long description, type, and directory options for the ArcGIS Snippet Editor. See the following screen shot:
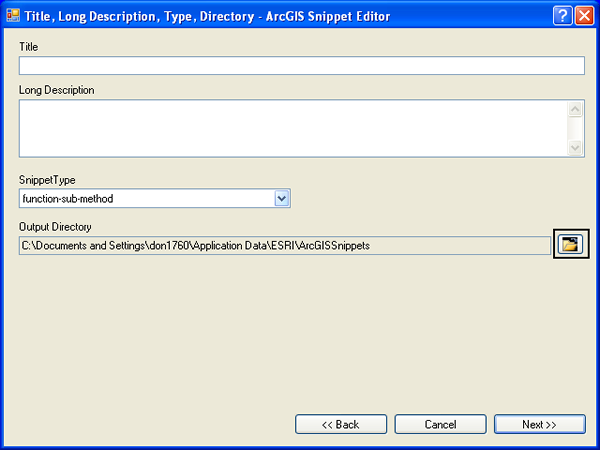
- If the output directory is changed on the ArcGIS Snippet Editor Manager dialog box, it automatically changes on the Title, Long Description, Type, Directory - ArcGIS Snippet Editor dialog box. Likewise, if the output directory is changed on the Title, Long Description, Type, Directory - ArcGIS Snippet Editor dialog box, it automatically changes on the ArcGIS Snippet Editor Manager dialog box.
- If the output directory is changed on the ArcGIS Snippet Editor Manager dialog box, it automatically changes on the Title, Long Description, Type, Directory - ArcGIS Snippet Editor dialog box. Likewise, if the output directory is changed on the Title, Long Description, Type, Directory - ArcGIS Snippet Editor dialog box, it automatically changes on the ArcGIS Snippet Editor Manager dialog box.
The initial default location for user-created ArcGIS snippets is %APPDATA%\ESRI\ArcGISSnippets. The %APPDATA% environment variable is set by the Windows operating system. To verify the %APPDATA% location, type %APPDATA% in Window Explorer's Address bar, then press Enter.
The directory location the ArcGIS Snippet Editor uses to list custom ArcGIS snippets is persisted in %APPDATA%\ESRI\ArcGISSnippets\Settings\ArcGISSnippetEditorPreferences9.xml. This file is written to each time a new directory is specified or when other customization options are changed on the Options - ArcGIS Snippet Editor Manager dialog box.
For developers using Windows Vista, if you discover that you are not able to navigate to the %APPDATA% folder when using the Browse for Folder dialog from the ArcGIS Snippet Editor dialog, you may need to change Windows Operating System Folder Options to Show hidden files and folders. By default in Windows Vista the option for Folder Options is do not show hidden files and folders.
The following is a screen shot example of not being able to see the %APPDATA% folder in Windows Vista when the Folder Options is set to do not show hidden files and folders.
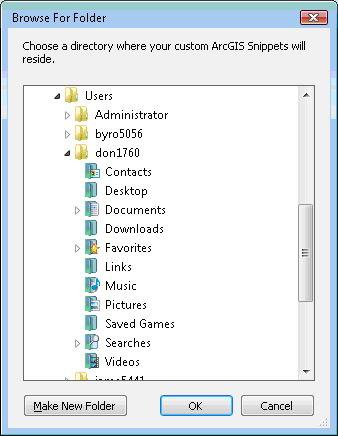
The following is a screen shot example of being able to see the %APPDATA% folder in Windows Vista when the Folder Options is set to show hidden files and folders.
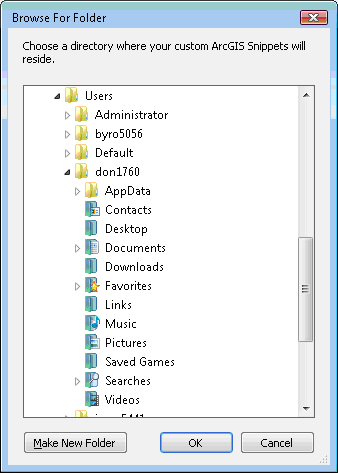
To change the options in the Windows Vista Operating System to allow for viewing hidden files and folders, open the Control Panel and switch to the Classic View. Then click on the Folder Options icon and select the View tab. From here you can choose Show hidden files and folders to enable viewing the %APPDATA% directory. See the following screen shot:
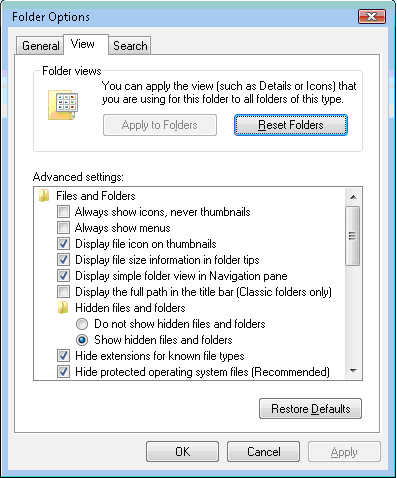
Set customization options
The ArcGIS Snippet Editor dialog boxes use numerous options to accelerate the creation of ArcGIS snippets, which can be customized according to your requirements. Do the following to customize the applicable options:
- On the ArcGIS Snippet Editor Manager dialog box, choose Options under the Tools menu. See the following screen shot:

- When you choose Options on the preceding screen shot, the Options - ArcGIS Snippet Editor Manager dialog box appears. See the following screen shot:
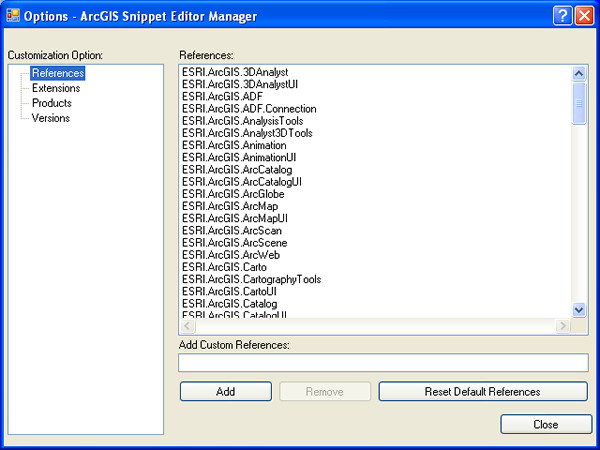
For more information about customization options, see Customization options for the ArcGIS Snippet Editor Manager.
See Also:
ArcGIS Snippet EditorCustomization options for the ArcGIS Snippet Editor Manager
Source code option for the ArcGIS Snippet Editor
Title, long description, type, and directory options for the ArcGIS Snippet Editor
References option for the ArcGIS Snippet Editor
Extensions, products, and versions options for the ArcGIS Snippet Editor
Statements option for the ArcGIS Snippet Editor
Snippets for ArcGIS .NET developers
ArcGIS Snippet Finder
| Development licensing | Deployment licensing |
|---|---|
| ArcGIS for Desktop Basic | ArcGIS for Desktop Basic |
| ArcGIS for Desktop Standard | ArcGIS for Desktop Standard |
| ArcGIS for Desktop Advanced | ArcGIS for Desktop Advanced |
| Engine Developer Kit | Engine |
