In this topic
ArcGIS Add Class Wizard dialog box
The ArcGIS Add Class Wizard dialog box opens when you select the ArcGIS Class item template in the Add New Item dialog box. For information on how to select and add ArcGIS item templates to your project, see Using item templates to extend ArcObjects.
The wizard provides a range of commonly implemented custom ArcObjects components. Although the class generated by this wizard does not contain boilerplate code, as most of the other ArcGIS item templates do, the ArcGIS Class item saves development time by automating repetitive tasks performed by a .NET developer who implements ArcObjects components. These tasks include adding a .NET class with Component Object Model (COM)-related attributes, implementing the correct interfaces, stubbing out interface members, and inserting component category registration code appropriate to the base component selected in the wizard.
Base Implementation option
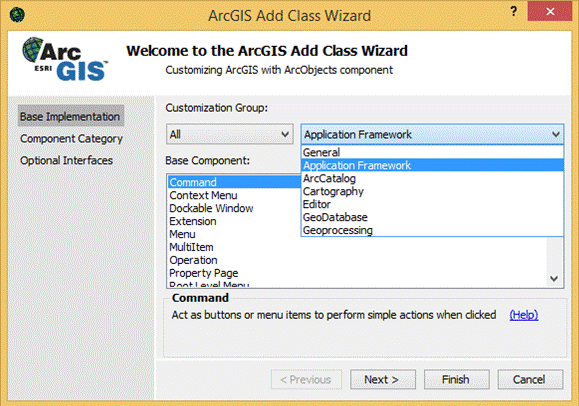
When you choose Base Implementation on the ArcGIS Add Class Wizard dialog box, the following options are available:
- Customization Group—Organizes ArcObjects customizations by product and functional area. Choose a product from the Customization Group drop-down list to restrict the available options to the classes applicable to ArcGIS Engine, ArcGIS for Desktop, or ArcGIS for Server. Select the area of functionality from the drop-down list on the right to display the relevant list of types in the Base Component list.
- Base Component—Allows you to select a type of custom component to implement. The available types in this list depend on the items selected in the Customization Group. An additional description is shown at the bottom of the wizard when you select a component in the list along with a link that directs you to the application programming interface (API) help system—click Help to show the required interface with its associated help topic.
See the following screen shot:

Component Category option
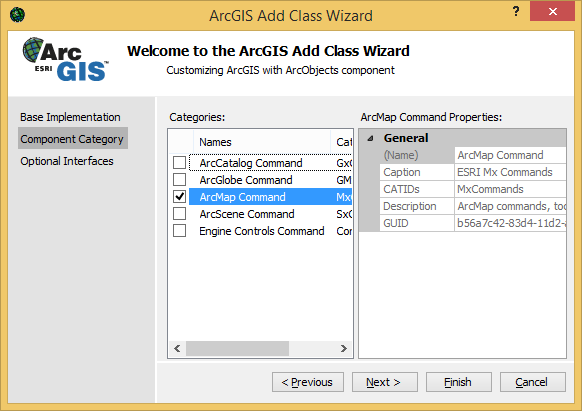
When you choose Component Category on the ArcGIS Add Class Wizard dialog box, the following options are available:
- Categories—Allows you to select the component categories in which to register the new class. The categories are dependent on the type of base component selected in the Base Implementation option.
- Category properties—Displays information about the highlighted component category and allows you to identify custom toolbars as premier toolbars.
See the following screen shot:

For more information about component categories, see ArcGIS Component Category Registrar dialog box.

For more information about component categories, see ArcGIS Component Category Registrar dialog box.
Optional Interfaces option
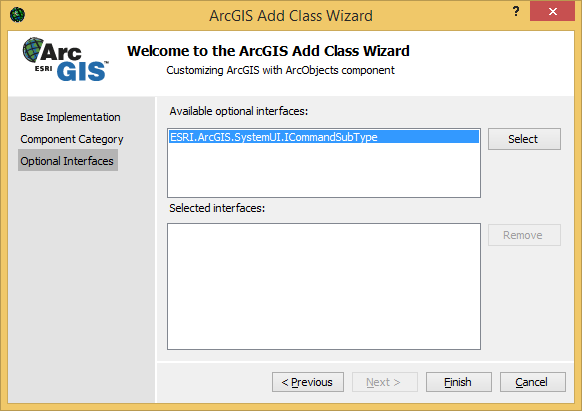
When you choose Optional Interfaces on the ArcGIS Add Class Wizard dialog box, the following options are available:
- Available optional interfaces—Displays interfaces that can be optionally implemented by the selected base component. For some base component types, this list can be empty, as there are typically no optional interfaces applicable to the selected type. To add optional interfaces for implementation in the new class, click the Select button.
- Selected interfaces—Lists the interfaces selected from the Available optional interfaces list. Interfaces listed in this area will be implemented in the new class.
When you right-click a highlighted item in the Available optional interfaces or Selected interfaces lists, a See Help menu appears. Click See Help to open the associated API documentation in the Help system.
When you click Finish, the ArcGIS Class Wizard adds a new class to your project with the appropriate COM class attributes, implements the selected interfaces, and includes any specified component category registrations. If it is a class library project, the project assembly is set to COM Visible and the Register for COM Interop setting is checked.
See the following screen shot:

See Also:
ArcGIS Visual Studio IDE Integration Framework for extending ArcObjectsUsing project templates to extend ArcObjects
ArcGIS Project Wizard
Using item templates to extend ArcObjects
Add ArcGIS Reference dialog box
ArcGIS Component Category Registrar dialog box
