In this topic
GUI based HelloWorld application
The following code example describes the steps for creating a graphical user interface (GUI) based ArcGIS Engine Java application using ArcGIS visual components. The ArcGIS Engine Java application creates a mapviewer for a .mxd map document.
[Java]
public class EngineVisualBeans{

    public static void main(String[] args)throws Exception{

        //Step 1: Initialize the Java COM Interop.
        EngineInitializer.initializeVisualBeans();

        //Step 2: Initialize a valid License.
        AoInitialize ao = new AoInitialize();
        ao.initialize(esriLicenseProductCode.esriLicenseProductCodeEngine);

        //Step 3: Create visual components for the mapviewer.

        //Create a map visual component and load a .mxd map document.
        final String devKitHome = System.getenv("AGSDEVKITJAVA");
        MapBean map = new MapBean();
        map.loadMxFile(devKitHome + "/java/samples/data/mxds/world.mxd", null, null);

        //Create a toolbar visual component and add standard ESRI tools and commands.
        ToolbarBean toolbar = new ToolbarBean();
        toolbar.addItem(ControlsMapZoomInTool.getClsid(), 0, 0, false, 0,
            esriCommandStyles.esriCommandStyleIconOnly);
        toolbar.addItem(ControlsMapZoomOutTool.getClsid(), 0, 0, false, 0,
            esriCommandStyles.esriCommandStyleIconOnly);
        toolbar.addItem(new ControlsMapFullExtentCommand(), 0,  - 1, false, 0,
            esriCommandStyles.esriCommandStyleIconOnly);
        toolbar.addItem(ControlsMapPanTool.getClsid(), 0, 0, false, 0,
            esriCommandStyles.esriCommandStyleIconOnly);

        //Create a table of contents (TOCBean) visual component for the map.
        TOCBean toc = new TOCBean();

        //Buddy up the map component with the toolbar and TOC components.
        toolbar.setBuddyControl(map);
        toc.setBuddyControl(map);

        //Step 4: Build the frame.
        JFrame frame = new JFrame("Hello Arcobjects");
        frame.add(map, BorderLayout.CENTER);
        frame.add(toolbar, BorderLayout.NORTH);
        frame.add(toc, BorderLayout.WEST);
        frame.setSize(500, 500);
        frame.setDefaultCloseOperation(JFrame.EXIT_ON_CLOSE);
        frame.setVisible(true);
    }

}
Analyzing the program
- Initialize the Java COM Interop—In the previous code example, the initializeVisualBeans() static method initializes and establishes communication settings for the Java Component Object Model (COM) Interop and informs the Java COM Interop that you will do graphical operations invoking the ArcGIS visual components. If not, this program should have called the initializeEngine() method. The initializeEngine() and initializeVisualBeans() methods are mutually exclusive. For more information on initializing the visual JavaBeans, see ArcObjects visual JavaBeans and Swing components.
- Initialize a valid License—The initialize() method of the AoInitialize object establishes permissions to access appropriate ArcObjects through licensing and checking out extensions. ArcGIS Engine based applications can run against the ArcGIS Engine Runtime license or if available, and coded appropriately, an ArcGIS Desktop license, such as ArcView, ArcEditor, or ArcInfo. A development and test version of the ArcGIS Engine Runtime license is available with the ArcGIS Engine software development kit (SDK) for Java. For more licensing information, see Licensing and deployments.
- Create visual components for the MapViewer—The MapBean, TOCBean, and ToolbarBean are some of the ArcGIS visual components that interact with each other and with other ArcGIS Engine objects to provide geographic information system (GIS) viewing capability. The following describes the sequential steps to create a simple mapviewer using these visual components:
- Create a map visual component and load a .mxd map document—A MapBean visual component facilitates display operations on a map document. Some of the basic display operations rendered by the MapBean visual component are setting general appearances, setting map and display properties, adding and managing data layers, and drawing and tracking shapes during design time. The loadMxFile method loads the corresponding map document in the specified path.
- Create a toolbar visual component and add generic ESRI tools and commands—The ToolBarBean is the visual component to hookup commands and tools (for example, Zoomin, ZommOut, and FullExtend) to the other visual components, such as the map visual component. The addItem() method lets you add standard ESRI provided tools and commands, as well as custom commands and tools to the toolbar.
- Create a table of contents (TOCBean) visual component for the map—The TOC visual component displays the map's table of contents. In general, it offers a convenient text description of the map document, such as the different layers and layer symbology of the associated map.
- Buddy up the map component with the toolbar and TOC components—The visual components are not aware of each other, even though they have been initialized. For the components to work in sync, the TOC and toolbar components should be aware of their associated map component. The setBuddyControl method of TOCBean and ToolBarBean lets you set up the communication between these components.
- Build frame—The map, TOC, and toolbar visual components are placed in a javax.swing.JFrame container. The BorderLayout manager positions the components as desired, typical of any GUI application.
Compiling and running the application
The ArcGIS Engine Java application can be compiled and run like any other Java application. The following initial steps are required to successfully compile and run any ArcGIS Engine application:
-
The Java compiler needs to be aware of the location of the referenced ArcObject classes. The ArcGIS Engine Runtime contains all the ArcObjects classes packaged into a set of Java Archive (JAR) files (arcobjects.jar). This .jar file is typically located in <ArcGISInstallDir>\java\lib. Include this .jar file in your classpath when compiling and running the ArcGIS Engine application. To compile the ArcGIS Engine application, run the following command:
-
javac <EngineVisualBeans.java>
-
The Java interpreter should be aware of the environment variable ARCGISHOME:
- On Windows platforms, ensure the ARCGISHOME environment variable is set to the ArcGIS install location.
- On Unix platforms, source the init_java script (.sh or .csh, located in <ArcGISInstallDir>) to automatically set up the necessary environment variables. For more information on setting up your environment, see Post installation. Run the following command in your command line or shell:
- java <EngineVisualBeans>
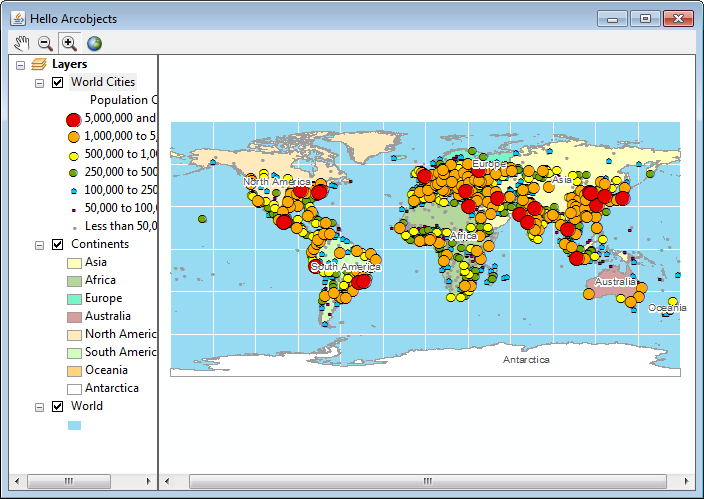
The following screen shot shows the results after completing the steps in this topic:

| Development licensing | Deployment licensing |
|---|---|
| Engine Developer Kit | Engine |
| ArcGIS for Desktop Basic | |
| ArcGIS for Desktop Standard | |
| ArcGIS for Desktop Advanced |