Click here to get the sample associated with this walkthrough.
In this topic
- About building a custom feature renderer
- Develop the custom feature renderer
- Create a Java project in Eclipse IDE
- Create a Java class
- Implement feature renderer methods
- Implement persistence
- Implement version compatibility
- Property pages for ArcGIS Desktop
- Export as a JAR file
- Deploy the custom feature renderer
- Consume the custom feature renderer
About building a custom feature renderer
A feature renderer allows you to visualize a feature layer by drawing the features. Several feature renderers are provided in ArcGIS. However, you can build a custom feature renderer to control how features are drawn. Building a custom feature renderer includes developing the custom feature renderer and deploying it to ArcGIS. When deployed to ArcGIS, a custom feature renderer can be consumed in ArcMap, ArcGIS Engine Java applications, and ArcGIS Server applications.
You'll build the custom feature renderer in Eclipse IDE using the ESRI-provided wizard. You'll implement the custom feature renderer so that when it's applied to a layer, the state of the renderer can be preserved in a map document or a layer file using the Save command. The implementation of the custom feature renderer will support version compatibility since a custom feature renderer developed in Java is not supported by ArcGIS prior to version 9.3.1. An alternative ArcGIS renderer is provided for this scenario. To access the renderer in ArcGIS Desktop, you'll also need to create an accompanying property page.
Point dispersal renderer
Suppose you have a point feature class where many points lie close to or on top of each other. You want to visualize the layer where the points are not cluttered and overlapping, even if that means drawing away from the original location as shown in the following illustration:

None of the renderers provided in ArcGIS can disperse points, so you'll need to build a custom feature renderer that disperses point features in a feature layer so all points are visible. That is a point dispersal renderer.
The complete code for this custom feature renderer is available as a sample Simple_Dispersal_Renderer. Code for a more advanced dispersal renderer that implements custom TOC legends and additional functionality is available as a sample PointDispersalRenderer.
Develop the custom feature renderer
This section explains the necessary tasks to develop the custom feature renderer.
Create a Java project in Eclipse IDE
To create a Java project in Eclipse IDE, perform the following steps:
- Start Eclipse IDE.
- Click File, click New, and click Java Project as shown in the following screen shot:

The New Java Project, Create a Java project dialog box opens. - Type carto.customrenderer.simple_dispersal_renderer as the project name as shown in the following screen shot:

- Click Next.
The Java Settings dialog box opens. - Click the Libraries tab and click Add Library as shown in the following screen shot:

The Add Library dialog box opens. - Select ArcGIS Engine Library and click Next.
- In the subsequent Add Library dialog box, click Finish.
The Java Settings dialog box opens and the ArcGIS Engine Library is added to the build path of the project as shown in the following screen shot:
- Click Finish
You created the carto.customrenderer.simple_dispersal_renderer Java project. It is listed in the Package Explorer window as shown in the following screen shot:
Create a Java class
To create a Java class to implement the custom feature renderer using the custom renderer wizard, perform the following steps:
- Click File, click New, and click Other as shown in the following screen shot:

The Select a wizard dialog box opens. - Expand the ESRI Templates, ArcGIS Extension, and Visualization nodes.
- Select Custom Renderer and click Next as shown in the following screen shot:

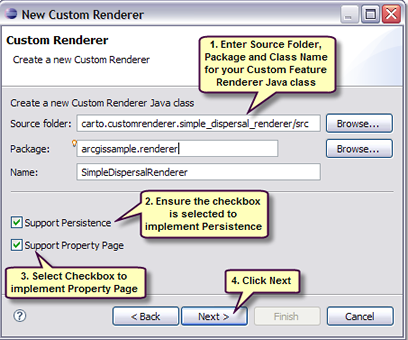
The New Custom Renderer Extension, Custom Renderer dialog box opens. - Type in or browse to the source folder, package, and class name information for the custom renderer Java class.
- Confirm that the Support Persistence check box is selected. This provides template code for persisting the state of your custom feature renderer in a .mxd document or .lyr file. For more information about persistence, see Implementing persistence for a custom feature renderer.
- Check the Support Property Page check box to create an associated property page template class for the custom feature renderer. A property page is required for a custom feature renderer to access the renderer in ArcGIS Desktop. For more information about property pages, see How to implement property pages for custom feature renderers.
- Click Next.See the following screen shot:
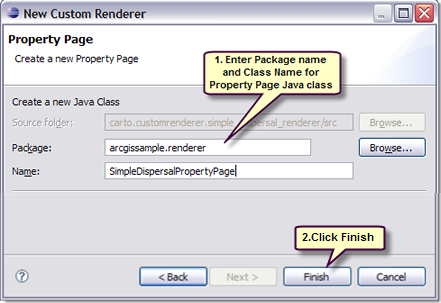
A property page implementation is required to access a custom feature renderer in ArcGIS Desktop. However, you can create and deploy a property page independently from a custom feature renderer.
- In the Property Page dialog box, type in or browse to the package and class name for the property page Java class. By default, the custom renderer root directory is SimpleDispersalRenderer.
- Click Finish. See the following screen shot:
Now, based on the information provided in the wizard a template Java class for a custom feature render (SimpleDispersalRenderer.java) and its property page (SimpleDispersalPropertypage.java) are created. They are both listed in the Package Explorer window as shown in the following screen shot:
The template class for the custom feature renderer (SimpleDispersalRenderer.java) implements the IFeatureRenderer and java.io.Externalizable interfaces for persistence and the IDocumentVersionSupportGEN interface for version compatibility support. It is also annotated with @ArcGISExtension annotation. See the following screen shot:
You must annotate the custom feature renderer Java class with @ArcGISExtension annotation. When deployed to ArcGIS, the custom feature renderer is recognized by its annotation.
Implement feature renderer methods
The SimpleDispersalRenderer.java auto-generated template class has method stubs for the IFeatureRenderer implementing interface. You need to add implementation code to these method stubs so that the custom dispersal renderer can disperse and draw the points (features) on the display.
-
CanRender method
The IFeatureRenderer.canRender() method allows you to determine whether your custom feature renderer can render the given features of the feature layer based on feature class and display properties. For example, your custom renderer might be applicable only to line features, or your custom renderer might have been designed for networks and may be applicable solely to feature classes that contain a particular type of network feature. In such cases, implementation of the IFeatureRenderer.canRender() method tests the properties of the feature class and returns true if your renderer implementation can render it and false if it cannot. The ArcGIS framework renders the features of the feature layer only if the canRender() method returns true.
You can apply the simple dispersal renderer solely to point feature layers. To do this, you need to add implementation code to the canRender() method so that it does not render to any other feature layer with line features or polygons. The following code snippet shows the implementation of the canRender() method for the simple dispersal renderer:
public boolean canRender(IFeatureClass fc, IDisplay display)throws IOException,
    AutomationException{

    if (fc.getShapeType() == esriGeometryType.esriGeometryPoint)
        return true;
    else
        return false;

}
-
Determine the layer draw phases
A layer can be rendered in the following draw phases: - Geography
- Annotation
- Selection
If there are selected features, the layer is rendered by default in the selection phase. You can render your custom renderer in geography, annotation, or both by implementing the IFeatureRenderer.isRenderPhase() method appropriately. The ArcGIS framework renders the layer in a particular phase only if the isRenderPhase() method returns true; otherwise it does not render for that particular phase.
Feature renderers typically draw features only during the geography phase; although in some cases, features are drawn in the annotation phase. For example, the ArcGIS renderer ProportionalSymbolRenderer draws proportional symbols for polygon features. The renderer draws the background fill symbol during the geography phase, then draws the proportionally sized marker symbol during the annotation phase.
The simple dispersal renderer draws only in the geography phase. Therefore, the isRenderPhase method returns true only if the draw phase provided by the framework is esriDrawPhase.esriDPGeography. Implementation of the isRenderPhase method is shown in the following code snippet:
[Java]
public boolean isRenderPhase(int drawPhase)throws IOException, AutomationException{
    //Renders only in the geography phase.
    if (drawPhase == esriDrawPhase.esriDPGeography)
        return true;
    else
        return false;
}
-
Drawing the feature
The ArcGIS framework invokes the IFeatureRenderer.draw() method to draw the features after invoking the canRender() and isRenderPhase() methods. The draw() method receives a feature cursor indicating the features to be drawn. Implementation of the draw() method renders the appropriate symbol for the features of the feature cursor by invoking the IFeatureDraw.draw() method on the feature. Any other relevant text symbols accompanying the feature, as in the case of a custom valence renderer, can be drawn using the IDisplay.drawText() method, which is drawn adjacent to the feature.
With the simple dispersal renderer, the draw() method creates a CharacterMarkerSymbol to represent the features. The feature's' x,y location is examined, and a new location is chosen to draw the feature representation based on the dispersal ratio. The features in the feature cursor are rendered using the IDisplay.drawPoint() method rather than IFeatureDraw.draw() in SimpleDispersalRenderer, since the feature's dispersed location can be far from its true location.
Perform the following steps to draw a feature:
- Set the display symbol that represents the features using the IDisplay.setSymbol() method.
- For each feature in the feature cursor, calculate its dispersed location by invoking the placeFeature() utility method, then invoke IDisplay.drawPoint() to draw the display symbol for the feature in its new location.
The following code describes the implementation of the draw() method for the simple dispersal renderer. The code snippet includes getter and setter methods for the dispersalRatio instance variable.
The custom renderer calls IFeatureDraw.draw() to draw the features. Calling IFeatureDraw.draw() allows custom features to use their own drawing methods.
//instance variables.
private double dispersalRatio;

//Use the draw method that draws the features on a dispersed location.
public void draw(IFeatureCursor featureCursor, int drawPhase, IDisplay display,
    ITrackCancel trackCancel)throws IOException, AutomationException{

    // Do not draw features if the display is null.
    if (display == null){
        System.exit(0);
    }

    //Step 1: Create and set the display symbol to represent the features.

    // Set the display symbol.
    CharacterMarkerSymbol markerSym = new CharacterMarkerSymbol();
    markerSym.setCharacterIndex(72);
    markerSym.setSize(12.0);
    IColor myFavColor = new RgbColor();
    myFavColor.setRGB(0xff0000);
    markerSym.setColor(myFavColor);
    display.setSymbol(markerSym);

    // Step 2: Loop through the features and draw them using the display symbol.

    //Calculate the dispersal distance from the dispersal ratio.
    //
    //The dispersal distance defines the minimum distance between two points.
    IDisplayTransformation displayTrans = display.getDisplayTransformation();
    double dispersalDist = displayTrans.fromPoints(markerSym.getSize()) *
        this.dispersalRatio;


    // Build a geometry bag to collect the drawn locations.
    IGeometryCollection geomColl = new GeometryBag();
    IFeature feature = featureCursor.nextFeature();
    boolean bContinue = false;
    if (trackCancel != null)
        bContinue = trackCancel.esri_continue();
    do{
        IPoint featureLocation = (IPoint)feature.getShape();
        IPoint disperseLocation = new Point();
        IPolygon symPoly = new Polygon();

        //Find a dispersed location that does not overlap previously drawn points.

        //The placeFeature method is a utility method.
        placeFeature(featureLocation, 0, geomColl, display, markerSym,
            disperseLocation, symPoly, dispersalDist);

        //Draw the symbol in the new dispersed location.
        display.drawPoint(disperseLocation);

        //Add the dispersed location's envelope to the geometry bag.
        geomColl.addGeometry(symPoly.getEnvelope(), null, null);

        //Move on to the next feature.
        feature = featureCursor.nextFeature();
        if (trackCancel != null)
            bContinue = trackCancel.esri_continue();

    }
    while ((feature != null) && (bContinue == true)); //End of loop.
}

//Add the getter method for instance variable dispersal ratio.
public double getDispersalRatio(){
    return dispersalRatio;
}

//Add the setter method for instance variable dispersal ratio.
public void setDispersalRatio(double dispersalRatio){
    this.dispersalRatio = dispersalRatio;
}
-
placeFeature utility method
The placeFeature() utility method calculates a new location for a feature, so the feature does not overlap previously drawn features. A geometry bag of symbol envelopes is cached in the draw() method, which records the currently drawn points on the display.
Each feature is placed at its true location. If the symbolized feature overlaps, all four points of the compass are tried, and the dispersal distance is increased until the feature is placed. The following diagram and code snippet illustrate how to calculate the dispersed location for the point features:
//Use the utility method to find the dispersed location.

public void placeFeature(IPoint point, int lTried, IGeometryCollection geomColl,
    IDisplay display, ISymbol symbol, IPoint disperseLocation, IPolygon symPoly,
    double dDispersalDist){
    try{
        // Calculate the place to try the feature.
        if (lTried == 0){
            disperseLocation.putCoords(point.getX(), point.getY());
        }
        else{
            double dDist = ((lTried - 1) / 4) * dDispersalDist;
            switch (lTried % 4){
                case 0:
                    disperseLocation.putCoords(point.getX() - dDist, point.getY());
                case 1:
                    disperseLocation.putCoords(point.getX(), point.getY() + dDist);
                    break;
                case 2:
                    disperseLocation.putCoords(point.getX() + dDist, point.getY());
                    break;
                case 3:
                    disperseLocation.putCoords(point.getX(), point.getY() - dDist);
                    break;
            }
        }
        // If it intersects previously drawn features,
        IRelationalOperator relOp = (IRelationalOperator)geomColl;
        symbol.queryBoundary(display.getHDC(), display.getDisplayTransformation(),
            disperseLocation, symPoly);
        if (!relOp.disjoint(symPoly.getEnvelope()))

        // try a new dispersed location.
            placeFeature(point, lTried + 1, geomColl, display, symbol,
                disperseLocation, symPoly, dDispersalDist);
        else
            return ;
    }
    catch (AutomationException e){
        e.printStackTrace();
    }
    catch (IOException e){
        e.printStackTrace();
    }
}
Implementation of other methods of a custom feature renderer are not essential to the SimpleFeatureRenderer, so they are not covered here. For more information about implementation of other methods of IFeatureRenderer—such as prepareFilter(), setExclusionSetByRef(), and getSymbolByFeature()—see How to implement custom feature renderers.
Implement persistence
A custom feature renderer can be persistable, which means that the state of the renderer is preserved when saving a map document or a layer file. You can persist a custom feature renderer by implementing the java.io.Externalizable interface. The variables required for rendering (in the case of the simple dispersal renderer, the dispersal ratio) are persisted to a storage medium by the Externalizable.writeExternal() method and retrieved from storage by the Externalizable.readExternal() method. Fore more information about implementing persistence, see Implementing persistence for a custom feature renderer.
The wizard has method stubs for the readExternal() and writeExternal() methods. The following code snippet shows how to implement persistence in the SimpleDispersalRenderer. In this case, dispersal ratio is the only persisted value.
[Java]
//Write the variables.
public void writeExternal(ObjectOutput out)throws IOException{
    out.writeDouble(this.dispersalRatio);
}

//Read the variables.
public void readExternal(ObjectInput in)throws IOException, ClassNotFoundException{
    this.dispersalRatio = in.readDouble();
}
Implement version compatibility
At ArcGIS 9.1, you can to persist a map document to earlier ArcGIS versions using the Save A Copy command. The saved document can be opened on any version of ArcGIS to which the document was persisted. However, persisting a custom feature renderer prior to ArcGIS 9.3.1 is not supported. You can implement IDocumentVersionSupportGEN as an alternative ArcGIS feature renderer to persist in versions prior to 9.3.1.
For the SimpleDispersalRenderer, a simple renderer is provided as an alternative renderer to be persisted in documents saved prior to ArcGIS 9.3.1. The IDocumentVersionSupportGEN interface method stubs are auto-generated by the wizard. The isSupportedAtVersion() method returns false for versions that are not supported. If the isSupportedAtVersion() method returns false, the convertToSupportedObject() method provides the renderer object to be persisted. The following code shows how to implement IDocumentVersionSupportGEN:
[Java]
//This method returns the alternative renderer.
public Object convertToSupportedObject(int docVersion)throws IOException,
    AutomationException{
    SimpleRenderer simpleRend = new SimpleRenderer();
    SimpleMarkerSymbol simpleMarkerSymbol = new SimpleMarkerSymbol();
    simpleMarkerSymbol.setSize(8);
    simpleMarkerSymbol.setStyle(esriSimpleMarkerStyle.esriSMSDiamond);
    simpleRend.setSymbolByRef(simpleMarkerSymbol);
    return simpleRend;
}

//This method verifies the existing version.
public boolean isSupportedAtVersion(int docVersion)throws IOException,
    AutomationException{
    //Support all versions above or equal to 9.3.
    if (arg0 >= esriArcGISVersion.esriArcGISVersion93)
        return true;
    else
    //The convertToSupportedObject() method is invoked if the isSupportedAtVersion() method returns false.
        return false;
}
Property pages for ArcGIS Desktop
To access custom feature renderers in ArcGIS Desktop, you need to create an accompanying custom renderer property page. The property page provides the user interface (UI) that allows desktop users to interactively set the properties of the custom renderer and apply the custom renderer to a feature layer in ArcGIS Desktop. The property page UI is located on the Symbology tab of the Layer Properties dialog box in ArcGIS Desktop along with other ArcGIS standard symbology options.
You do not need to implement a property page if you're consuming your custom feature renderer solely through ArcGIS Engine or ArcGIS Server Java applications.
You used the custom renderer wizard to automatically created the SimpleDispersalPropertyPage.java Java class property page for the SimpleDispersalRenderer. The Java class is annotated with @ArcGISExtension annotation, the category attribute is set to ArcGISCategories.ESRIRendererPropertyPages, and the Java class extends BaseCustomRendererPropertyPage as shown in the following screen shot:

To implement a property page, perform the following tasks:
-
Create a Java class that extends javax.swing.JFrame
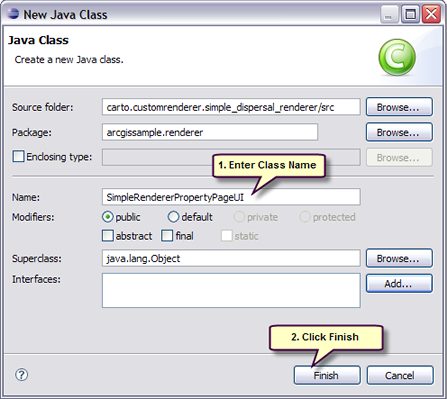
This class provides a simple graphical user interface (GUI) that accepts the properties of the renderer. This GUI is embedded on the Symbology tab of the Layer Properties dialog box. To create the Java class, perform the following steps: - Select and right-click the arcgissample.renderer package.
- In the context menu, click New and click Class. The New Java Class dialog box opens.
- Type in the Java class name and click Finish as shown in the following screen shot:
The class you created is added to the project in the Package Explorer as shown in the following screen shot: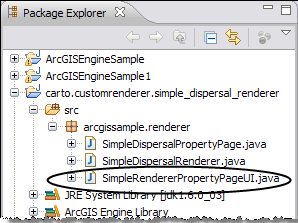
- Copy the following code snippet to the Java class to create the GUI:
package arcgissample.renderer;

import java.awt.Rectangle;
import javax.swing.JFrame;
import javax.swing.JLabel;
import javax.swing.JPanel;
import javax.swing.JTextField;
import javax.swing.UIManager;
import javax.swing.border.TitledBorder;

public class SimpleRendererPropertyPageUI extends JFrame{
    private JPanel jContentPane = null;
    private JLabel jLabel = null;
    private JTextField jTextField = null;
    private JPanel jPanel = null;
    private JLabel jLabel1 = null;
    /**
     * This is the default constructor.
     */

    public SimpleRendererPropertyPageUI()throws Exception{
        initialize();
    }
    /**
     * This method initializes the frame.
     * @return void
     */
    private void initialize()throws Exception{
        this.setSize(424, 254);
        this.setResizable(false);
        this.setContentPane(getJContentPane());
        this.setTitle("Dispersal Property Page");

    }
    /**
     * This method creates a content pane for the panel.
     * @return javax.swing.JPanel
     */
    private JPanel getJContentPane()throws Exception{
        if (jContentPane == null){
            jContentPane = new JPanel();
            jContentPane.setLayout(null);
            jContentPane.add(getJPanel(), null);
        }
        return jContentPane;
    }
    /**
     * This method creates a panel.
     *
     * @return javax.swing.JPanel
     */
    private JPanel getJPanel(){
        if (jPanel == null){
            jPanel = new JPanel();
            jPanel.setLayout(null);
            jPanel.setBounds(new Rectangle(8, 14, 405, 206));
            TitledBorder titled = new TitledBorder("Change Dispersal Ratio");
            jPanel.setBorder(titled);

            //Create a label that reads Dispersal Ratio.
            jLabel = new JLabel();
            jLabel.setText("Dispersal Ratio");
            jLabel.setBounds(new Rectangle(14, 97, 83, 27));
            //Add the label to the panel.
            jPanel.add(jLabel, null);
            //Create and add a text field that accepts the dispersal ratio value to the panel.
            jPanel.add(getJTextField(), null);

            //Create an information label.
            jLabel1 = new JLabel();
            jLabel1.setBounds(new Rectangle(12, 35, 385, 40));
            jLabel1.setText(
                "This ratio affects how far the marker symbol is moved from its original location.");
            //Add the label to the panel.
            jPanel.add(jLabel1, null);
        }
        return jPanel;
    }
    /**
     * This method creates a text field that accepts a dispersal ratio for the DispersalRenderer.
     * @return javax.swing.JTextField
     */
    public JTextField getJTextField(){
        if (jTextField == null){
            jTextField = new JTextField();
            jTextField.setBounds(new Rectangle(107, 98, 100, 27));
        }
        return jTextField;
    }
    static{
        try{
            UIManager.setLookAndFeel(UIManager.getSystemLookAndFeelClassName());
        }
        catch (Exception e){
            e.printStackTrace();
        }
    }
}
-
Override the BaseCustomRendererPropertyPage methods
To override the BaseCustomRendererPropertyPage methods, following these instructions: Select the SimpleDispersalPropertyPage.java class that was auto-generated by the wizard. The wizard also auto-generated implementation for the getCustomRendererDef(), getDescription(), getName(), getPreviewImage(), getType() and getPriority() methods. However, implementation for the initGUI() and apply() methods must be added. The purpose and implementation of these methods are described here: - initGUI—The initGUI() method creates an instance of the GUI form previously created in this topic. This GUI form is embedded on the Symbology tab of the Layer Properties dialog box in ArcMap and allows custom feature renderer properties to be set as shown in the following code:
//instance variable: The GUI form created using the previous code snippet.
SimpleRendererPropertyPageUI simplePropertyPageUI;


//This method returns the GUI form instance to the framework.
public JFrame initGUI(IFeatureRenderer arg0){

    try{
        this.simplePropertyPageUI = new SimpleRendererPropertyPageUI();
    }
    catch (Exception e){
        e.printStackTrace();
    }
    return simplePropertyPageUI;
}
- apply—Implementation of the apply() method allows you to apply the property values entered in the GUI form to the renderer. In the case of SimpleDispersalRenderer, the dispersal ratio from the text field of the GUI form is applied as the property of the SimpleDispersalRenderer as shown in the following code snippet:
//instance variable: The GUI form.
SimpleRendererPropertyPageUI simplePropertyPageUI;

//This method applies the properties retrieved from the GUI dialog.
public void apply(IFeatureRenderer arg0){

    SimpleDispersalRenderer simpleRenderer = (SimpleDispersalRenderer)arg0;

    //Retrieve the value from the text field of the form.
    String dispersalRatio = this.simplePropertyPageUI.getJTextField().getText();

    //Set the property of the custom renderer.
    simpleRenderer.setDispersalRatio(Double.parseDouble(dispersalRatio));
}
For more information about property pages, see How to implement property pages for custom feature renderers.
Export as a JAR file
The custom feature renderer you created can be deployed to ArcGIS and consumed in ArcGIS Desktop, ArcGIS Engine, or ArcGIS Server applications. Deploy the custom renderer and its property page by exporting the Java classes as a Java Archive (JAR) file called custom_simple_dispersal_renderer.jar.
For more information about creating a JAR file, see How to export extension classes as a JAR file.
Deploy the custom feature renderer
The custom feature renderer is deployed to ArcGIS by placing the JAR file in the <ArcGIS Install Dir>/java/lib/ext folder. ArcGIS applications (ArcGIS Engine, ArcMap, ArcCatalog, and ArcGIS Server) recognize the custom feature renderer by its extension annotation when the application is started. If the ArcGIS application is already running, you'll need to restart it after the custom feature renderer is deployed. If you modify the code in the custom feature renderer Java classes that are bundled in the JAR file, the JAR file must be recreated and redeployed. You'll also need to restart the ArcGIS application after the JAR file is redeployed.
Consume the custom feature renderer
To consume the custom feature renderer in ArcMap, perform the following steps:
-
Start ArcMap using the Empty Map option.
-
Click Add Data and add the %AGSDEVKITJAVA%/java/samples/data/AirportsAndGolf/GOLF.shp shape file. Some of the rendered point features are cluttered as shown in the following screen shot:

-
Right-click the Golf layer and click Properties as shown in the following screen shot:
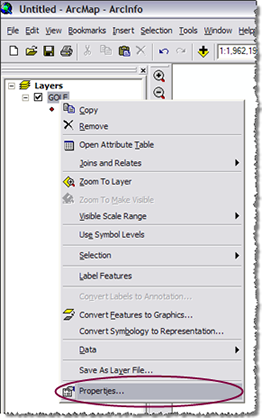
The Layer Properties dialog box opens. -
Click the Symbology tab. SimpleDispersalRenderer is listed under Custom Renderer in the left pane of the dialog box along with other feature renderers.
-
Select SimpleDispersalRenderer. The GUI form that you created is embedded in the Symbology tab.
-
Type in the dispersal ratio and click Apply as shown in the following screen shot:

-
Click OK.
The renderer is applied to the Golf layer and the points are dispersed as shown in the following screen shot:
For more information on consuming custom feature renderers in Java applications, see Consuming custom feature renderers.
You can create custom TOC legends to show a list of the symbols, labels, and headings that correspond to your custom feature renderer.
For more information about implementing custom legends, see How to implement TOC legends for custom feature renderers.
See Also:
How to implement custom feature renderersImplementing persistence for a custom feature renderer
How to implement custom property pages for custom feature renderers
How to implement TOC legends for custom feature renderers
| Development licensing | Deployment licensing |
|---|---|
| Engine Developer Kit | Engine |
| Server | Server |
| ArcGIS for Desktop Basic | ArcGIS for Desktop Basic |
| ArcGIS for Desktop Standard | ArcGIS for Desktop Standard |
| ArcGIS for Desktop Advanced | ArcGIS for Desktop Advanced |