In this topic
- About implementing custom property pages for custom feature renderers
- Assigning priorities to a custom renderer category
- Implementing property pages
About implementing custom property pages for custom feature renderers
A feature renderer enables you to visualize feature layers in a map, and symbolizes and draws features in a feature layer. ArcGIS 9.3.1 lets you create custom feature renderers to control the way features are symbolized and drawn. Annotate custom feature renderers with @ArcGISExtension and deploy to ArcGIS. For more information, see Building custom feature renderers in Eclipse IDE.
From ArcGIS 9.3.1 onwards, custom feature renderers can also be accessed in ArcGIS Desktop, ArcGIS Engine, and ArcGIS Server applications. However, to access custom feature renderers in ArcGIS Desktop, create an accompanying custom renderer property page. The property page provides the user interface (UI) that allows ArcGIS Desktop users to set the custom renderer properties and apply the custom renderer to a feature layer in ArcGIS Desktop.
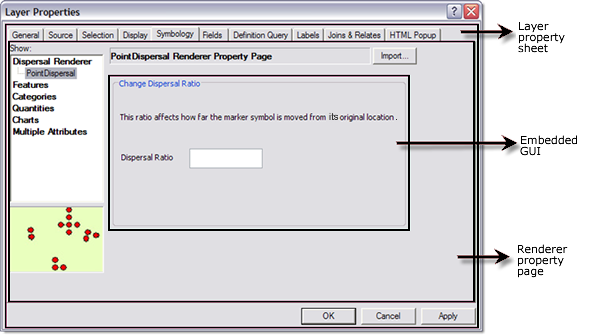
The UI provided by the property page appears under the Symbology tab on the Layer Properties dialog box in ArcGIS Desktop with ArcGIS standard symbology options.
The following screen shot shows the PointDispersal custom feature renderer on the left pane:

Assigning priorities to a custom renderer category
Use the BaseCustomRendererPropertyPage.getType() method to define a category for custom feature renderers when shown on the Layer Properties dialog box with the category of other standard ArcGIS renderers. The position of the custom renderer category is defined by the BaseCustomRendererPropertyPage.getPriority() method.
The getPriority() method returns a lower number making the renderer and category appear toward the top of the list (the priority of the first page in a category controls where the category shows in the list). Use a high number for custom renderers to ensure they show after the standard renderers.
The following table shows standard renderer property pages and priorities:
|
Type
|
Name
|
Priority
|
| Features | Single symbol | 100 |
| Categories | Unique values | 200 |
| Unique values, many fields | 210 | |
| Match to symbols in a style | 300 | |
| Graduated symbols | 310 | |
| Proportional symbols | 320 | |
| Dot density | 330 | |
| Charts | Pies | 400 |
| Bars | 410 | |
| Stacked | 420 | |
| Attributes | Quantity by category | 500 |
Implementing property pages
This section discusses how to implement a custom property page for a custom renderer by creating a Java class for a GUI form, creating a Java class for a property page, and deploying a property page.
Creating a Java class for a GUI form
The reason for creating a graphical user interface (GUI) form is to create interactive form elements that accept the properties of the custom feature renderer from ArcGIS Desktop users.
To create a GUI form, create a Java class that extends javax.swing.JFrame. The GUI form can include Java GUI components and ArcGIS controls, such as the SymbologyControl, depending on the properties of its associated custom renderer. For more information, see Sample: PointDispersalRenderer.
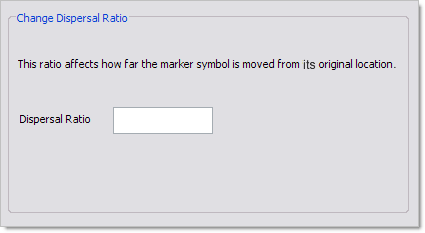
In the PointDispersalRenderer example, the dispersal ratio is the only required property of the PointDispersalRenderer. Therefore, the corresponding GUI form that accepts the value for the dispersal ratio shows as in the following screen shot:

The following shows the corresponding code example to create the GUI form:
[Java]
package arcgis.sample;
import java.awt.Rectangle;
import javax.swing.JFrame;
import javax.swing.JLabel;
import javax.swing.JPanel;
import javax.swing.JTextField;
import javax.swing.UIManager;
import javax.swing.border.TitledBorder;

public class PointDispersalRendererUI extends JFrame{
    private JPanel jContentPane = null;
    private JLabel jLabel = null;
    private JTextField jTextField = null;
    private JPanel jPanel = null;
    private JLabel jLabel1 = null;
    /**
     * This is the default constructor.
     */
    public PointDispersalRendererUI()throws Exception{
        initialize();
    }
    /**
     * This method initializes the frame
     * @return void.
     */
    private void initialize()throws Exception{
        this.setSize(424, 254);
        this.setResizable(false);
        this.setContentPane(getJContentPane());
        this.setTitle("Dispersal Property Page");

    }
    /**
     * This method creates a ContentPane for the panel
     * @return javax.swing.JPanel.
     */
    private JPanel getJContentPane()throws Exception{
        if (jContentPane == null){
            jContentPane = new JPanel();
            jContentPane.setLayout(null);
            jContentPane.add(getJPanel(), null);
        }
        return jContentPane;
    }
    /**
     * This method creates a panel
     *
     * @return javax.swing.JPanel.
     */
    private JPanel getJPanel(){
        if (jPanel == null){
            jPanel = new JPanel();
            jPanel.setLayout(null);
            jPanel.setBounds(new Rectangle(8, 14, 405, 206));
            TitledBorder titled = new TitledBorder("Change Dispersal Ratio");
            jPanel.setBorder(titled);

            //Create a label that displays Dispersal Ratio.
            jLabel = new JLabel();
            jLabel.setText("Dispersal Ratio");
            jLabel.setBounds(new Rectangle(14, 97, 83, 27));
            //Add label to the panel.
            jPanel.add(jLabel, null);
            //Create and add a text field to accept dispersal ratio value to the panel.
            jPanel.add(getJTextField(), null);

            //Create an information label.
            jLabel1 = new JLabel();
            jLabel1.setBounds(new Rectangle(12, 35, 385, 40));
            jLabel1.setText(
                "This ratio affects how far the marker symbol is moved from its original location.");
            //Add label to the panel.
            jPanel.add(jLabel1, null);
        }
        return jPanel;
    }
    /**
     * This method creates a text field to accept the dispersal ratio for pointDispersalRenderer
     * @return javax.swing.JTextField.
     */
    public JTextField getJTextField(){
        if (jTextField == null){
            jTextField = new JTextField();
            jTextField.setBounds(new Rectangle(107, 98, 100, 27));
        }
        return jTextField;
    }
    static{
        try{
            UIManager.setLookAndFeel(UIManager.getSystemLookAndFeelClassName());
        }
        catch (Exception e){
            e.printStackTrace();
        }
    }
}
Creating a Java class for a property page
The property page creates an instance of the GUI form and includes necessary information required to create a property page (for example, name, description, preview image, and so on) and provides it to the ArcGIS framework. The ArcGIS framework builds the property page based on the information provided by the property page implementation.
To implement a property page, create a Java class that extends the BaseCustomRendererPropertyPage class. Annotate the Java class with @ArcGISExtension and specify the category attribute of the annotation as ArcGISCategories.ESRIRendererPropertyPages. See the following code example:
[Java]
//The annotation for the custom renderer property page.
@ArcGISExtension(categories = {
    ArcGISCategories.ESRIRendererPropertyPages
}

)
//The Java class extends BaseCustomRendererPropertyPage.
public class PointDispersalPropertyPage extends BaseCustomRendererPropertyPage{

}
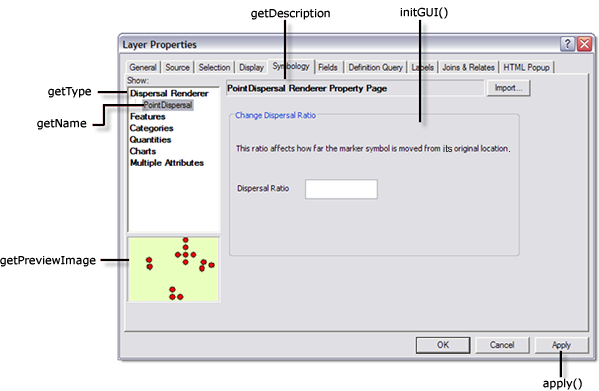
Override the methods of BaseCustomRendererPropertyPage. The following screen shot shows the implementation of the methods on the property page:

The following table shows the return value and description for each method of the BaseCustomRendererPropertyPage class:
|
Method Name
|
Return Value
|
Description
|
|
String
|
Provides a name for the custom feature renderer on the left pane on the dialog box.
|
|
|
String
|
Provides a category for the custom feature renderer on the left pane on the dialog box.
|
|
|
int
|
Determines the position of the category of the custom renderer on the left pane on the dialog box. The dispersal renderer is assigned a priority value of 0 in the preceding screen shot. For more information on assigning priorities, see Assigning priorities to a custom renderer category in this topic.
|
|
|
int
|
Provides a preview image of the custom renderer on the left pane on the dialog box. A preview image size of 116 by 88 pixels shows with a ratio of 1:1. If the image is larger or smaller, it is scaled to fit the preview area.
|
|
|
String
|
Provides the description of the renderer on top of the property page.
|
|
|
JFrame
|
Provides the GUI that is embedded on the property page. The GUI provides UI controls to set the properties of the custom renderer.
|
|
|
void
|
The apply method is triggered when Apply or OK is clicked on the Layer Properties dialog box. This method implementation includes setting the properties of the renderer based on the values provided by the user on the GUI form (see the following code example). After calling the apply() method, the framework adds the renderer to the specified layer.
|
|
|
IFeatureRenderer
|
Provides the associated feature renderer of the property page.
|
The following code example shows the implementation of the methods for the PointDispersalRenderer property page:
[Java]
//Property page Java class for the PointDispersalRenderer.

//The annotation and the assigned category attribute ESRIRendererPropertyPage.
//The Java class extends BaseCustomRendererPropertyPage.
@ArcGISExtension(categories = {
    ArcGISCategories.ESRIRendererPropertyPages
}

)public class PointDispersalPropertyPage extends BaseCustomRendererPropertyPage{
    PointDispersalPropertyPageUI pointPropertyPageUI;

    //Provides a name on the left pane of the dialog box.
    @Override public String getName()throws IOException, AutomationException{
        return "PointDispersal";
    }

    //Provides a category to show the custom renderer on the left pane.
    @Override public String getType()throws IOException, AutomationException{
        return "Dispersal Renderer";
    }


    //Specifies the position of the category defined by getType() method on the left pane.
    @Override public int getPriority()throws IOException, AutomationException{
        return 0;
    }

    //Provides a description of the custom renderer on top of the property page.
    @Override public String getDescription()throws IOException, AutomationException{
        return "PointDispersal Renderer Property Page";
    }

    //Provides a preview image of the renderer.
    @Override public int getPreviewImage()throws IOException, AutomationException{
        PictureMarkerSymbol picMarker = new PictureMarkerSymbol();
        picMarker.createMarkerSymbolFromFile(esriIPictureType.esriIPictureBitmap,
            "C:\\temp\\DispersedPoints.bmp");
        int handel = picMarker.getPicture().getHandle();
        return handel;
    }

    //Initializes the GUI form that provides UI controls for renderer properties.
    public JFrame initGUI(IFeatureRenderer arg0){

        try{
            pointPropertyPageUI = new PointDispersalPropertyPageUI();
        }
        catch (Exception e){
            e.printStackTrace();
        }
        return pointPropertyPageUI;
    }


    //The renderer properties are defined based on the values
    //added by the user on the GUI form.
    @Override public void apply(IFeatureRenderer featRenderer){
        PointDispersalRenderer pointRenderer = (PointDispersalRenderer)featRenderer;
        String dispersalRatio = pointPropertyPageUI.getJTextField().getText();
        pointRenderer.setDispersalRatio(Double.parseDouble(dispersalRatio));
    }

    //Specifies the associated custom renderer of the property page.

    @Override public Class getCustomRendererDef(){
        return customrenderer.pointdispersal.PointDispersalRenderer.class;
    }
} //End of class.
Deploying a property page
The custom feature renderer property page Java class files are exported as Java Archive (JARs) files with its associated custom feature renderer class files. The property page is deployed to ArcGIS by placing the JAR file in <ArcGIS Install Dir>/java/lib/ext.
ArcMap recognizes the property page when it is started by its ArcGIS Extension annotation. If ArcMap is running, restart it after the JAR file is deployed. When deployed, the property page will be accessible in ArcGIS Desktop under the Symbology tab on the Layer Properties dialog box with the standard ArcGIS renderers.
If there are code modifications in the Java classes on the property page or the custom feature renderer bundled in the JAR file, recreate and redeploy the JAR file, then restart your ArcGIS application.
Alternatively, the property page implementation that includes the GUI form class file and the property page class file can be bundled independently as a JAR file, and the custom feature renderer class files can be bundled independently as another JAR file and deployed independently.
If the property page classes are bundled independently as JAR files, the JAR file manifest indicates the class path of its corresponding custom feature renderer JAR file. The following shows an example JAR manifest file:
Manifest-Version: 1.0
Class-Path: c:/ArcGIS/java/lib/ext/simple_dispersal_renderer.jar;
Class-Path: c:/ArcGIS/java/lib/ext/simple_dispersal_renderer.jar;
For more information about exporting Java classes as JAR files and about creating manifest files, see How to export a custom geoprocessing tool.
See Also:
Sample: PointDispersalRendererBuilding custom feature renderers in Eclipse IDE
Implementing custom feature renderers
How to implement persistence and version compatibility
How to implement TOC legends for custom feature renderers
| Development licensing | Deployment licensing |
|---|---|
| Engine Developer Kit | Engine |
| Server | Server |
| ArcGIS for Desktop Basic | ArcGIS for Desktop Basic |
| ArcGIS for Desktop Standard | ArcGIS for Desktop Standard |
| ArcGIS for Desktop Advanced | ArcGIS for Desktop Advanced |