
In this topic
- Using add-ins
- Implementing interfaces
- Inheriting ArcGIS base classes
- Using ArcGIS item templates
- Creating a command or tool
Using add-ins
Creating an add-in is the easiest and recommended way to create simple commands (buttons) and tools. Add-ins are fully documented in Building add-ins for ArcGIS Desktop.
Implementing interfaces
A custom command can be created by implementing ICommand. By implementing ICommand, you define a command's appearance, state, and behavior. A command is plugged into an application by registering itself in to the appropriate command component categories. When the command is used by the application framework, the OnCreate method is called to initialize and hook to the application or control.
A tool is a type of command that allows interaction with a display canvas in an ArcGIS application. To create a custom tool, implement both the ICommand and ITool interfaces. By implementing ITool, you define the cursor, mouse, or keystroke interaction performed by a tool.
You must stub out and provide implementation code for each interface member in the source code. You are also responsible for registering the class to the appropriate component category.
Using the ArcGIS Add Class Wizard to extend ArcObjects will help you accomplish these development tasks.
Inheriting ArcGIS base classes
The BaseCommand and BaseTool classes simplify the creation of custom commands and tools for ArcGIS. They provide a default implementation for each member of ICommand and ITool. Instead of stubbing out each member and providing implementation code, you have to override the members that your custom command or tool requires. The exception is ICommand.OnCreate; this member must be overridden in your derived class.
The following table shows the members that have a significant base class implementation, along with a description of that implementation. Override these members when the base class behavior is not consistent with your customization. For example, enabled is set to true by default; if you want your custom command enabled only when a specific set of criteria has been met, you must override this property in your derived class.
|
Member |
Description |
|
The bitmap is made transparent based on the pixel value at position 0,0. The bitmap is null until set by the derived class. | |
|
If null, sets the category to Misc. | |
|
Set to false. | |
|
Set to true. | |
|
Set to false. | |
|
Set to true. |
Using ArcGIS item templates
The Base Command and Base Tool item templates are available to help you create commands and tools more efficiently than directly implementing the interfaces. The advantages of using the item templates are listed as follows:
- The ArcGIS Base Command and Base Tool templates inherit from the BaseCommand and BaseTool abstract classes. Instead of implementing the Bitmap, Caption, Category, Name, Message, and ToolTip properties individually, you can set the values to be returned from these read-only properties in the class constructor and rely on the BaseCommand or BaseTool class to provide the implementation for these methods. The other members are left to return the default values.
- The templates also add the necessary resource file or files, bitmap images, and cursor files to the project.
- The templates override the OnCreate method that is passed a handle or hook to the ArcGIS Engine control or ArcGIS Desktop application that the command works with - for example, MapControl, PageLayoutControl, ToolbarControl, or ArcMap. The templates process the incoming hook object and set the initial state of the command or tool appropriately.
- The IApplication interface is used to hold on to the application object if the command only works in an ArcGIS Desktop application.
- The HookHelper object is used to hold on to the hook, and the IHookHelper interface it implements can return the ActiveView, PageLayout, and Map regardless of the type of hook that is passed.
- The GlobeHookHelper object is used to hold on to the hook, and the IGlobeHookHelper interface it implements can return the Camera, Globe, GlobeDisplay, and ActiveViewer regardless of the type of hook that is passed.
- The SceneHookHelper object is used to hold on to the hook, and the ISceneHookHelper interface it implements can return the SceneViewer, Scene, SceneGraph, and Camera regardless of the type of hook that is passed.
- All custom commands or tools must be exposed to the Component Object Model (COM). The templates insert the COM related attributes and required globally unique identifiers (GUIDs) to expose a .NET class to COM.
- Visual Studio provides the ability to specify functions that execute when an assembly exposed to COM is registered and unregistered on a system. This allows the class to be registered in the appropriate command component category. The ArcGIS Base Command and Base Tool templates provide these COM component category registration functions.
Creating a command or tool
Follow these general steps to add a command or tool implementation to an existing project:
- Select Base Command or Base Tool from the Add New Item dialog box and click Add to add the item to your Visual Studio project. For information on how to access the dialog box, see Using item templates to extend ArcObjects.
- After you click Add, the ArcGIS New Item Wizard Options dialog box appears. Select the type of command or tool you want to create and click OK. The type of command or tool you choose depends on the ArcGIS Engine control or ArcGIS Desktop application you want the command or tool to work with. See the following screen shot:
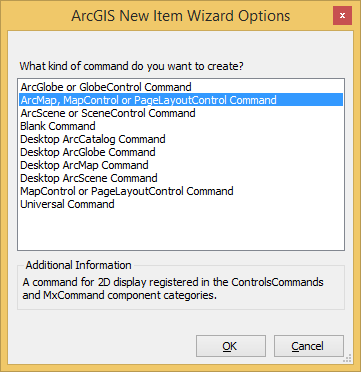
A Universal Command or Universal Tool works with the ArcGIS Engine MapControl, PageLayoutControl, GlobeControl, and SceneControl, as well as the ArcGIS Desktop ArcMap, ArcGlobe, and ArcScene applications. A Blank Command or Blank Tool does not contain any component category registration code or implementation in the OnCreate method; you need to provide this.
- Modify the code below the TODO comment lines in the constructor of the generated class. Review the code in the overridden OnCreate method, which is responsible for initializing the command or tool with the hook control or application.
- In the case of a command, provide implementation within the OnClick method. In the case of a tool, provide implementation within the OnMouseDown, OnMouseMove, or OnMouseUp methods.
- If necessary, override other methods or properties from the base class. Using the autocompletion feature in Visual Studio, type public override (C#) or Public overrides (VB.NET) and press the spacebar to get a list of the available members to override.
- If necessary, edit the command bitmap or tool cursor file. These files have the same name as the class file.
See Also:
Working with ArcGIS base classesESRI.ArcGIS.ADF.BaseClasses namespace
How to create a command or tool to work with the controls
Using item templates to extend ArcObjects
| Development licensing | Deployment licensing |
|---|---|
| ArcGIS Desktop Basic | Engine |
| ArcGIS Desktop Standard | ArcGIS Desktop Basic |
| ArcGIS Desktop Advanced | ArcGIS Desktop Standard |
| Engine Developer Kit | ArcGIS Desktop Advanced |