
For general information on creating new items for projects, see the documentation on the Microsoft Developer Network (MSDN) Web site. You can also find step-by-step information on using the different elements of the ArcGIS Visual Studio Integration Framework in the .NET development walkthroughs.
In this topic
Getting started with the item templates
Once you have installed ArcGIS Visual Studio Integration Framework, item templates for ArcGIS customizations are available in the Add New Item dialog box. To open the Add New Item dialog box, right-click a project in Solution Explorer and choose Add, then New Item. Alternatively, you can choose Add New Item from the Project menu (or press Ctrl+Shift+A).
To display the ArcGIS item templates in the Add New Item dialog box, click the ArcGIS node in the Categories pane. Depending on the installed ArcGIS products, you will see additional product-specific templates available under the ArcGIS node. See the following screen shot:
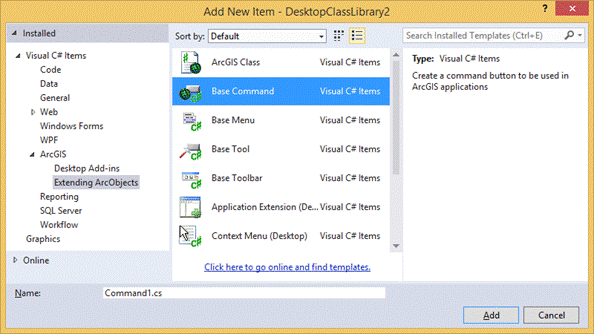
When you select an item template, a brief description of that item appears beneath the Categories pane.
Available ArcGIS item templates
The available item templates are as follows:
- ArcGIS (common)
- ArcGIS Class
- Base Command
- Base Tool
- Base Menu
- Base Toolbar
- Desktop
- Context Menu
- Dockable Window
- Application Extension
- Just-In-Time (JIT) Extension
- Property Page
- Engine
- Context Menu
Selecting an ArcGIS item template
When you have selected a template, name the new item and click the Add button to continue. See the following:
- If you select the ArcGIS Class item template, the ArcGIS Add Class Wizard opens. See Using the ArcGIS Add Class Wizard to extend ArcObjects for details on using that wizard.
-
If you select other ArcGIS item templates, new code files are added to your project with default code, such as class attributes, component category registration, implemented interface member stubs, and additionally, template code added to some members. Some of these templates also display more dialog boxes, allowing the new item to be tailored to your requirements.
For example, the Base Command and Base Tool templates display the ArcGIS New Item Wizard Options dialog box (shown as follows). This dialog box allows you to decide the application environment at which your new command or tool is aimed; if you choose Desktop ArcMap Command, the hook passed to your command item is checked against the IMxApplication interface. If you choose a MapControl or PageLayoutControl Command, the new command item uses the IHookHelper interface instead. See the following screen shot: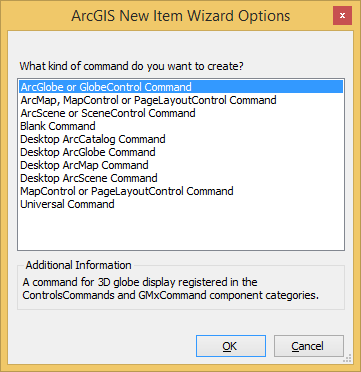
See Also:
ArcGIS Visual Studio IDE Integration Framework for extending ArcObjectsUsing the ArcGIS Add Class Wizard to extend ArcObjects
Using project templates to extend ArcObjects
How to register custom components for multiple products