
In this topic
- About creating a custom tool
- Create a class library
- Add references
- Delete the class1 file
- Create a DrawGraphicLine tool
- Understand and edit DrawGraphicLine class template
- Add ArcGIS snippets functionality to DrawGraphicLine tool template
- Code the OnMouseDown method
- Compile the project
- Use the tool in ArcMap
- Debug the tool
- Deploy the tool
About creating a custom tool
This walkthrough guides you through the steps to create a tool that allows the user to draw graphic lines in the map. This tool is written by inheriting from the Esri BaseTool class available in the ESRI.ArcGIS.ADF.Local assembly.
Create a class library
Do the following steps to create a class library:
- Start Visual Studio.
- Click File, click New, and click Project.
To complete this scenario, use C# or VB .NET. The code for both languages is shown and the full solutions for both languages are included in the associated sample. However, this topic only shows the VB .NET dialog boxes and screen shots since the dialog boxes and views you interact with in C# are very similar.
- On the New Project dialog box, select Visual C# or Visual Basic under the Project types area, click the ArcGIS node, then click Desktop.
- Click the Class Library (ArcMap) template under the Templates area.
- Name the project CustomTool and click Browse to navigate to the location where you want to save the project. See the following screen shot:
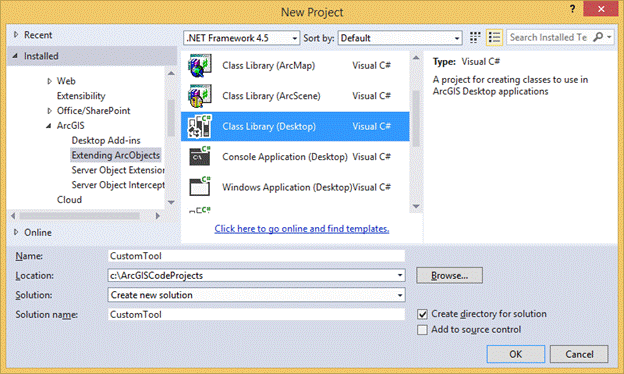
- Click OK to create the project.
If the Create directory for solution check box is selected, Visual Studio creates a subdirectory of the selected directory to store your project files. The name of the new directory will be the specified project name.
Add references
To complete this walkthrough, add the applicable references to the .NET assemblies that contain ArcObjects functionality. The first dialog box that appears after selecting the Class Library (ArcMap) template is the ArcGIS Project Wizard. Use the ArcGIS Project Wizard to add the Esri-provided .NET assemblies. At this point, Esri assemblies will not be added to allow another feature of the Visual Studio integrated development environment (IDE) - ArcGIS item templates and the ArcGIS snippet finder - to be shown. ArcGIS item templates and the ArcGIS snippet finder automatically add the necessary Esri assemblies into the Visual Studio code editor.
Click the Recent tab on the Add Reference dialog box to view recently added references.
Delete the class1 file
When your project is created, a class1 file (either .cs or .vb depending on the selected language) is added to the project by default; however, this walkthrough will not use the file. Right-click the class1 file in the Solution Explorer, click Delete, and click OK to permanently delete the file.
Create a DrawGraphicLine tool
Use one of the ArcGIS item templates to add a new class for the DrawGraphicLine tool to your project. See the following steps:
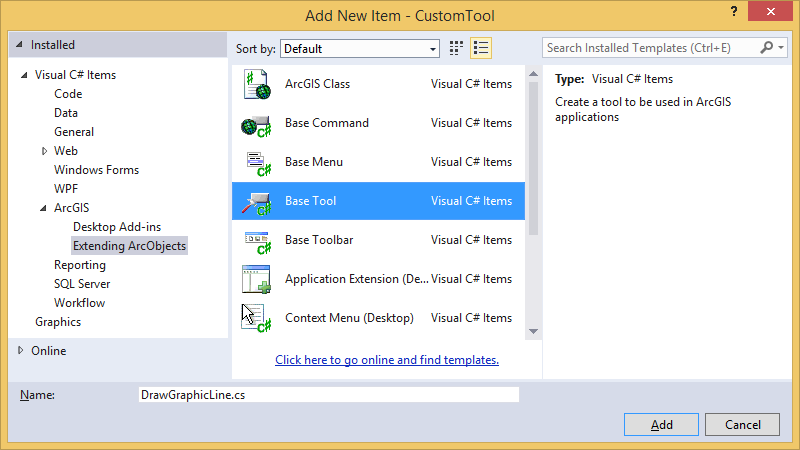
- On the Solution Explorer, right-click the project, click Add, and click Add New Item.
- On the Add New Item dialog box, under the Categories area, click the Visual Basic Items node and click ArcGIS. Click Base Tool under the Templates area. Name the class DrawGraphicLine.cs (C#) or DrawGraphicLine.vb (VB .NET), and click Add. See the following screen shot:
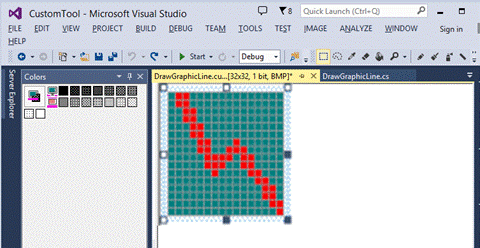
When the ArcGIS New Item Wizard Options dialog box appears, click Desktop ArcMap Tool, and click OK. - By default, a bitmap is added to the project and will be the icon you click in ArcMap to use for your custom tool. Customize the bitmap with the image editor by double-clicking DrawGraphicLine.bmp on the Solution Explorer and use the Visual Studio tools to design your .bmp file. Alternatively, you can browse for an existing image such as a .png file. See the following screen shot:
Understand and edit DrawGraphicLine class template
- Imports (VB .NET) or using (C#) statements have been added to the DrawGraphicLine class. Since these are shortcuts, you do not have to fully qualify your code in the code editor. To have the Imports or using statements, it is required that .NET assemblies be added to the project. This was done automatically as part of the ArcGIS Add Item templates for the Tool class. No modification of this code section is required for the walkthrough.
- The DrawGraphicLine class inherits from the BaseTool abstract class. The BaseTool class uses the implementation of ITool and ICommand, which makes coding easier. Abstract classes are classes that cannot be instantiated and are frequently partially implemented or not implemented. Abstract classes are closely related to interfaces; however, they differ significantly from interfaces in that a class can implement any number of interfaces, but it can inherit from only one abstract class. No modification of this code section is required for the walkthrough.
- Component Object Model (COM) registration functions and COM globally unique identifiers (GUIDs) sections are automatically added and are embedded within collapsible #Region (VB .NET) or #region (C#) statements. Since ArcObjects are a COM-based application, it is necessary to have the .NET created .dlls be supported by COM. These code sections allow ArcObjects to use .NET code. For more information, see Using ArcObjects (COM-based) in .NET and Binary compatibility. Edit these sections if you want different GUIDs or want to add the tool to additional component categories.
- A private member variable (m_application) is provided and will be set in the OnCreate event (or method) as the hook object from the calling application passed into the DrawGraphicLine class. Since ArcMap consumes the custom .dll, the hook object (ArcMap.exe) is passed into the OnCreate event of the DrawGraphicLine class. This event sets the m_application variable which is of type ESRI.ArcGIS.Framework.IApplication and begins the entry point for your tool to perform its functionality.
- Other events (or methods) are automatically stubbed out for the DrawGraphicLine tool (OnClick, OnMouseDown, OnMouseMove, and OnMouseUp). More information can be found for these methods in the ArcObjects library reference in the ESRI.ArcGIS.ADF.BaseTool class methods documentation. Of particular interest is the OnMouseDown method in which custom code will be written. For more information, see Coding the OnMouseDown method section in this walkthrough. The OnMouseDown method fires when the user previously clicked the DrawGraphicLine tool to activate it, then clicks the data view of ArcMap.
- The final piece of template code is the constructor. The constructor code is important because it notifies ArcMap about the DrawGraphicLine tool class and how it can be used on the graphical user interface (GUI). Modify the constructor to use the functionality by ArcMap. Modify the code to resemble the following code example:
public DrawGraphicLine()
{
    //
    // TODO: Define values for the public properties.
    //
    base.m_category="Walkthroughs"; //Localizable text.
    base.m_caption="Draw Graphic Line"; //Localizable text.
    base.m_message=""; //Localizable text.
    base.m_toolTip="Draws a graphic line in the map window of ArcMap.";
        //Localizable text.
    base.m_name="CustomTool_DrawGraphicLine";
        //Unique ID, nonlocalizable (for example, "MyCategory_ArcMapTool").
    try
    {
        //
        // TODO: If necessary, change the resource name.
        //
        string bitmapResourceName=GetType().Name + ".bmp";
        base.m_bitmap=new Bitmap(GetType(), bitmapResourceName);
        base.m_cursor=new System.Windows.Forms.Cursor(GetType(), GetType().Name +
            ".cur");
    }
    catch (Exception ex)
    {
        System.Diagnostics.Trace.WriteLine(ex.Message, "Invalid Bitmap");
    }
}
Public Sub New()
    MyBase.New()
    ' TODO: Define values for the public properties.
    MyBase.m_category="Walkthroughs" 'Localizable text.
    MyBase.m_caption="Draw Graphic Line" 'Localizable text.
    MyBase.m_message="" 'Localizable text.
    MyBase.m_toolTip="Draws a graphic line in the map window of ArcMap." 'Localizable text.
    MyBase.m_name="CustomTool_DrawGraphicLine" 'Unique ID, nonlocalizable (for example, "MyCategory_ArcMapTool").

    Try
    'TODO: If necessary, change the resource name.
    Dim bitmapResourceName As String=Me.GetType().Name + ".bmp"
    MyBase.m_bitmap=New Bitmap(Me.GetType(), bitmapResourceName)
    MyBase.m_cursor=New System.Windows.Forms.Cursor(Me.GetType(), Me.GetType().Name + ".cur")
    Catch ex As Exception
    System.Diagnostics.Trace.WriteLine(ex.Message, "Invalid Bitmap")
    End Try

End Sub
Add ArcGIS snippets functionality to DrawGraphicLine tool template
ArcGIS snippets are chunks of ArcObjects reusable code that can be inserted into your project. Do the following steps to access ArcGIS snippets:
- To access ArcGIS snippets, right-click the Visual Studio code editor window at the necessary insertion point (before the end of the class file), and Insert Snippet: Double-click `ArcObjects` from the popup window. Double-click 'Mapping'. Double click 'Map Documents' and Double-click 'Get ActiveView from ArcMap', the code snippet gets added.
You will add three ArcGIS snippets to the DrawGraphicLine class (add these snippets to the DrawGraphicLine.vb [VB .NET] or DrawGraphicLine.cs [C#] file at the bottom of the class file).
#region "Get ActiveView from ArcMap"
///<summary>Get ActiveView from ArcMap.</summary>
///<param name="application">An IApplication interface that is the ArcMap application.</param>
///<returns>An IActiveView interface.</returns>
///<remarks></remarks>
public IActiveView GetActiveViewFromArcMap(IApplication application)
{
    if (application == null)
    {
        return null;
    }
    IMxDocument mxDocument=application.Document as IMxDocument; // Dynamic cast.
    IActiveView activeView=mxDocument.ActiveView;
    return activeView;
}

#endregion
#Region "Get ActiveView from ArcMap"
'''<summary>Get ActiveView from ArcMap</summary>
'''<param name="application">An IApplication interface that is the ArcMap application.</param>
'''<returns>An IActiveView interface.</returns>
'''<remarks></remarks>

Public Function GetActiveViewFromArcMap(ByVal application As IApplication) As IActiveView

    If application Is Nothing Then
        Return Nothing
    End If

    Dim mxDocument As IMxDocument=TryCast(application.Document, IMxDocument) ' Dynamic cast.
    Dim activeView As IActiveView=mxDocument.ActiveView

    Return activeView

End Function

#End Region
Add the ArcGIS snippets by right-click the Visual Studio code editor window at the necessary insertion point (before the end of the class file), and Insert Snippet: Double-click `ArcObjects` from the popup window. Double-click 'Geometry'. Double click 'Get Polyline From Mouse Clicks' , code snippet gets added.
[C#] #region "Get Polyline From Mouse Clicks"
///<summary>
///Create a polyline geometry object using the RubberBand.TrackNew method when a user clicks on the map control.
///</summary>
///<param name="activeView">
An ESRI.ArcGIS.Carto.IActiveView interface that users interact with to draw a
polyline. < / param >
///<returns>An ESRI.ArcGIS.Geometry.IPolyline interface that is the polyline the user draws.</returns>
///<remarks>Double-click to end tracking the polyline.</remarks>
public IPolyline GetPolylineFromMouseClicks(IActiveView activeView)
{
IScreenDisplay screenDisplay=activeView.ScreenDisplay;
IRubberBand rubberBand=new RubberLineClass();
IGeometry geometry=rubberBand.TrackNew(screenDisplay, null);
IPolyline polyline=(IPolyline)geometry;
return polyline;
}
#endregion
#Region "Get Polyline From Mouse Clicks"
'''<summary>
'''Create a polyline geometry object using the RubberBand.TrackNew method when a user clicks on the map control.
'''</summary>
'''<param name="activeView">An ESRI.ArcGIS.Carto.IActiveView interface that users interacts with to draw a polyline.</param>
'''<returns>An ESRI.ArcGIS.Geometry.IPolyline interface that is the polyline the user draws.</returns>
'''<remarks>Double-click to end tracking the polyline.</remarks>

Public Function GetPolylineFromMouseClicks(ByVal activeView As IActiveView) As IPolyline

    Dim screenDisplay As IScreenDisplay=activeView.ScreenDisplay

    Dim rubberBand As IRubberBand=New RubberLineClass
    Dim geometry As IGeometry=rubberBand.TrackNew(screenDisplay, Nothing)

    Dim polyline As IPolyline=CType(geometry, IPolyline)

    Return polyline

End Function

#End Region
Add the ArcGIS snippets by right-click the Visual Studio code editor window at the necessary insertion point (before the end of the class file), and Insert Snippet: Double-click `ArcObjects` from the popup window. Double-click 'Mapping'. Double click 'Add Graphic to Map', code snippet gets added.
[C#] #region "Add Graphic to Map"
///<summary>Draw a specified graphic on the map using the supplied colors.</summary>
///<param name="map">An IMap interface.</param>
///<param name="geometry">An IGeometry interface. It can be of the geometry type: esriGeometryPoint, esriGeometryPolyline, or esriGeometryPolygon.</param>
///<param name="rgbColor">An IRgbColor interface. The color to draw the geometry.</param>
///<param name="outlineRgbColor">An IRgbColor interface. Geometries with an outline will be this color.</param>
///<remarks>Calling this function will not automatically make the graphics appear in the map area. Refresh the map area after calling this function with methods, such as, IActiveView.Refresh or IActiveView.PartialRefresh.</remarks>
public void AddGraphicToMap(IMap map, IGeometry geometry, IRgbColor rgbColor,
IRgbColor outlineRgbColor)
{
IGraphicsContainer graphicsContainer=(IGraphicsContainer)map; // Explicit cast.
IElement element=null;
if ((geometry.GeometryType) == esriGeometryType.esriGeometryPoint)
{
// Marker symbols.
ISimpleMarkerSymbol simpleMarkerSymbol=new SimpleMarkerSymbolClass();
simpleMarkerSymbol.Color=rgbColor;
simpleMarkerSymbol.Outline=true;
simpleMarkerSymbol.OutlineColor=outlineRgbColor;
simpleMarkerSymbol.Size=15;
simpleMarkerSymbol.Style=esriSimpleMarkerStyle.esriSMSCircle;
IMarkerElement markerElement=new MarkerElementClass();
markerElement.Symbol=simpleMarkerSymbol;
element=(IElement)markerElement; // Explicit cast.
}
else if ((geometry.GeometryType) == esriGeometryType.esriGeometryPolyline)
{
// Line elements.
ISimpleLineSymbol simpleLineSymbol=new SimpleLineSymbolClass();
simpleLineSymbol.Color=rgbColor;
simpleLineSymbol.Style=esriSimpleLineStyle.esriSLSSolid;
simpleLineSymbol.Width=5;
ILineElement lineElement=new LineElementClass();
lineElement.Symbol=simpleLineSymbol;
element=(IElement)lineElement; // Explicit cast.
}
else if ((geometry.GeometryType) == esriGeometryType.esriGeometryPolygon)
{
// Polygon elements.
ISimpleFillSymbol simpleFillSymbol=new SimpleFillSymbolClass();
simpleFillSymbol.Color=rgbColor;
simpleFillSymbol.Style=esriSimpleFillStyle.esriSFSForwardDiagonal;
IFillShapeElement fillShapeElement=new PolygonElementClass();
fillShapeElement.Symbol=simpleFillSymbol;
element=(IElement)fillShapeElement; // Explicit cast.
}
if (!(element == null))
{
element.Geometry=geometry;
graphicsContainer.AddElement(element, 0);
}
}
#endregion
#Region "Add Graphic to Map"
'''<summary>Draw a specified graphic on the map using the supplied colors.</summary>
'''<param name="map">An IMap interface.</param>
'''<param name="geometry">An IGeometry interface. It can be of the geometry type: esriGeometryPoint, esriGeometryPolyline, or esriGeometryPolygon.</param>
'''<param name="rgbColor">An IRgbColor interface. The color to draw the geometry.</param>
'''<param name="outlineRgbColor">An IRgbColor interface. Geometries with an outline will be this color.</param>
'''<remarks></remarks>

Public Sub AddGraphicToMap(ByVal map As IMap, ByVal geometry As IGeometry, ByVal rgbColor As IRgbColor, ByVal outlineRgbColor As IRgbColor)

    Dim graphicsContainer As IGraphicsContainer=CType(map, IGraphicsContainer) ' Explicit cast.
    Dim element As IElement=Nothing

    If (geometry.GeometryType)=esriGeometryType.esriGeometryPoint Then

        ' Marker symbols.
        Dim simpleMarkerSymbol As ISimpleMarkerSymbol=New SimpleMarkerSymbolClass()
        simpleMarkerSymbol.Color=rgbColor
        simpleMarkerSymbol.Outline=True
        simpleMarkerSymbol.OutlineColor=outlineRgbColor
        simpleMarkerSymbol.Size=15
        simpleMarkerSymbol.Style=esriSimpleMarkerStyle.esriSMSCircle
        Dim markerElement As IMarkerElement=New MarkerElementClass()
        markerElement.Symbol=simpleMarkerSymbol
        element=CType(markerElement, IElement) ' Explicit cast.

    ElseIf (geometry.GeometryType)=esriGeometryType.esriGeometryPolyline Then

        '  Line elements.
        Dim simpleLineSymbol As ISimpleLineSymbol=New SimpleLineSymbolClass()
        simpleLineSymbol.Color=rgbColor
        simpleLineSymbol.Style=esriSimpleLineStyle.esriSLSSolid
        simpleLineSymbol.Width=5
        Dim lineElement As ILineElement=New LineElementClass()
        lineElement.Symbol=simpleLineSymbol
        element=CType(lineElement, IElement) ' Explicit cast.

    ElseIf (geometry.GeometryType)=esriGeometryType.esriGeometryPolygon Then

        ' Polygon elements.
        Dim simpleFillSymbol As ISimpleFillSymbol=New SimpleFillSymbolClass()
        simpleFillSymbol.Color=rgbColor
        simpleFillSymbol.Style=esriSimpleFillStyle.esriSFSForwardDiagonal
        Dim fillShapeElement As IFillShapeElement=New PolygonElementClass()
        fillShapeElement.Symbol=simpleFillSymbol
        element=CType(fillShapeElement, IElement) ' Explicit cast.

    End If

    If Not (element Is Nothing) Then

        element.Geometry=geometry
        graphicsContainer.AddElement(element, 0)

    End If

End Sub

#End Region
- To collapse the ArcGIS snippet, click the plus (+) sign next to the snippet's #Region (VB .NET) or #region (C#) directive. The code's functionality is still available; however, the code in that region is hidden making the file easier to read when there is a lot of code.
- If you use the snippet finder's default options at the top of the class file, additional Imports (VB .NET) or using (C#) statements are added to the project. Each ArcGIS snippet contains information about the necessary Esri assemblies embedded in its Extensible Markup Language (XML) structure on disk. Information is accessed by the ArcGIS Snippet Finder and allows for this automated behavior during the snippet insertion on the code editor.
- There are many available options for searching and inserting ArcGIS snippets with the ArcGIS Snippet Finder. Access these options by clicking Tools, then Options on the ArcGIS Snippet Finder window. To access the Help system, click the question mark (?) on the Preference dialog box of the ArcGIS Snippet Finder to view more information about the search and insert options.
Code the OnMouseDown method
The snippets are now in place on the code editor window of the DrawGraphicLine tool and need to be called from the OnMouseDown method. This executes the code when the custom tool is active and the user clicks the map.
Use the following code example to tie all the ArcGIS snippets together and complete the functionality of the DrawGraphicLine tool:
[C#] public override void OnMouseDown(int Button, int Shift, int X, int Y)
{
//TODO: Add DrawGraphicLine_VB.OnMouseDown implementation.
//Get the active view from the application object (that is, hook).
IActiveView activeView=GetActiveViewFromArcMap(m_application);
//Get the polyline object from the user's mouse clicks.
IPolyline polyline=GetPolylineFromMouseClicks(activeView);
//Make a color to draw the polyline.
IRgbColor rgbColor=ESRI.ArcGIS.ADF.Converter.ToRGBColor(Color.FromArgb(255, 0,
0));
//Add the user's drawn graphics as persistent on the map.
AddGraphicToMap(activeView.FocusMap, polyline, rgbColor, rgbColor);
//Only redraw the portion of the active view that contains graphics.
activeView.PartialRefresh(esriViewDrawPhase.esriViewGraphics, null, null);
}
Public Overrides Sub OnMouseDown(ByVal Button As Integer, ByVal Shift As Integer, ByVal X As Integer, ByVal Y As Integer)
'TODO: Add DrawGraphicLine.OnMouseDown implementation.

'Get the active view from the application object (that is, hook).
Dim activeView As IActiveView=GetActiveViewFromArcMap(m_application)

'Get the polyline object from the user's mouse clicks.
Dim polyline As IPolyline=GetPolylineFromMouseClicks(activeView)

'Make a color to draw the polyline.
Dim rgbColor As IRgbColor=ESRI.ArcGIS.ADF.Converter.ToRGBColor(Color.FromArgb(255, 0, 0))

'Add the user's drawn graphics as persistent on the map.
AddGraphicToMap(activeView.FocusMap, polyline, rgbColor, rgbColor)

'Only redraw the portion of the active view that contains graphics.
activeView.PartialRefresh(esriViewDrawPhase.esriViewGraphics, Nothing, Nothing)

End Sub
Compile the project
Do the following steps to build your project:
- Save the project.
- Click the Build menu and click Build Solution.
- View the Output window at the bottom of the Visual Studio .NET IDE. If the project builds correctly, a report shows that the build succeeded.
Check the results of the build operation by viewing the project's subdirectories. By default, build a debug version of the project. The .dll file that results from the build operation will be stored in the Bin\Debug subdirectory of your project. This directory also contains debug information (.pdb) and a type library (.tlb) file produced by the Assembly Registration tool.
The obj subdirectory of the project directory contains temporary files used by the compiler and by Visual Studio.
- If you successfully followed this walkthrough, the build succeeds and you can close Visual Studio since the custom tool has been created. If your build operation did not succeed, select the Error List window to view the errors, correct the errors as indicated, and close Visual Studio once you have a successful build.
If you double-click the error, the line of code causing the error is automatically selected.
Use the tool in ArcMap
Do the following steps to use the custom DrawGraphicLine tool in ArcMap:
- Start ArcMap and open a map document with data layers.
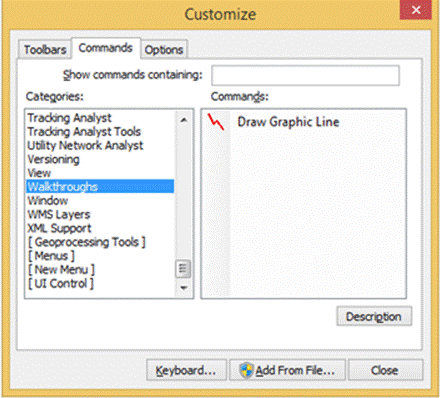
- Click the Tools menu and click Customize. The Customize dialog box appears.
- Click the Commands tab and click Walkthroughs under the Categories area. See the following screen shot:
If you do not see your category or command, verify Register for COM Interop is checked in your Visual Studio project's properties under the Build tab, then rebuild the project.
- In the Commands area under the Commands tab, click Draw Graphic Line and drag it on the ArcMap GUI in the toolbar section. Close the Customize dialog box. See the following screen shot:
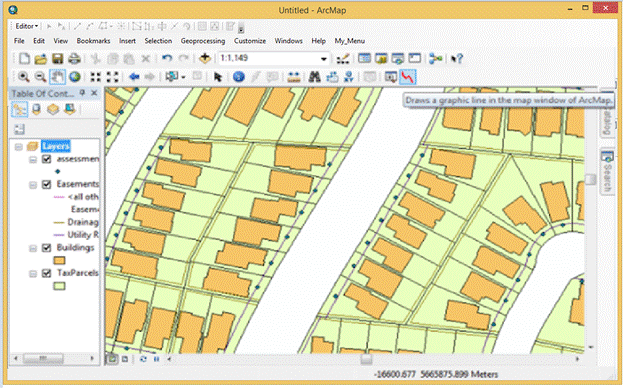 Click the added tool on the toolbar.
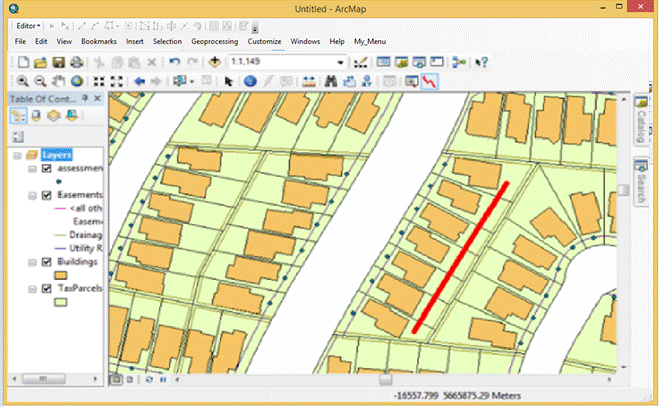
- Click the map window, move the mouse, click again several times to draw a polyline, and double-click to finish the drawing. See the following screen shot:
 When you finish drawing graphics on the map, click the Select Elements tool to select the graphic and press Delete to remove the graphic. See the following screen shot:
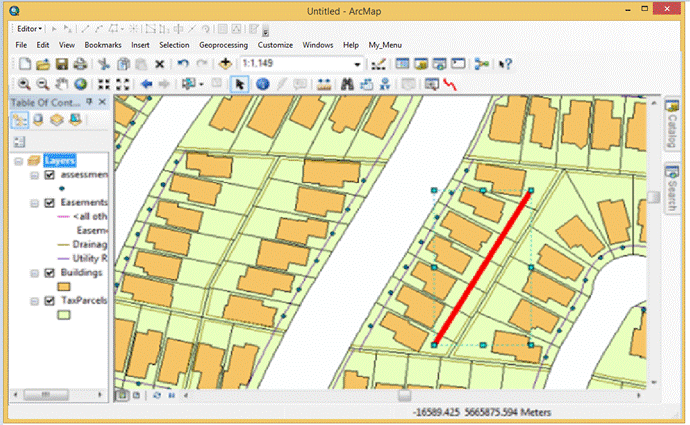
Debug the tool
- Return to the solution in the Visual Studio IDE.
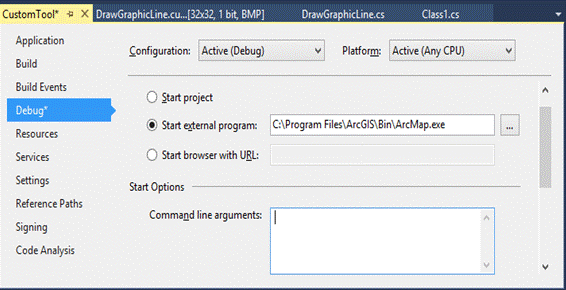
- Verify that ArcMap.exe is set as the external program to use for debugging. This is another feature set for you by the ArcGIS project template when you create your project.
- Right-click the CustomTool project in the Solution Explorer window and click Properties.
- Click the Debug tab on the property page.
- Under the Start Action area, select Start external program to use ArcMap.exe in the Bin folder of your ArcGIS install directory. See the following screen shot:
Debugging preferences are not set in the associate sample files since that information is stored in the project user file (*.csproj.user or *.vbproj.user) and these files are not included with the samples. If you are trying to debug using the provided sample, set ArcMap.exe as the debug application.
If the project user file has been removed since you created the project, Start Action will be set to Start project. To debug, select Start external application and browse to ArcMap.exe.
With the default installation settings, ArcMap.exe is installed in \Program Files\ArcGIS\Bin.
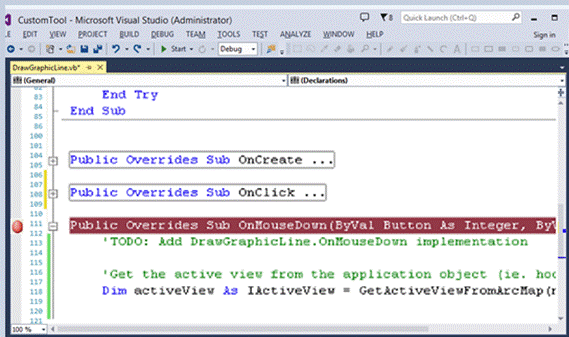
- In the code window for the DrawGraphicLine, find the OnMouseDown method and set a breakpoint. See the following screen shot:
To set a breakpoint in the Visual Studio IDE, click the margin indicator bar (the gray area on the left side of the code editor) next to the code where you want the breakpoint set.
- Click the Debug menu and click Start Debugging (or press F5). Visual Studio runs ArcMap. When the user clicks the map area in ArcMap, the debugger returns to Visual Studio and allows you to step through the code one line at a time with the buttons on the debugging toolbar.
Deploy the tool
Once you have created your tool, run it on another user's ArcGIS Desktop application. To do this, deploy your tool. For more information, see Deploying custom components.
See Also:
Creating commands and toolsSample: Create a custom tool
Deploying custom components
| Development licensing | Deployment licensing |
|---|---|
| ArcGIS Desktop Basic | ArcGIS Desktop Basic |
| ArcGIS Desktop Standard | ArcGIS Desktop Standard |
| ArcGIS Desktop Advanced | ArcGIS Desktop Advanced |