
In this topic
Debugging a function tool in background processing
When geoprocessing tools are run in ArcGIS applications, the user has the option to run them in a background process (personal server) instead of running them in ArcMap. For more information, see Foreground and background processing in the ArcGIS Desktop Help system.
When debugging a tool, attaching Visual Studio to the application (for example, ArcMap) will not trigger execution and validation break points since the code is not running in the application.
To debug tools, you can disable background processing or attach your debugger to the background process. To disable background processing, select Options under the application's Geoprocessing menu and clear the Run in background check box.
Debugging in the background
Complete the following steps to debug the tool in a background process:
- Start Visual Studio and open your tool project.
- When you run or build the .NET solution, it creates a dynamic-link library (DLL) that must be registered by the ESRIRegAsm utility. You can add a post-build command to automate the registration process. In the Project properties Build Events section, type the command on the post-build event command line. The following is one example of a post-build command to register with ArcGIS Engine:
"$(ProgramFiles)\Common Files\ArcGIS\bin\esriRegAsm.exe" $(TargetPath) /p:Engine /v:10.1 /s
If debugging on ArcGIS Desktop then set product to Desktop as /p:Desktop instead of /p:Engine
- Also, in the Project properties Debug section, set ArcMap in the Start external program option by browsing to the ArcMap.exe location. The default location is <Install Directory>\bin\ArcMap.exe.
- Set a breakpoint as necessary for debugging.
- Click Debug and click Start Debugging (or press F5) to run the project. The ArcMap application starts.
- From the ArcMap menu, click Geoprocessing > Geoprocessing Options. Confirm that Enabled is checked to ensure that background processing is enabled if you want to debug in the background, then click OK on the dialog box. This starts the background processes (if not already started).
- In Visual Studio, click Tools, then click Attach to Process. See the following screen shot:

- When you click Attach to Process, the Attach to Process dialog box appears. Under the Available Processes section, there will be two of the background processes (RuntimeLocalServer.exe). Select both of the processes and click Attach. See the following screen shot:

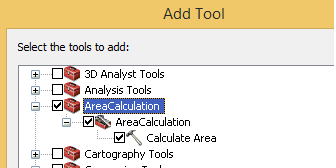
- In ArcMap, right-click the toolbox and select Add, then click Tool to add the function tool to a custom toolbox. The Add Tool dialog box appears. On the Add Tool dialog box, you can see your function tool under a toolbox named after the category you set in your code. See the following screen shot:
- Add the data to ArcMap (if not already added), and run your tool after populating the parameters.
- At the appropriate execution point, the debugging stops at the breakpoint.
See Also:
Building a custom geoprocessing function toolSample: Calculate area geoprocessing function tool
Running custom (model or script) tools in the background
ESRIRegAsm utility