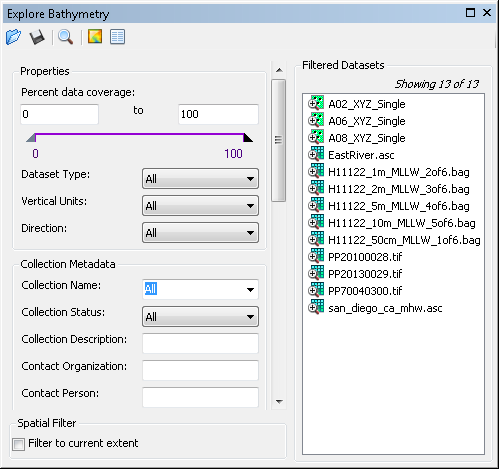
The Explore Bathymetry tool allows you to define filters for your bathymetric data. With defined metadata and properties associated to each bathymetric surface, you can filter through the available datasets to access only the necessary surfaces. The Explore Bathymetry window provides access to the properties, collection, extended, and internal metadata. Once a filter is applied, you can either save the filter with the Save Filter tool or create a surface model within the Compose Surface window.
The collection and extended metadata fields are fully configurable. You can add new fields, add new field drop-down items, or retire fields from the display. The following steps refer to the default metadata fields that come with the ArcGIS for Maritime : Bathymétrie installation. If you have made configuration changes that impact the metadata field display, these steps will differ from your experience.
Accessing the Explore Bathymetry window
You can access the Explore Bathymetry window in ArcMap through the Bathymetry toolbar.
- Start ArcMap.
- On the main menu, click Customize > Toolbars > Bathymetry.
-
Click the Explore Bathymetry button
 on the Bathymetry toolbar.
The Explore Bathymetry window appears. The right side of the window lists all bathymetry datasets from the active BIS geodatabase.

Filtering by properties
The Explore Bathymetry window not only allows you to filter by metadata but also on the properties of the datasets registered to the BIS geodatabase. Properties that you can filter by include percent data coverage, dataset type, vertical units, direction, and location. Filtering based on properties such as location will allow you to quickly eliminate unnecessary datasets that may not exist in your area of interest.
- Optionally, in the first Percent data coverage text box, type a numeric value for the lower end percent range.
- Optionally, in the second Percent data coverage text box, type a numeric value for the upper end percent range.
- Click the Dataset Type drop-down arrow and choose an option if you want to filter by dataset type.
- All—Shows datasets belonging to any dataset type
- Gridded BAG—Shows only .bag datasets
- Gridded general—Shows any non-.bag raster datasets, such as .tif or .asc
- Vector—Shows only point feature classes
- Click the Vertical Units drop-down arrow and choose an option if you want to filter by vertical unit.
- Feet
- Meters
- Click the Direction drop-down arrow and choose an option if you want to filter by direction.
- Positive Up—Datasets whose bathymetry values are stored as negative
- Positive Down—Datasets whose bathymetry values are stored as positive
- Optionally check the Filter to current extent check box in the Spatial Filter section.
This automatically filters for any datasets whose footprints intersect your current data frame extent.
Filtering by collection metadata
Collection metadata defines the necessary attributes for a collection of bathymetry data. A collection could consist of all bathymetry data holdings in a common geographic area or represent the bathymetry data acquired during a specific survey. The detailed information on the collection can be linked to raster data within the BIS geodatabase.
- In the Collection Metadata section, click the Collection Name drop-down arrow and choose a collection you defined in the Manage Collections dialog box, or choose All to filter across all collections.
- Optionally click the Collection Status drop-down arrow and choose the collection status you want to use as a filter.
- Planning
- In Progress
- Complete
Any collection status items you have added or removed in the configuration XML file will be reflected in the drop-down menu.
- Optionally type a description of the survey you want to query in the Collection Description text box.
- Type an organization name in the Contact Organization text box to filter based on a specific organization that is responsible for the bathymetry.
- Optionally type a name in the Contact Person text box to filter for a specific person responsible for the bathymetry.
- Optionally click the first Survey Date (from, to) drop-down arrow and choose a value for the start date.
These field values allow you to query for bathymetry acquired between a date range.
- Optionally click the second Survey Date (from, to) drop-down arrow and choose a value for the end date.
- Optionally click the Classification drop-down arrow and choose the appropriate classification value.
The default classification values are
- Public
- Confidential
- Secret
Any classification values you added or removed in the configuration XML will be reflected in the drop-down menu.
Filtering by extended metadata
Extended metadata allows you to customize metadata for any of your raster file formats. In particular, it extends the ONS metadata embedded in and specific to the BAG file format. This offers additional metadata for IHO Survey Order, Sensor make and model, and Vessel and Sensor type, as well as any custom metadata you define. For example, you can add fields that define which Multibeam echo sounding equipment was used on a specific vessel.
-
In the Extended Metadata section, click the IHO Survey Order drop-down arrow, and choose the IHO Survey Order you want to use to filter bathymetry.
The default orders are:
- Special Order
- Order 1a
- Order 1b
- Order 2
- Order 1 (deprecated)
- Order 3 (deprecated)
Any orders you have added or removed from the list in the configuration XML file will be reflected in the drop-down menu.
- Click the Sensor drop-down arrow and choose the appropriate sensor manufacturer you want to use to filter bathymetry.
The default sensors are
- Sensor 1
- Sensor 2
- Sensor 3
Any sensors you have added or removed from the list in the configuration XML file will be reflected in the drop-down menu.
- Click the Vessel drop-down arrow and choose the data collection vessel you want to use to filter bathymetry.
The default vessels are
- Vessel 1
- Vessel 2
- Vessel 3
Any vessels you have added or removed from the list in the configuration XML file will be reflected in the drop-down menu.
- Click the Data Type drop-down arrow and choose the appropriate data type filter.
The default data type values are
- Multibeam
- Single Beam
- Interferometry
- LiDAR
Any data types you have added or removed from the list in the configuration XML file will be reflected in the drop-down menu.
Filtering by internal metadata
Internal metadata contains the ONS metadata fields that adhere to the ISO 19115 geographic metadata standard and are stored within datasets in the BAG file format. Since the internal metadata fields are derived from the BAG dataset’s internal metadata, you don’t have the same customization options as you do with the collection and extended metadata field display. However, you can hide fields from the display.
- In the Internal Metadata section, type a value in the Title text box to filter based on a specific dataset title.
- Type a value in the Abstract text box to filter based on a specific dataset abstract.
- Click the first Date drop-down arrow and choose the beginning date value filter.
- Click the second Date drop-down arrow and choose the ending date value filter.
- Type a name in the Contact Person text box to filter based on a specific person responsible for the datasets.
- Type an organization name in the Responsible Organization text box to filter based on a specific organization responsible for the bathymetry.
- Type an X,Y value in the first Cellsize text box.
- Type an X,Y value in the second Cellsize text box.
The values in the Cellsize text boxes filter all datasets that have a cell size value between the first and second boundaries you define.
Saving the filters
You can save the filter settings to a file and later apply the filter to other bathymetry data as well as add filtered bathymetry data directly to the Compose Surface window to sort the data and apply display rules.
- Click the Save Filter button
 at the top of the Explore Bathymetry window.
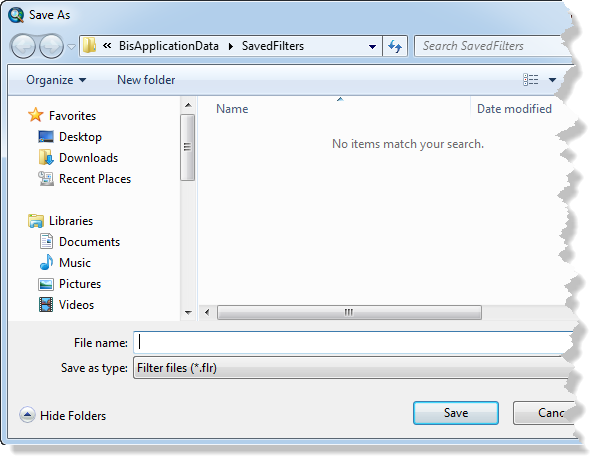
The Save As dialog box appears.

- Optionally browse to a new location where you want to save your filter.
- Type a name for the file in the File name text box.
- Click Save.
- Optionally click the Preview button
 at the top of the Explore Bathymetry window.
A mosaic dataset that references your filtered data, as well as a Bathymetry Data Index referencing all available data within your system, is added to ArcMap.