- Enabling the geodatabase for versioning
- Enabling the geodatabase for archiving
- Setting up a Reviewer workspace
- Registering elements with the element catalog
- Creating a preference to define what is analyzed by the Change Reporter tool
- Finding changes in tables and feature classes using the Change Reporter tool
- Viewing changes in the Reviewer table
Aviation data is constantly updated, and it can be challenging to determine which charts have been affected by the data changes. The Change Reporter tool allows you to view changes made to individual feature classes and tables in a geodatabase as well as the products that have been affected. The geodatabase you want to use with the Change Reporter tool must have versioning and archiving enabled, meaning the tool can only be run on an géodatabase d’entreprise. Using this tool, you can find differences between different versions of the geodatabase or the default version of the production database at different points in time.
The changes are displayed in a table once the process is complete and are reported using ArcGIS Data Reviewer for Desktop. They can be viewed in the Reviewer table.
The Change Reporter tool reports changes to the main feature classes and tables in the aviation production database. Changes to cartographic, masking, and annotation feature classes are not reported in the results.
Enabling the geodatabase for versioning
Versioning isolates your work across multiple edit sessions, allowing you to edit without locking features in the production version or immediately impacting other users. Versioning must be enabled on the geodatabase that you want to use with the Change Reporter tool.
For more information, visit An overview of traditional versioning.
- Start ArcMap.
- In the Catalog window, right-click the dataset, feature class, or table in the production database and point to Manage.
- Click Register As Versioned.
The Register As Versioned dialog box appears.
- Cliquez sur OK.
Enabling the geodatabase for archiving
Archiving in ArcGIS provides the functionality to record and report changes (additions, modifications, and deletions) made to any or all data in a geodatabase. Geodatabase archiving is the mechanism for capturing, managing, and analyzing data changes. The archiving model supports the complete geodatabase data model. Stand-alone feature classes, feature datasets, tables, relationship classes, networks, topologies, and terrains can all participate in archiving. Once archiving is enabled, all changes that are saved or posted to the default version are maintained in the corresponding archive class. The archive class is a complete copy of the archive-enabled class, plus all the edits that have been saved or posted to the default version. The Change Reporter tool allows you to query the historical archives, read changes from the geodatabase history tables, and write those changes to a Reviewer table. You can choose which feature classes or tables are to be searched and specify a date and time range. Any records in the feature classes or tables that changed within the specified date and time range are recorded in the Reviewer table.
Geodatabase archiving allows you to analyze your data as it changes over time. It helps preserve data changes and assists in identifying the type of changes made. The Change Reporter tool accesses these archiving tables and writes those changes to the Reviewer table.
- In the Catalog window, browse to the geodatabase for which you want to enable archiving.
- Select and right-click a feature dataset, feature classes, or tables, and click Archiving > Enable Archiving.
Setting up a Reviewer workspace
Data Reviewer allows you to conduct visual and automated reviews of data in support of database production. The Data Reviewer environment is made up of a series of tools that support the visual review of geodatabase and shapefile data quality. It is used to analyze data in your geodatabase and identify anomalies where corrections, additions, and deletions must be made to spatial data and its attributes. Data validation is performed during Reviewer sessions using data checks as well as the analysis tools that are part of Data Reviewer. Features are symbolized in a consistent manner to facilitate interpretation.
A Reviewer workspace needs to be created for the Change Reporter tool to write the records in the Reviewer table. In a Reviewer session, you can review your data, write records to the Reviewer table, and interact with records in the Reviewer table.
- Start ArcMap.
- Browse to the geodatabase that you want the Reviewer tables and feature datasets to be created in.
- In the Catalog window, right-click your Reviewer database and point to Import > XML > Workspace Document.
- Click the Data button in the What do you want to import section of the Import XML Workspace Document dialog box.
- Click the browse button and browse to the UpdatedReviewerSchema.xml file.
- Choose the UpdatedReviewerSchema.xml document and click Open.
- Cliquez sur Suivant.
- To change a suggested name in the Target Name column, you can overwrite the name.
- If you are importing into a file or an enterprise geodatabase and you want to use a configuration keyword, you can choose one from the Config Keyword drop-down menu.
- Click Finish to import the information from the XML document.
Registering elements with the element catalog
The element catalog is a table in the production database that stores information about each data-driven element, including the products for which they have been created and the data used to generate them. To verify that the elements are referencing the correct data sources, you can verify they are registered in the element catalog so they can be compared along with the feature classes and tables. Registering the elements ensures that any changes to the data on which they are based or their position can also be reported by the Change Reporter tool.
This process also repairs elements that have become unregistered and removes entries for elements that are no longer in the product layout.
- If necessary, on the main menu, click Customize > Production > Product Library to open the Product Library window.
- Get a local copy of each product for which data-driven elements need to be registered in the element catalog.
- If necessary, change to layout view.
- Click the Element Catalog Viewer button
 on the Aviation Layout toolbar.
The Element Catalog Viewer dialog box appears. Any elements that are in the map but do not have records in the element catalog are listed under Unregistered. Elements that have records in the element catalog but do not appear in the map appear under the Missing heading.
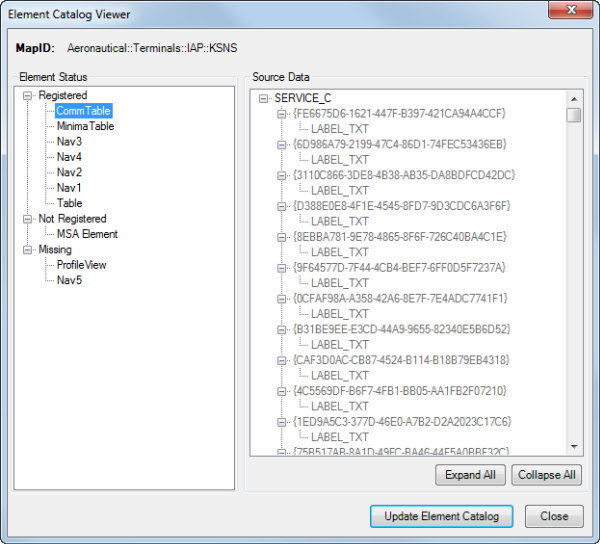
- Click Update Element Catalog.
- Cliquez sur Fermer.
Creating a preference to define what is analyzed by the Change Reporter tool
A preference is a set of saved settings that define the feature classes and tables to be evaluated by the Change Reporter tool. It also includes information such as the product instances to be analyzed and any supplementary areas of interest (AOIs) to be used in analyzing the data. Once a preference is created, it can be saved in the aviation production database and reused after more edits have been made to your data.
If a supplemental AOI feature class is used, it must be a polygon feature class that is currently in the aviation production database. A supplemental AOI is an additional region of interest that you can add to a preference and that can be used to identify features that may have changed outside of the existing product AOIs but may still be of interest to report. This means that even if not all of the instances are selected in the preference, they may still be analyzed due to the supplemental AOIs being used.
- Ensure that the correct product library and production database are set.
-
On the main menu, click
Customize > Production > Production Properties.
The Production Properties dialog box appears.
- Click Aviation Properties in the list on the left side of the Production Properties dialog box.
- Click the cell next to Change Reporter Preferences and click the ellipsis button (...) that appears.
The Change Reporter Preferences dialog box appears. The production database is analyzed to determine which feature classes and tables have versioning and archiving enabled.
- Click OK to close the message.
The Change Reporter Preferences dialog box appears.
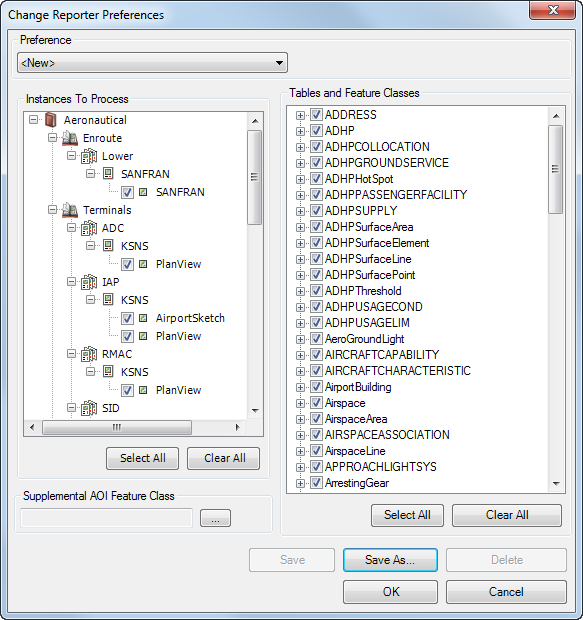
- Check the check boxes next to the instances to be analyzed using the Change Reporter tool.
Only instances that are considered maintained instances appear in the Instances To Process list. Additions, modifications, and deletions that fall within the geometry of the instance AOIs are reported.
You can click Select All or Clear All to check or uncheck all the instances at once, respectively.
- Check the check boxes next to the tables and feature classes to be analyzed by the Change Reporter tool.
Only feature classes and tables that have versioning and archiving enabled can be included in the preference. You can click Select All or Clear All to check or uncheck all the feature classes and tables at once, respectively.
- Optionally, expand a selected table or feature class and uncheck individual fields so they are not analyzed.
- To use a supplemental AOI feature class, do the following:
- Click the ellipsis button (...) next to the Supplemental AOI Feature Class field.
The Supplemental AOI Feature Class dialog box appears.
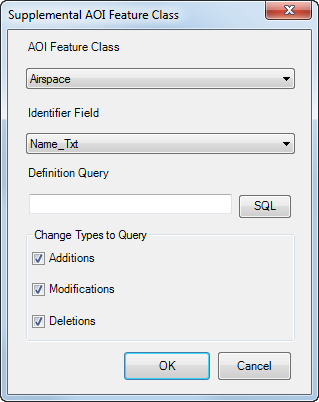
- Click the AOI Feature Class drop-down arrow and choose the feature class with the supplemental AOI features.
- Click the Identifier Field drop-down arrow and choose the field that identifies the AOI in the MAPID_TXT field on the Reviewer table and in the tree view displayed on the Change Reporter Results dialog box.
- Optionally, click SQL and define a definition query to limit the number of features used for analysis in the AOI feature class.
- Check the check boxes next to the types of changes based on the AOI feature extents.
Additions are reported when features or table rows are added. Modifications are reported when the geometry or attributes of a feature are modified. Deletions are reported when features or table rows are deleted.
- Cliquez sur OK.
The Change Reporter Preferences dialog box appears.
- Click the ellipsis button (...) next to the Supplemental AOI Feature Class field.
- Click Save As.
The Preference Name dialog box appears.
- Type a name for the preference in the Enter Name text box.
- Cliquez sur OK.
The Change Reporter Preferences dialog box appears.
- Cliquez sur OK.
The Production Properties dialog box appears.
- Cliquez sur OK.
Finding changes in tables and feature classes using the Change Reporter tool
The Change Reporter tool allows you to find changes made to individual feature classes or an entire geodatabase between specified dates and times. You can find these changes by comparing two versions of the aviation production database or by comparing the default version of the database based on a date range. The changes reported are feature additions, modifications, and deletions. Once found, these changes are automatically committed to the Reviewer table for further examination.
- On the main menu, click Customize > Toolbars > Aviation Data Management.
- Click the Change Reporter button
 on the Aviation Data Management toolbar.
The Change Reporter dialog box appears.
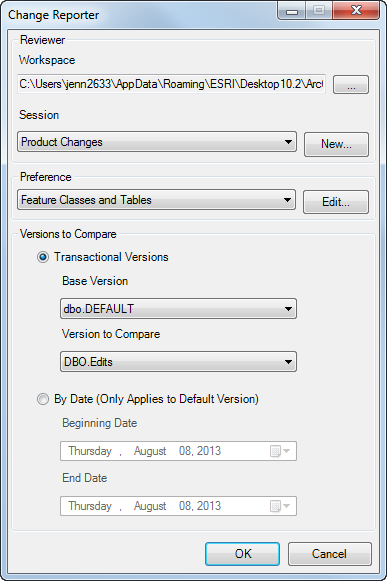
- Browse to the directory of the Workspace field you want to review to choose a Reviewer workspace.
- Choose a Reviewer session to report Change Reporter results by doing one of the following:
To use an existing Reviewer session that does not have Change Reporter records
Click the Session drop-down arrow and choose a session name.
To create a session
Click New to create a session, type a name for the session in the Enter Name text box on the New Session Name dialog box, and click OK.
- Click the Preference drop-down arrow and choose the settings to run on the production database.
- Choose one of the following options for comparing the production database at different points in time:
- Transactional Version—Compares versions of the production database to find records that have been modified. The base version is typically the primary (Default) version of the production database, and the Version to Compare is the secondary version.
- By Date (Only Applies to Default Version)—Searches the Default version of the production database for records that have been modified within the specified date range.
- Configure one of the following options to compare versions:
Compare transactional versions
Click the Base Version drop-down arrow and choose the primary version of the production database. Click the Version to Compare drop-down arrow and choose the production database secondary version to be compared to the base version.
Compare by version date
Click the drop-down arrow in the Beginning Date field and choose the start of the date range. Click the drop-down arrow in the End Date field and choose the end date for the date range.
- Click OK to start processing.
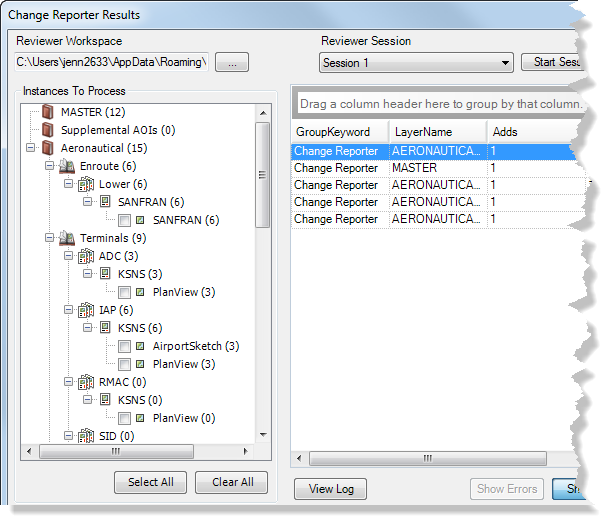
The Change Reporter Results dialog box appears when processing is complete.
Use the Instances To Process tree to review differences based on primary features, solutions, product classes, series, charts, and instances affected. The number of changes found appears in parentheses next to each node. The table illustrates the change types that have been reported and the quantity for each.
- Click Close on the Change Reporter Results dialog box.
- Cliquez sur OK.
Viewing changes in the Reviewer table
After the Change Reporter tool has been run, the Reviewer table is populated with records identifying changes to the specified feature classes and tables. Each change is categorized as an addition, modification, or deletion.
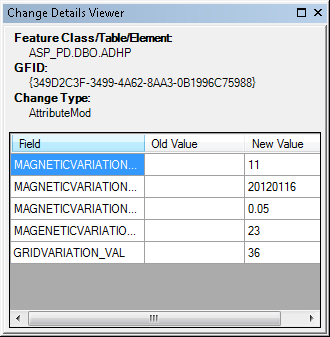
The Reviewer table displays the changes made to feature classes and tables in a specified geodatabase once the Change Reporter tool processing is complete. The Change Details window provides a simplified view of the changes that have been made to a feature or table record.
For information on navigating the Reviewer table, visit Browsing table records.
| Field | Label | Description |
|---|---|---|
LIFECYCLEPHASE | Phase | The current quality control phase for a record, indicated by an icon. |
LIFECYCLESTATUS | Status | The current status of the record, which is based on the status assigned to it on the Update Results dialog box. |
ORIGINTABLE | Source | Feature class or table from which the change was detected. |
RECORDID | ID | Sequential record number that is autopopulated by Data Reviewer. |
ORIGINCHECK | Check Type | The process that created the change records in the Reviewer table. |
PARAMETERS | Check Parameters | The names of the Base and Comparison versions or the Start and End date and time range on which the Change Reporter tool was run. The process that created the change records in the Reviewer table. |
NOTES | Check Notes | Detailed information about the change made to the feature, table row, or element, including the GFID; if an attribute modification was made, the old and new values are also included. |
SEVERITY | Severity | The default severity is 5, but can be changed. |
REVIEWSTATUS | Description | Change type: Add, Attribute Modification, Geometry Modification, or Delete. |
REVIEWTECHNICIAN | Created By | The name of the user from the Reviewer session. |
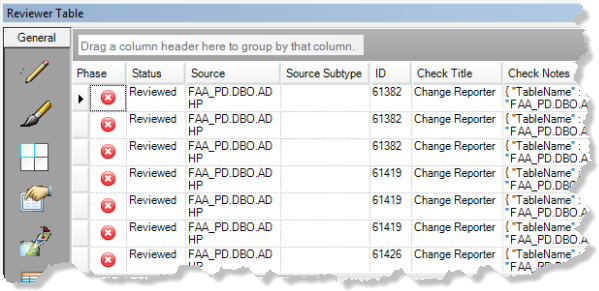
- Start the Reviewer session that contains the Change Reporter tool records.
- Click the Reviewer Table button
 to open the Reviewer table and review the records.
The records can be corrected and evaluated as needed.
- Click the Change Details button
 on the Aviation Data Management toolbar.
 The Change Details window appears.
- If necessary, dock the window in ArcMap.
- Double-click a Change Reporter tool record in the Reviewer table to view detailed information on the changes to the feature or element.
The information presented in the Change Details Viewer window is from the NOTES field in the Reviewer table.
- Repeat step 5 for each record to be reviewed.
- Stop the Reviewer session once you are finished reviewing the records.
This workflow is a step-by-step description of working with the Change Reporter tool. It describes steps that need to be completed before running the Change Reporter tool, explains the relationship between geodatabase versioning and archiving and the Change Reporter tool, and describes steps for starting a Reviewer session. Finally, the workflow guides you through running the tool and reviewing the results in the Reviewer table. The outcome of the workflow is a table that contains the records of all the changes made to feature classes and tables inside of the specified geodatabase and within the given dates and times. These records can then be corrected and evaluated as needed.