Conditions préalables :
Before executing this procedure, you must have a point tracking layer in your map document, and the tracking layer must have an appropriate track ID defined. If the tracking layer does not have an appropriate track ID defined, you will not get the expected results from following this procedure. You can set or change the track ID for a tracking layer on the Time tab of the Layer Properties dialog box.
Directional vectors can be added to events in a point tracking layer to show the direction in which a tracked object is heading and how fast it is going.
- Double-click a point tracking layer in the Contents window to open the Layer Properties dialog box. Click the Symbology tab.
- Click Advanced Event Options in the Show panel and make sure that the checkbox next to Advanced Event Options is checked. Also, make sure the Events checkbox above it is checked.
If you want to add directional vectors only for the most current events in each track, click Advanced Most Current Event Options instead of Advanced Event Options and continue following the steps below. To add directional vectors for only the most current events in each track, a track ID must be identified in your tracking layer.
- Check the Directional Vectors checkbox in the Enhanced Types panel in the middle of the Symbology tab to turn on directional vectors.
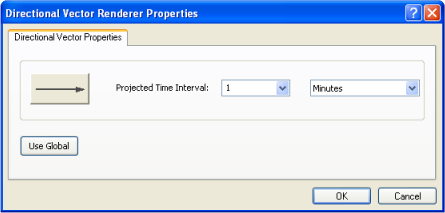
- Click the Properties... button next to the Directional Vectors checkbox in the Enhanced Types panel. This opens the Directional Vector Renderer Properties dialog box.

- By default, all directional vector properties for the tracking layer will be set to the global properties contained in your map document. As soon as you change the directional vector properties for a specific tracking layer on the Directional Vector Renderer Properties dialog box, as you will do in the following steps, the tracking layer will no longer be using the directional vector global properties. After making changes to the properties, you can return to using the global settings at any time by clicking the Use Global button.
- Click the large button with a line symbol on the Directional Vector Renderer Properties dialog box. This opens the Symbol Selector dialog box. Select a line symbol to represent directional vectors in your tracking layer.
When selecting a symbol for directional vectors, it is recommended that you select a symbol with an arrow at the end, similar to the default symbol. This will allow you to see the direction in which tracked objects are moving.
- Click the Projected Time Interval drop-down arrow and click a number from the drop-down list. You can also click inside the text box and enter a number.
- Click the following drop-down arrow and choose the units for the projected time interval.
The number and units together determine the length of the directional vectors. For example, if you enter 2 in the first text box and choose Hours for the units, then each directional vector projects where a tracked object will be two hours in the future. You must understand your data to choose an appropriate projected time interval.
- Click OK to close the Directional Vector Renderer Properties dialog box.
- Click OK to close the Layer Properties dialog box and apply all the changes.
The directional vectors now appear for events in your tracking layer. As you play back your tracking data, only directional vectors for events that are visible will be displayed.