ArcGIS Desktop

  • ArcGIS Pro
  • ArcMap

  • My Profile
  • Aide
  • Sign Out
ArcGIS Desktop

ArcGIS Online

La plateforme cartographique de votre organisation

ArcGIS Desktop

Un SIG professionnel complet

ArcGIS Enterprise

SIG dans votre entreprise

ArcGIS Developers

Outils de création d'applications de localisation

ArcGIS Solutions

Modèles d'applications et de cartes gratuits pour votre secteur d'activité

ArcGIS Marketplace

Téléchargez des applications et des données pour votre organisation.

  • Documentation
  • Support
Esri
  • Se connecter
user
  • Mon profil
  • Déconnexion

ArcMap

  • Accueil
  • Commencer
  • Carte
  • Analyser
  • Gérer les données
  • Outils
  • Extensions

Setting global directional vector properties

Global directional vector properties are saved in a map document. By default, they are used by all tracking layers in the map document, unless you set different directional vector properties for individual layers.

  1. Click Tracking Analyst on the Tracking Analyst toolbar to expand the drop-down list. Click Settings to open the Tracking Analyst Global Settings Properties dialog box.
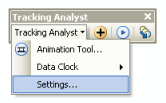
    Select Settings... from the Tracking Analyst dropdown menu
  2. Click the Directional Vector Properties tab.
  3. Click the large button with a line symbol on the Directional Vector Renderer Properties dialog box. This opens the Symbol Selector dialog box. Choose a line symbol to represent the global directional vectors to be used in your map document.

    When choosing a symbol for directional vectors, it is recommended that you choose a symbol with an arrow at the end, similar to the default symbol. This will allow you to see the direction that tracked objects are moving in.

  4. Click the Projected Time Interval drop-down arrow and click a number from the drop-down list. You can also click inside the text box and enter a number.
  5. Click the following drop-down arrow and choose the units for the projected time interval.

    The number and units together determine the length of the directional vectors. For example, if you enter 2 in the first text box and choose Hours for the units, then each directional vector projects where a tracked object will be two hours in the future. You must understand your data to choose an appropriate projected time interval.

  6. Click OK to close the Tracking Analyst Global Settings Properties dialog box and apply the changes.

The new global directional vector properties you set will be used by all point tracking layers in your map that are using global directional vectors. New tracking layers that are added to your map document will use the global directional vector settings by default.

Astuce :

If directional vectors do not appear on the map for a tracking layer, it may be because they are too small. You might need to zoom in on the map or follow the steps above to increase the projected time interval for your global directional vectors. If one set of global directional vector properties is not sufficient for all tracking layers in your map, you might need to set the directional vector properties by layer.

Learn how to set directional vector properties for a single tracking layer.

Rubriques connexes

  • Temporal data symbology
  • Symbolizing point data using directional vectors

ArcGIS Desktop

  • Accueil
  • Documentation
  • Support

ArcGIS

  • ArcGIS Online
  • ArcGIS Desktop
  • ArcGIS Enterprise
  • ArcGIS
  • ArcGIS Developer
  • ArcGIS Solutions
  • ArcGIS Marketplace

A propos d'Esri

  • A propos de la société
  • Carrières
  • Blog d’Esri
  • Conférence des utilisateurs
  • Sommet des développeurs
Esri
Donnez-nous votre avis.
Copyright © 2021 Esri. | Confidentialité | Légal