Components of the Advanced Callout Script Builder tool
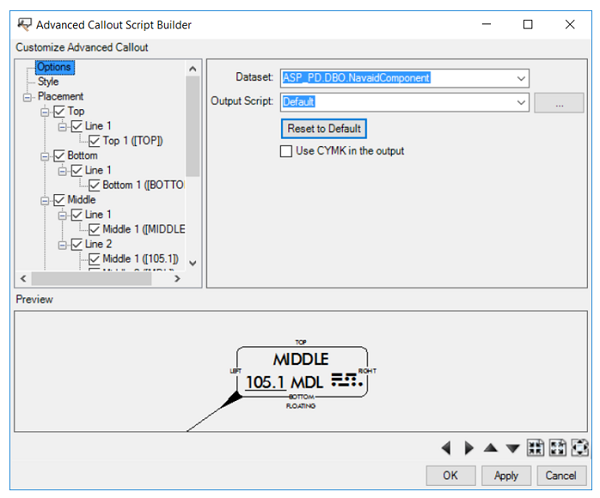
The following sections highlight the different options available on the Advanced Callout Script Builder dialog box.
Options tree
The components of this tree view allow you to choose a feature layer's dataset from the currently activated view, if one exists. You can change the location for the saved output script, opt to use CYMK instead of RGB when defining colors in the output, and reset the contents of the dialog to the available factory defaults.
If you choose one of the available datasets from the currently activated view, the Placement tree's element text combo boxes will be populated with the names of all of the fields found in that dataset, to assist you in building an optimal advanced callout script for use with that particular dataset.
Style tree
This tree has various options that allow you to build, format, and symbolize an advanced callout and customize its structure.
Placement
This manipulates the actual text in the callout. Various options are available, such as Top, Bottom, Middle, Left, Right, and Floating.
Of all the options, Top, Bottom, Left, and Right are similar in their functionality. They allow you to create a line and change symbology in the callout. Changing each of these options changes different corresponding components of the callout, which can be previewed. You can add text or remove the line by right-clicking Add Text or Remove Line, respectively. Text color and size can also be changed.
The information you insert in the elements is converted, written, and saved to the .xml file and inserted into the body of the Visual Basic code text.
Middle
The Middle element attributes, before the Advanced Callout Script Builder functionality was available, managed the placement of the middle element in the advanced callout element. With the Advanced Callout Script Builder tool, after right-clicking Middle, you can access the Add VMC (Vertical Morse Code) option. You may need to remove the Middle element before enabling it. The font is fixed and the text cannot be localized or modified. Another option, Line Leading, allows you to edit the distance between the Middle and Bottom elements.
Preview
There is a set of buttons under the preview that allow you to change the way you want to view the callout.
Creating an advanced callout with the Advanced Callout Script Builder tool
The Advanced Callout Script Builder tool allows you to create a label expression that can be used to interactively build, format, and symbolize an advanced callout and customize its structure.
The tool functionality has all the label expression information necessary to build an advanced callout. Prior to this enhancement, the process of building and creating a label was long and difficult with manual editing and testing necessary.
The Advanced Callout Script Builder tool is not dependent on any database, and it does not use any data from the .mxd file, although you can select a particular feature layer in an .mxd file to access the names of its database fields when working with the tool. To use the Advanced Callout Script Builder tool, you need a product library, an appropriate license, and an aviation production database.
The following steps allow you to create and edit an advanced callout using the Advanced Callout Script Builder tool:
- 启动 ArcMap 或 ArcCatalog。
- Add the dataset from which you want to create the label expression.
- On the main menu, click Customize > Toolbars > Aviation Data Management.
- Click the Advanced Callout Script Builder button
 on the Aviation Data Management toolbar.
The Advanced Callout Script Builder dialog box appears with the Options tree view. The fields in the dialog box are populated with default values. Factory defaults are available at <Installation location>\Program Files (x86)\ArcGIS\AviationCharting\<version>\Utilities\AdvancedCalloutScriptBuilder. You can create a sample advanced callout with this information.

- In the Style tree, you can check and uncheck various callout properties.
The options on the right side of the dialog box change according to the options you check in the Style tree. The callout preview also changes accordingly.
- In the Placement tree, right-click Line 1 in each of the options to add or remove additional text elements.
- 单击应用。
- 单击确定。
- Click Customize > Production > Production Properties.
The Production Properties dialog box appears.
- Click the Aviation Properties drop-down and scroll to Log File Location. The output files are located in the same location where you configured your log files.
An AdvancedCalloutScriptBuilder folder is created locally on your machine. This folder contains your output, which is configurable. The output consists of two .xml files and one .lxp file. The output default .xml file is an updated version of the .xml input file. The next time the Advanced Callout Script Builder dialog box opens, changes stored in the output .xml file is restored. Thus, you can continue working where you left off. The Preview.xml and Script.lxp files are your true outputs.
Preview.xml is the raw annotation .xml file that the Advanced Callout Script Builder tool uses to generate its previews.
Script.lxp is the actual label expression.
Creating a label expression using Advanced Callout Script Builder
A label expression (LXP) is used to adjust the formatting of your annotation. Both XML and VBS samples are created at the installation location. All the editing and formatting done in ArcMap is saved in VBS format. The log file location contains the .xml and .lxp files and a raw preview can be saved in XML format to the clipboard, which is editable in ArcMap.
For more information, see Creating a label expression (LXP).
Loading the Label Expression (LXP) into an annotation class
Once the LXP is created, you need to perform the following steps to load it into an annotation class:
- 启动 ArcMap 或 ArcCatalog。
- Browse to the aviation production database that you want to use.
- Choose and right-click on an annotation feature class.
The script applies to the selected annotation feature class.
- Right-click the annotation feature class and click Properties.
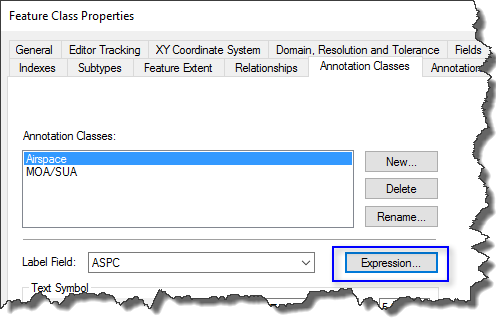
The Feature Class Properties dialog box appears.
- Click the Annotation Classes tab.

- Choose the appropriate annotation class from the Annotation Classes field.
- Click Expression.
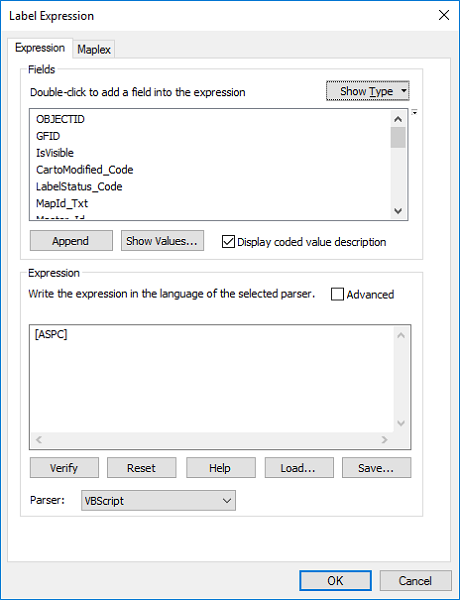
The Label Expression dialog box appears.

- Click the Expression tab.
- Click Load.
- Choose the .lxp output from the Advanced Callout Script Builder drop-down arrow and click Open.
- Click Verify.
- 单击确定。
- Click OK on the Feature Class Properties dialog box.