Mit der Data Reviewer-Lizenz verfügbar.
Before you can start digitizing points in a Positional Accuracy Assessment tool (PAAT) session, there are several parameters that must be configured. These parameters are presented to you in a wizard that allows you to choose the layers; the color and size of the grid, if applicable; the reporting units; and the field names for the evaluation methods and the evaluation values.
Choosing layers for the PAAT session
When you initially choose the layers, you are indicating what is going to be evaluated and what is going to be used as the reference. You can use feature classes or rasters for one or both of the layers. However, when the raster is a digital elevation model (DEM), the reference layer must be a z-enabled point feature class.
- Start ArcMap.
- If necessary, load data in the map.
- On the main menu, click Customize > Toolbars > Data Reviewer.
- On the Data Reviewer toolbar, click Data Reviewer > Positional Accuracy Assessment.
The Positional Accuracy Assessment toolbar appears.
- Click the Start Session button
 on the Positional Accuracy Assessment toolbar.
The Welcome to the Positional Accuracy Assessment Tool Wizard dialog box appears.
- Click Next.
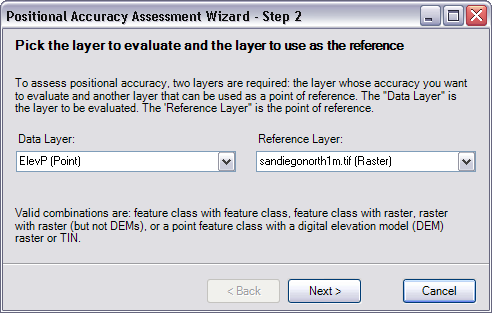
The Pick the layer to evaluate and the layer to use as the reference dialog box appears.

- Click the Data Layer drop-down arrow and choose a layer to evaluate.
- Click the Reference Layer drop-down arrow and choose a layer to use as a reference.
- Klicken Sie auf Weiter.
Setting the grid size and color for the PAAT session
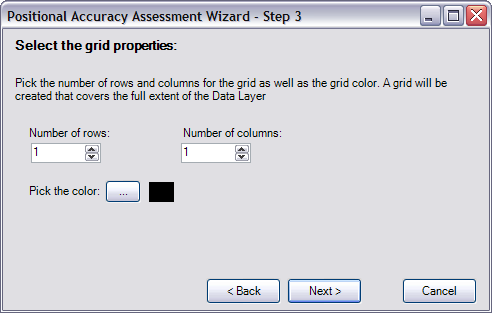
Once the layers are selected, you can choose the color of the grid that is drawn over the reference layer. The size of the grid and the number of columns and rows are automatically calculated. However, you can change the size and color of the overall grid.
- If necessary, change the numbers in the Number of rows and Number of columns text boxes to define the grid size.

- Click the ellipsis (...) next to Pick the color to choose a different color for the grid.
The grid color can be black, white, red, green, blue, or yellow.
- Klicken Sie auf Weiter.
Defining the reporting units
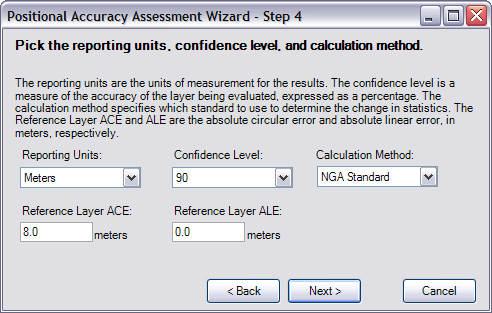
The reporting units part of the wizard allows you to define several parameters for the assessment results. These fields determine the units of measurement used to report the results and the level of confidence they should be assigned, as well as allow you to specify which standard should be used to calculate statistics and any measurement that can be used to define the uncertainty of the reference layer.
- Click the Reporting Units drop-down arrow and choose the unit of measurement you want to use for the points you create during the session.
The reporting units are the unit of measurement used with the results of the positional assessment process. You can use meters, feet, or centimeters.

- Click the Confidence Level drop-down arrow and choose the confidence level to be used with the statistics.
The confidence level is the degree of certainty of the final accuracy statistic, which is expressed as a percentage. You can choose 90, 95, or 99.
- Click the Calculation Method drop-down arrow and choose the calculation method that is going to be used to determine the statistics.
The calculation method used to determine the change in statistics. Either the National Geospatial-Intelligence Agency (NGA) Standard or United States Geological Survey (USGS) Standard can be used. Each standard is based on a specification for the NGA and USGS, respectively.
- If you know the CE accuracy value of the reference layer and want to use this value in the calculation to produce an absolute CE for the layer being evaluated, type this value in the Reference Layer ACE text box.
This is the value to be used for the uncertainty in the reference layer, if known. If this number is known, the resulting accuracy value will have absolute accuracy. If this number is unknown, the resulting accuracy value is relative to the reference layer.
- If you know the LE accuracy value of the reference layer and want to use this value in the calculation to produce an absolute LE for the layer being evaluated, type this value in the Reference Layer ALE text box.
This is the number of meters to be used for the uncertainty in the reference layer, if known. If this number is known, then the resulting accuracy value will have absolute accuracy. If this number is unknown, the resulting accuracy value is relative to the reference layer.
- Klicken Sie auf Weiter.
Defining the field names
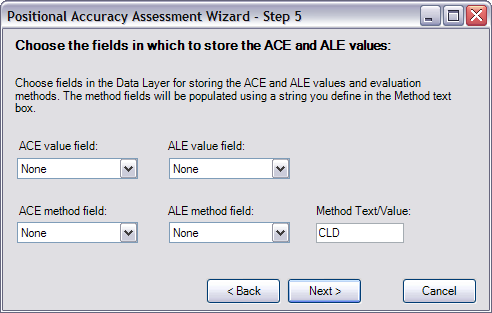
The field name definition part of the wizard allows you to choose the fields in which the ACE and ALE values are stored. You can also choose fields for storing the ACE and ALE evaluation methods. All four fields are populated using a string you define. For example, if you have fields selected for ACE value field, ACE method field, ALE value field, and ALE method field, all four would be populated using text from the Method text box.
- Click the ACE value field drop-down arrow and choose a field in which to store the evaluation layer's ACE value.

- Click the ACE method field drop-down arrow and choose a field in which to store the ACE evaluation method.
- Click the ALE value field drop-down arrow and choose a field in which to store the evaluation layer's ALE value.
- Click the ALE method field drop-down arrow and choose a field in which to store the ALE evaluation method.
- Type the text you want to use to populate the ACE value field, ACE method field, ALE value field, and ALE method field.
- Click Next.
The Your Positional Accuracy Session Parameters dialog box appears. It shows the parameters chosen for the positional accuracy session.
- Klicken Sie auf Fertig stellen.
The PAAT session is started and you can start to add points to the reference and data layer.