Available with Standard or Advanced license.
Parcels can be created using the parcel traverse or built from a network of construction lines. You would build parcels from construction lines when they are pasted from copied CAD lines or when they are added to subdivide a parcel.
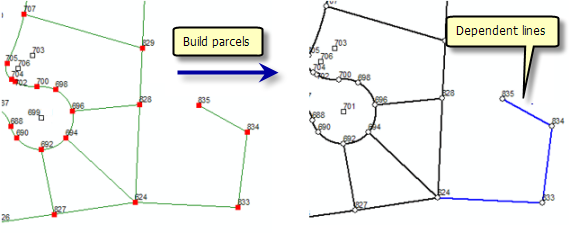
The parcel traverse works with one parcel at a time, where lines are entered separately for each individual parcel. Parcel construction works with a network of lines where many parcels can be built from closed loops. Once construction lines have been added or pasted, parcels can be built from the line work by clicking the Build Parcels tool  on the Parcel Details dialog box. Any dangling lines are automatically set to dependent lines unless another valid category has already been set for the line, for example, a connection line.
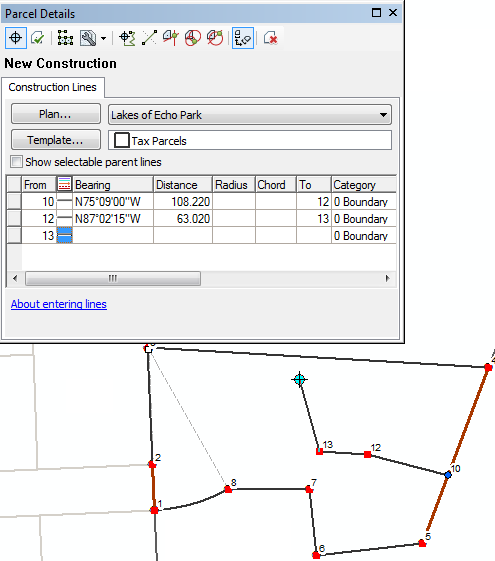
Parcel construction is useful for copying and pasting line work representing parcel boundaries such as CAD files.
Adding parcel construction lines
To start adding construction lines, open the Plan Directory dialog box, right-click the plan in which you want to construct parcels, and click Construction. To split a parcel using construction lines, right-click a selected parcel and click Construct From Parent.
You can use any of the following methods to create parcel construction lines:
Digitizing lines
You can digitize straight lines in a freehand approach in the parcel construction environment. As each line is added, the dimensions are computed from the line geometry and are populated in the Construction grid on the Parcel Details dialog box.
To begin digitizing construction lines, right-click the map using the Construction tool  , and click Digitize Mode. Click Keep Changes on the Parcel Details dialog box to save your construction lines as an unjoined construction, or click Build Parcels to build new parcels and join them to the parcel fabric.
Entering lines
You can traverse construction lines by entering a sequential set of dimensions in the Construction grid on the Parcel Details dialog box. You can traverse in any number of construction lines in the construction line grid; however, you cannot generate misclose information like you can in the parcel traverse grid, as you are not working with an individual parcel. The purpose of the construction line grid is to store a network of construction lines from which parcels can be generated.
To enter construction lines, use the Construction tool  and click anywhere in the map to place the starting point of your first construction line. Enter dimensions in the Construction grid on the Parcel Details dialog box. Click Keep Changes on the Parcel Details dialog box to save your construction lines as an unjoined construction, or click Build Parcels to build new parcels and join them to the parcel fabric.
Pasting lines from an external data source
You can copy lines from an external source, such as a feature class, and paste the lines into the parcel construction environment. This is an easy way of bringing CAD line work into the parcel construction environment. When copying lines from an external source, ensure the lines are planarized. Planarized lines are split at their points of intersection (in other words, there are always nodes at points of intersection). Lines that are pasted into the construction environment are automatically planarized for you. You can also planarize lines before copying and pasting them into the construction environment by using the Planarize tool  on the Topology toolbar.
Creating parallel offset lines
You can add new construction lines that are parallel to existing construction lines or parcel lines using the Create Parallel Offset tool. To create a parallel offset line, right-click a construction line and click Create Parallel Offset.
Creating lines using an internal angle and a distance
You can create construction lines that are deflected off an existing construction line or parcel line at a specified angle and length using Angle/Length. To create a line using a deflection angle and a length, right-click a line with an endpoint that is the same as the starting point of your construction line and click Angle/Length. This tool would typically be used when splitting parcels that are created using internal angles instead of bearings.
Adding segmented construction lines
The Segmented Line tool  located on the Parcel Details dialog box can be used to add construction lines that are already segmented or split with a specified number of segments.
To create a segmented construction line, click the Segmented Line tool  and click the starting point of the construction line. Right-click and enter the number of segments to add to the construction line on the Enter the number of segments dialog box. You can also type the number of segments with the active Segmented Line tool
  .
.
Creating construction lines using COGO tools
COGO tools are available for adding construction lines. For example, construction lines can be added using tools such as Delta X,Y and distance-distance intersection.
Preventing dangling lines and sliver parcels
When adding construction lines, construction points that lie very close to lines are detected and highlighted. You can snap these points to their nearest lines as line points by right-clicking the construction point and clicking Snap Point To Nearest Line. This prevents the creation of incorrect parcels and unwanted dangling lines.
In the construction grid, inconsistent bearing and distance dimensions are highlighted. These inconsistencies can result in large miscloses on parcels that are built from these lines. Bearing and distance dimensions on construction lines can become inconsistent when the dimensions of connected lines are edited and changed.
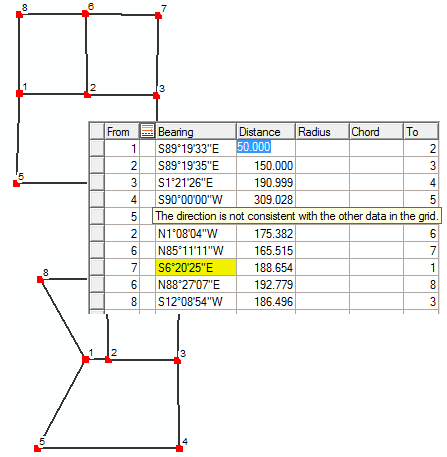
Very short lines are also highlighted in the construction grid. Short lines should be checked for connectivity and validity as they can result in the creation of unwanted parcels.
Construction points are highlighted when the construction line is not connected to any line in the network. Change the point numbers of the line in the construction grid such that it connects appropriately to the existing network.
Planarizing construction lines
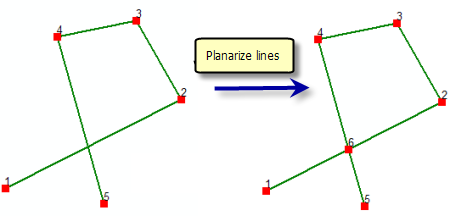
When building parcels from construction lines, the build process requires that each construction line be a single line between two construction points. Lines that intersect need to have a construction point at their point of intersection. In other words, construction lines need to be planarized. Planarized lines are split at their points of intersection.
When lines are pasted into parcel construction, they are automatically planarized during the paste process. For example, in CAD files, lines are often not planarized, and when these lines are pasted as parcel construction lines, they are automatically planarized for you.
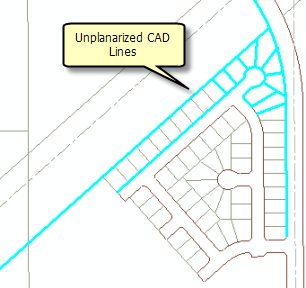
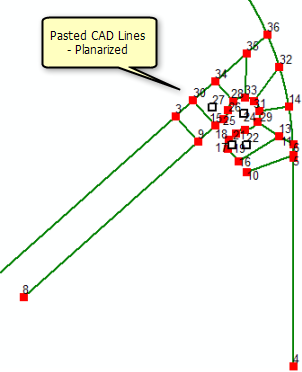
Construction lines need to be manually planarized if they intersect without a construction point. To planarize construction lines, click Planarize Lines  on the Parcel Details dialog box.
Building parcels from construction lines
Parcels can be built from construction lines by clicking the Build Parcels tool  located on the Parcel Details dialog box. The build process generates new parcels from each closed loop detected in your construction lines. You can also choose whether to flag any parent parcels as historic or to keep all parcels current by clicking the Build Parcels arrow and clicking Build and mark Historic or Build and keep all Current. For example, if you are splitting an existing parcel using construction lines, you would choose the Build and mark Historic build option.
If the build process detects construction lines that are not part of a closed loop, for example, dangling lines, the build process will keep the dangling lines as attached, dependent lines.
