In the previous step, you set up your parcel fabric data model. The next step involves setting a staging environment for data loading.
When preparing data for loading to a parcel fabric, it is recommended that data be loaded into a staging geodatabase prior to loading. In the staging geodatabase, parcel data is separated by type and topologies are created for each parcel type. Topologies are loaded into the parcel fabric from the staging geodatabase using the Load A Topology To A Parcel Fabric geoprocessing tool. The staging process should follow the recommended steps described below. Depending on your data, you might skip some steps or perform them in a different order.
Extract a sample area of parcels
Before loading your entire dataset of parcels to the parcel fabric, test the workflow with a small sample area of parcels. This will allow you to determine data requirements and identify potential problems that might hinder or obstruct the data migration process. Extract a sample area of approximately 1000 to 2000 parcels that contains the most of the parcel types you will be loading.
Take an inventory
Take an inventory of your existing parcel polygon data. Count the number of parcel polygons you are going to load. You want to ensure that the number of polygons stays the same during staging, formatting, and after loading. For example, polygons with corrupted geometry will not be loaded into the parcel fabric. If a polygon is dropped during any stage of the loading process, you can either investigate and fix it or enter the parcel in the parcel fabric.
Set up staging feature datasets
If you have data with overlapping parcel types, each parcel type should be loaded as a separate topology into the parcel fabric. The staging geodatabase should contain a feature dataset for each parcel type. Each feature dataset should contain an empty, polygon feature class.
If you are loading to a parcel fabric enabled with the Local Government Information Model (LGIM), you can download and unpack the staging layer package. In this package, the feature datasets and feature classes for each parcel type in the LGIM are already created.
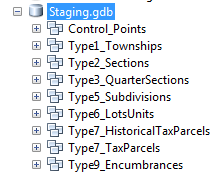
Set up a staging geodatabase using the LGIM
- Create an empty staging geodatabase.
- Download the Tax Parcel Editing Map under Maintain Tax Parcel Inventory on the Land Records center.
Download and unzip the contents.
- In the Catalog window in ArcMap, browse to the \Application\Migration Tools folder, right-click the layer package, and click Unpack.
- On the Import Schema Package dialog box, add the location of your staging geodatabase.
- Click the Show Details arrow, choose the Other option under Spatial Reference, and specify the spatial reference of your parcel data. Click OK to unpack the layer package.
Once the layer package has been unpacked, staging feature datasets for each parcel type are created in your staging geodatabase and are added to the map.
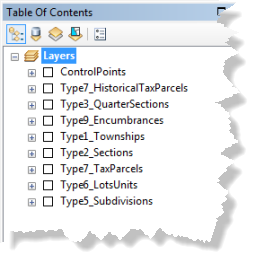
Staging feature datasets - Save the map document.
Set up a staging geodatabase without using the LGIM
- Create an empty staging geodatabase.
- Create a feature dataset for each parcel type that will be loaded.
- Create an empty polygon feature class in each feature dataset.
Add attribute fields
Add attribute fields to the new polygon feature classes for each parcel type. Attribute fields should map to attribute fields in the parcel fabric Parcels table. You may need to recalculate or re-create the attribute fields in your source data, as they will be loaded into attribute fields in the staging feature classes.
Add attribute fields to the LGIM staging feature classes
All the attribute fields used by the LGIM for each parcel type are already added to the polygon feature classes in the staging feature datasets. These attribute fields map to fields in a parcel fabric enabled with the LGIM. If you need to add any additional attribute fields to any of the polygon feature classes, make sure you add the same attribute fields to the parcel fabric Parcels table.
Add attribute fields without using the LGIM
- Add attribute fields to each of the polygon feature classes that represent your parcel types.
- Add a Name (type: String) field to represent the parcel name/PIN/APN.
- Add a Type (type: Long) field to represent the parcel type.
- Add StatedArea (type: String), Accuracy (type: Long), Historical (type: Long), LegalStartDate (type: Date), LegalEndDate (Type: Date), and PlanName (type: String) fields if you are maintaining these attributes in your source parcel data.
- Add any attribute fields that are not represented by the parcel fabric system fields, for example, parcel subtypes and ownership.
Make sure to add the same attribute fields to the parcel fabric Parcels table for these attributes to load successfully.
Calculate source attribute fields
If necessary, calculate the fields in your source polygons to match the fields in the staging polygons. You will use the simple data loader to map and load your source fields to the fields in the staging polygons. For example, the parcel name/PIN/APN field should be of type string so that it can load into the Name (type: String) field in the staging feature classes.
If you are using the LGIM staging feature classes, calculate the parcel types in your source parcel data to match the parcel types used by the LGIM (lrParcelType domain) as follows:
- Tax parcels in your source data should be calculated to type 7 (Tax).
Use the Field Calculator to calculate the Type field of your source polygons to 7.
- Lot or unit parcels in your source data should be calculated to type 6 (Conveyance Division).
Use the Field Calculator to calculate the Type field of your source polygons to 6.
- Subdivision or condo parcels in your source data should be calculated to type 5 (Simultaneous Conveyance).
Use the Field Calculator to calculate the Type field of your source polygons to 5.
- Township, section, and quarter section parcels in your source data should be calculated to type 1 (PLSS Township), 2 (PLSS Section), and 3 (PLSS Quarter Section), respectively.
Use the Field Calculator to calculate the Type field of your source polygons to 1, 2, and 3.
- Encumbrance parcels in your source data should be calculated to type 9 (Encumbrance).
Use theField Calculator to calculate the Type field of your source polygons to 9.
Calculate the parcel subtypes in your source data to match the attribute domains used for the different parcel types in the LGIM as follows:
- Lot or unit parcels use the Lot or Unit Type field for subtypes.
The Lot or Unit Type field uses the lrSimConDivType attribute domain.
- Subdivision or condo parcels use the Sub or Condo Type field for subtypes.
The Sub or Condo Type field uses the lrSimConType attribute domain.
- Encumbrance parcels use the Encumbrance Type field for subtypes.
The Encumbrance Type field uses the lrEncumbranceType attribute domain.
Load source polygons into staging
Use the Simple Data Loader wizard to load your source polygons into your staging polygons.
- In the Catalog window in ArcMap, right-click the polygon staging feature class to which you want to load data and click Load > Load Data.
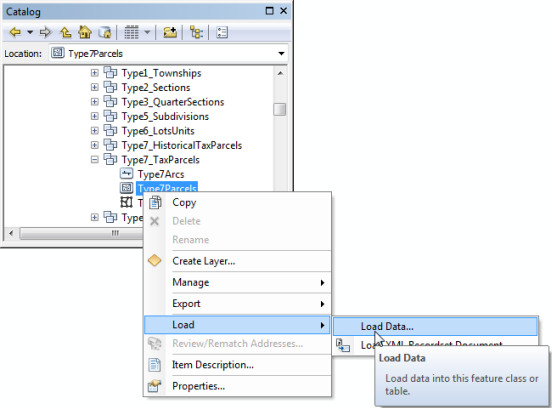
Loading data to a feature class - Click Next on the Simple Data Loader dialog box.
- Browse to your source parcel polygon feature class and add it to List of source data to load. Click Next.
- Confirm that I do not want to load all features into a subtype is chosen and click Next.
- Map the fields of your source polygon feature class to the fields in the staging polygon feature class. Click Next.
Different fields will be available depending on which parcel types you are loading. For example, if you chose to load polygons to the Type6Parcels feature class (lots or units), the SimConDivType field (alias of Lot or Unit Type) field is available. This is the parcel subtype field for lot or unit parcels.
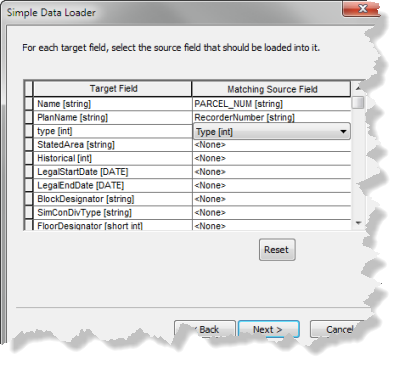
Field mapping - If necessary, choose Load only the features that satisfy a query and click Query Builder to build a query that loads parcels of a specified type.
For example, if you are loading parcels into the Type7Parcels feature class, you will build a query to select parcels of type 7.
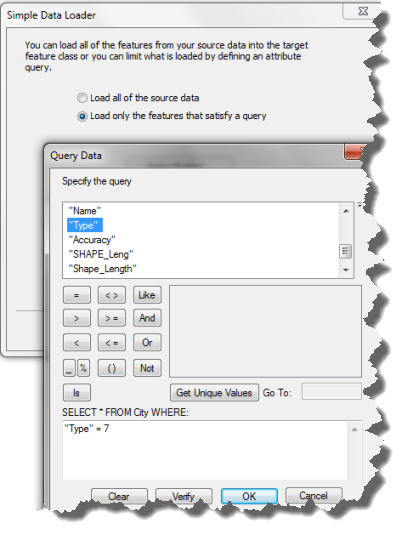
Query for parcels of type 7 - Click Next once you have added your query.
- Click Finish on the summary page of the wizard to begin loading parcels.
When loading data into the LGIM staging feature classes, you can refer to the Local Government Information Model data dictionary for more information on the fields available in the staging feature classes.
In the next step you will prepare and format your parcel geometries.